複合的なコンポーネントを組み立てる
前の章では、最初のコンポーネントを作成しました。この章では、学習した内容をさらに発展させて、タスクの一覧である TaskList を作成します。それではコンポーネントを組み合わせて、複雑になった場合にどうすればよいか見てみましょう。
TaskList (タスクリスト)
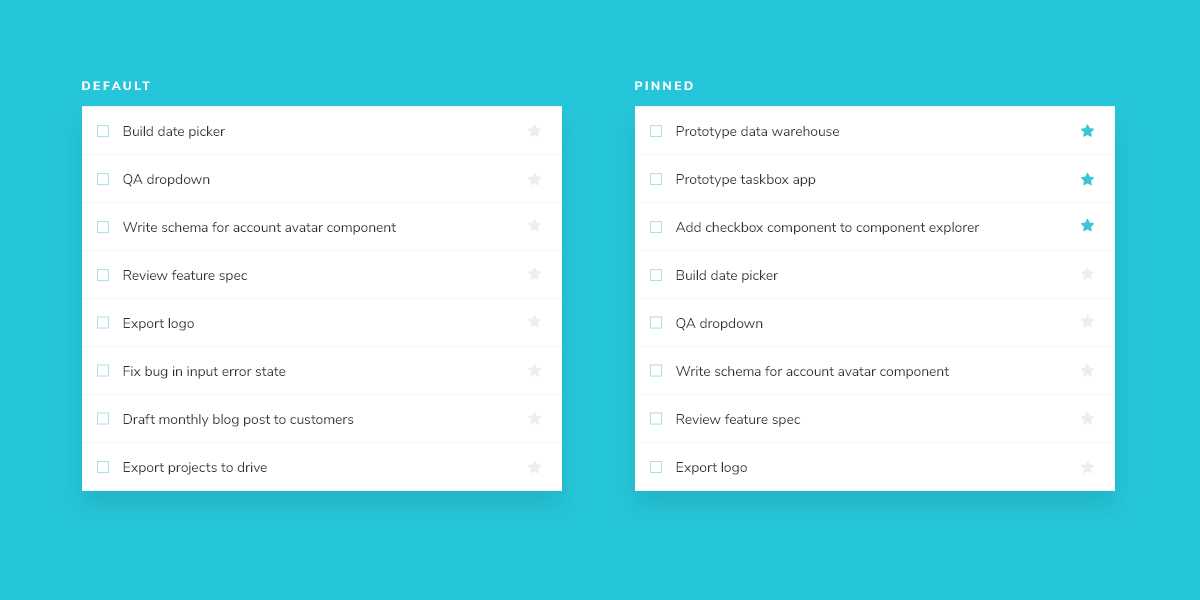
Taskbox はピン留めされたタスクを通常のタスクより上部に表示することで強調します。これにより TaskList に、タスクのリストが通常のタスクのみである場合と、ピン留めされたタスクとの組み合わせである場合というストーリーを追加するべき 2 つのバリエーションができます。
Task のデータは非同期に送信されるので、接続がないことを示すため、読み込み中の状態も併せて必要となります。さらにタスクがない場合に備え、空の状態も必要です。

セットアップする
複合的なコンポーネントも基本的なコンポーネントと大きな違いはありません。TaskList のコンポーネントとそのストーリーファイル、src/components/TaskList.vue と src/components/TaskList.stories.ts を作成しましょう。
まずは TaskList の大まかな実装から始めます。前の章で作成した Task コンポーネントをインポートし、属性とアクションを入力として渡します。
<template>
  <div class="list-items">
    <template v-if="loading"> loading </template>
    <template v-else-if="isEmpty"> empty </template>
    <template v-else>
      <Task
        v-for="task in tasks"
        :key="task.id"
        :task="task"
        @archive-task="onArchiveTask"
        @pin-task="onPinTask"
      />
    </template>
  </div>
</template>
<script lang="ts" setup>
import type { TaskData } from '../types'

import { computed } from 'vue'

import Task from './Task.vue'

type TaskListProps = {
  tasks: TaskData[]
  loading?: boolean
}

const props = defineProps<TaskListProps>()

const isEmpty = computed(() => props.tasks.length === 0)

const emit = defineEmits<{
  (e: 'archive-task', id: string): void
  (e: 'pin-task', id: string): void
}>()

/**
 * Event handler for archiving tasks
 */
function onArchiveTask(taskId: string): void {
  emit('archive-task', taskId)
}

/**
 * Event handler for pinning tasks
 */
function onPinTask(taskId: string): void {
  emit('pin-task', taskId)
}
</script>
次に Tasklist のテスト状態をストーリーファイルに記述します。
import type { Meta, StoryObj } from '@storybook/vue3-vite'

import TaskList from './TaskList.vue'

import * as TaskStories from './Task.stories'

export const TaskListData = [
  { ...TaskStories.TaskData, id: '1', title: 'Task 1' },
  { ...TaskStories.TaskData, id: '2', title: 'Task 2' },
  { ...TaskStories.TaskData, id: '3', title: 'Task 3' },
  { ...TaskStories.TaskData, id: '4', title: 'Task 4' },
  { ...TaskStories.TaskData, id: '5', title: 'Task 5' },
  { ...TaskStories.TaskData, id: '6', title: 'Task 6' },
]

const meta = {
  component: TaskList,
  title: 'TaskList',
  tags: ['autodocs'],
  excludeStories: /.*Data$/,
  decorators: [() => ({ template: '<div style="margin: 3em;"><story/></div>' })],
  args: {
    ...TaskStories.TaskData.events,
  },
} satisfies Meta<typeof TaskList>

export default meta
type Story = StoryObj<typeof meta>

export const Default: Story = {
  args: {
    // Shaping the stories through args composition.
    // Inherited data coming from the Default story.
    tasks: TaskListData,
  },
}

export const WithPinnedTasks: Story = {
  args: {
    // Shaping the stories through args composition.
    // Inherited data coming from the Default story.
    tasks: [
      ...Default.args.tasks.slice(0, 5),
      { id: '6', title: 'Task 6 (pinned)', state: 'TASK_PINNED' },
    ],
  },
}

export const Loading: Story = {
  args: {
    tasks: [],
    loading: true,
  },
}

export const Empty: Story = {
  args: {
    // Shaping the stories through args composition.
    // Inherited data coming from the Loading story.
    ...Loading.args,
    loading: false,
  },
}
💡デコレーターは、ストーリーに任意のラッパーを提供する方法です。今回は、デフォルトエクスポートの decorator キーを使って、レンダリングされるコンポーネントの周囲にスタイルを追加しています。後で説明するように、コンポーネントに別のコンテキストを追加することもできます。
TaskStories をインポートすることで、ストーリーに必要な引数 (args) を最小限の労力で組み合わせることができます。そうすることで、2 つのコンポーネントが想定するデータとアクション (モック化されたコールバック) の一貫性が保たれます。
それでは TaskList の新しいストーリーを Storybook で確認してみましょう。
状態を作りこむ
今のコンポーネントはまだ粗削りですが、目指すべきストーリーの全体像は見えてきました。単に .list-items だけのためにラッパーを作るのは単純すぎると思うかもしれません。その通りです。ほとんどの場合、単なるラッパーのためだけに新しいコンポーネントは作りません。TaskList の本当の複雑さは withPinnedTasks、loading、empty といったエッジケースに現れているのです。
<template>
  <div class="list-items">
    <template v-if="loading">
      <div v-for="n in 6" :key="n" class="loading-item" data-testid="loading" id="loading">
        <span class="glow-checkbox" />
        <span class="glow-text"> <span>Loading</span> <span>cool</span> <span>state</span> </span>
      </div>
    </template>

    <div v-else-if="isEmpty" class="list-items" data-testid="empty" id="empty">
      <div class="wrapper-message">
        <span class="icon-check" />
        <p class="title-message">You have no tasks</p>
        <p class="subtitle-message">Sit back and relax</p>
      </div>
    </div>

    <template v-else>
      <Task
        v-for="task in tasksInOrder"
        :key="task.id"
        :task="task"
        @archive-task="onArchiveTask"
        @pin-task="onPinTask"
      />
    </template>
  </div>
</template>
<script lang="ts" setup>
import type { TaskData } from '../types'

import { computed } from 'vue'

import Task from './Task.vue'

type TaskListProps = {
  tasks: TaskData[]
  loading?: boolean
}

const props = defineProps<TaskListProps>()

const isEmpty = computed(() => props.tasks.length === 0)
const tasksInOrder = computed(() => {
  return [
    ...props.tasks.filter((t) => t.state === 'TASK_PINNED'),
    ...props.tasks.filter((t) => t.state !== 'TASK_PINNED'),
  ]
})

const emit = defineEmits<{
  (e: 'archive-task', id: string): void
  (e: 'pin-task', id: string): void
}>()

/**
 * Event handler for archiving tasks
 */
function onArchiveTask(taskId: string): void {
  emit('archive-task', taskId)
}

/**
 * Event handler for pinning tasks
 */
function onPinTask(taskId: string): void {
  emit('pin-task', taskId)
}
</script>
追加したマークアップで UI は以下のようになります。
リスト内のピン留めされたタスクの位置に注目してください。ピン留めされたタスクはユーザーにとって優先度を高くするため、リストの先頭に描画されます。