How we built a profile card generator for Storybook
Combining React and Netlify functions to build a social image generator

Storybook is an essential tool for UI development. 58k stars on Github, 10 million monthly downloads on NPM, used by thousands of engineers daily and over 1200 contributors.
Our incredible progress is a testament to the vibrant community. That’s why we recognize notable contributors every week, mention them in changelogs, and shout them out in releases.
Recently, we discovered how to showcase the community even more using profile cards. Our API pulls contributor information and generates a custom image unique to the contributor. It combines React, creative-coding, and Netlify functions. This post shows you how to build something like this for your project.
Shout-outs
Storybook is a community-driven project. We appreciate all kinds of contributions from discussion to documentation to bug-fixes to feature improvements. We highlight these contributions and say “thank you!” by shouting out folks on Twitter. That gives their work more visibility and they get more followers.
I wanted to take that up a notch ✨
Each shout-out is accompanied by a profile card that includes a thank you message, a profile picture, and a contour background. Each background is unique and derived from the username. How? More on that later. First let’s talk about the overall architecture.

Generative Images with Netlify Functions
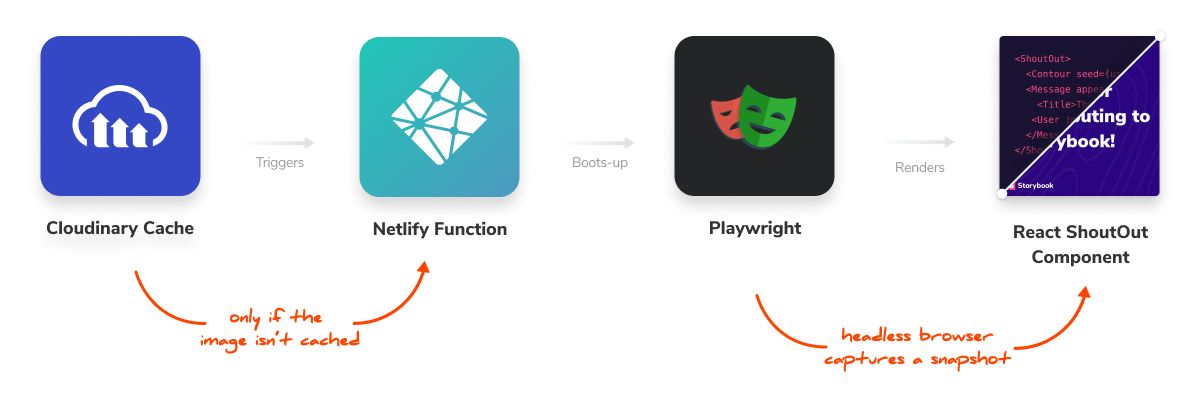
The whole thing is powered by an image generation API. The profile card generator is implemented as a React component. A Netlify Function handles the requests, spins-up a headless browser with Playwright to screenshot the DOM 📸 and returns an image.
Cloudinary is used as a write-through cache for the image generator Function. That means, you only generate the image once and subsequent requests are instant.
The bulk of this set up is based on Chris Biscardi’s wonderful Building an OpenGraph image generation API course.

Creative coding contours
The benefit of using a headless browser is that I could use HTML and CSS to create the layout. And SVG for the contour background. A dynamically generated SVG.
The contour is a combination of two generative art concepts: noise and the Marching squares algorithm.
Noise
Noise is kind of like Math.random() but creates a lot more smoother and organic output.
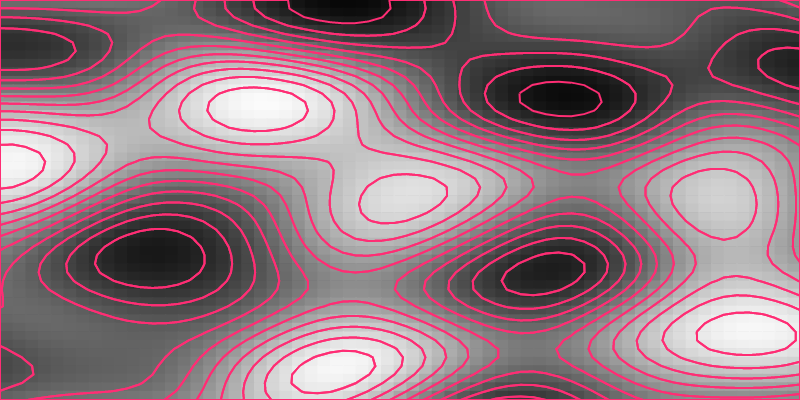
I split the canvas into a 2D grid with (x,y) coordinates. The noise function returns a value between 0 and 1 for each coordinate. The output looks something like this:

What is it used for? To generate natural looking texture textures such as clouds and landscapes. Oh and to win an Oscar 🏆
In my case, I used it as the source data for the contours.
Marching Squares 🥁
The Marching Squares algorithm generates an approximation for a contour line of a two dimensional scalar field. In other words, it will create lines where all points on the line have the same value from the noise function.
MarchingSquares.js is a JavaScript implementation of this algorithm. You give it a 2-dimensional array of noise data and it computes iso-bands for you. The output is an array of paths. Where each path is an array of [x, y] coordinates.

SVG Contours
canvas-sketch-util is a wonderful utility library for creative-coding in the browser. It offers both a noise function and a pathsToSVGPaths function. The latter is what I used for converting the iso-bands into SVGs.

Now, it’s your turn!
Checkout the ShoutOut component in our Storybook. Try changing the username and see how it affects the contours.

Spin-up your own profile card generator service using this one click deploy.
By combining a bunch of familiar web technologies, we were able to create something unique. I hope that this can serve as a starting point for your explorations. Give us a shout on Twitter and share your work.