构建一个页面
我们专注于从下到上构建 UI; 从小做起并增加复杂性. 这样做使我们能够独立开发每个组件,找出其数据需求,并在 Storybook 中使用它. 所有这些都无需 启动服务器或构建出页面!
在本章中,我们通过组合页面中的组件,并在 Storybook 中开发该页面 来继续提高复杂性.
嵌套的容器组件
由于我们的应用程序非常简单,我们将构建的页面非常简单,只需简单地包装TaskList组件 (通过 Redux 提供自己的数据) 在某些布局中并拉出 redux 中顶层error的字段 (假设我们在连接到 服务器时遇到问题,我们将设置该字段) . 创建InboxScreen.js在你的components夹:
import React from 'react';
import PropTypes from 'prop-types';
import { connect } from 'react-redux';

import TaskList from './TaskList';

export function PureInboxScreen({ error }) {
  if (error) {
    return (
      <div className="page lists-show">
        <div className="wrapper-message">
          <span className="icon-face-sad" />
          <div className="title-message">Oh no!</div>
          <div className="subtitle-message">Something went wrong</div>
        </div>
      </div>
    );
  }

  return (
    <div className="page lists-show">
      <nav>
        <h1 className="title-page">
          <span className="title-wrapper">Taskbox</span>
        </h1>
      </nav>
      <TaskList />
    </div>
  );
}

PureInboxScreen.propTypes = {
  error: PropTypes.string,
};

PureInboxScreen.defaultProps = {
  error: null,
};

export default connect(({ error }) => ({ error }))(PureInboxScreen);
我们也改变了App,用于渲染的组件InboxScreen (最终我们会使用路由器来选择正确的页面,但不要在此担心) :
import React, { Component } from 'react';
import { Provider } from 'react-redux';
import store from './lib/redux';

import InboxScreen from './components/InboxScreen';

class App extends Component {
  render() {
    return (
      <Provider store={store}>
        <InboxScreen />
      </Provider>
    );
  }
}

export default App;
然而,事情变得有趣的是在 Storybook 中渲染故事.
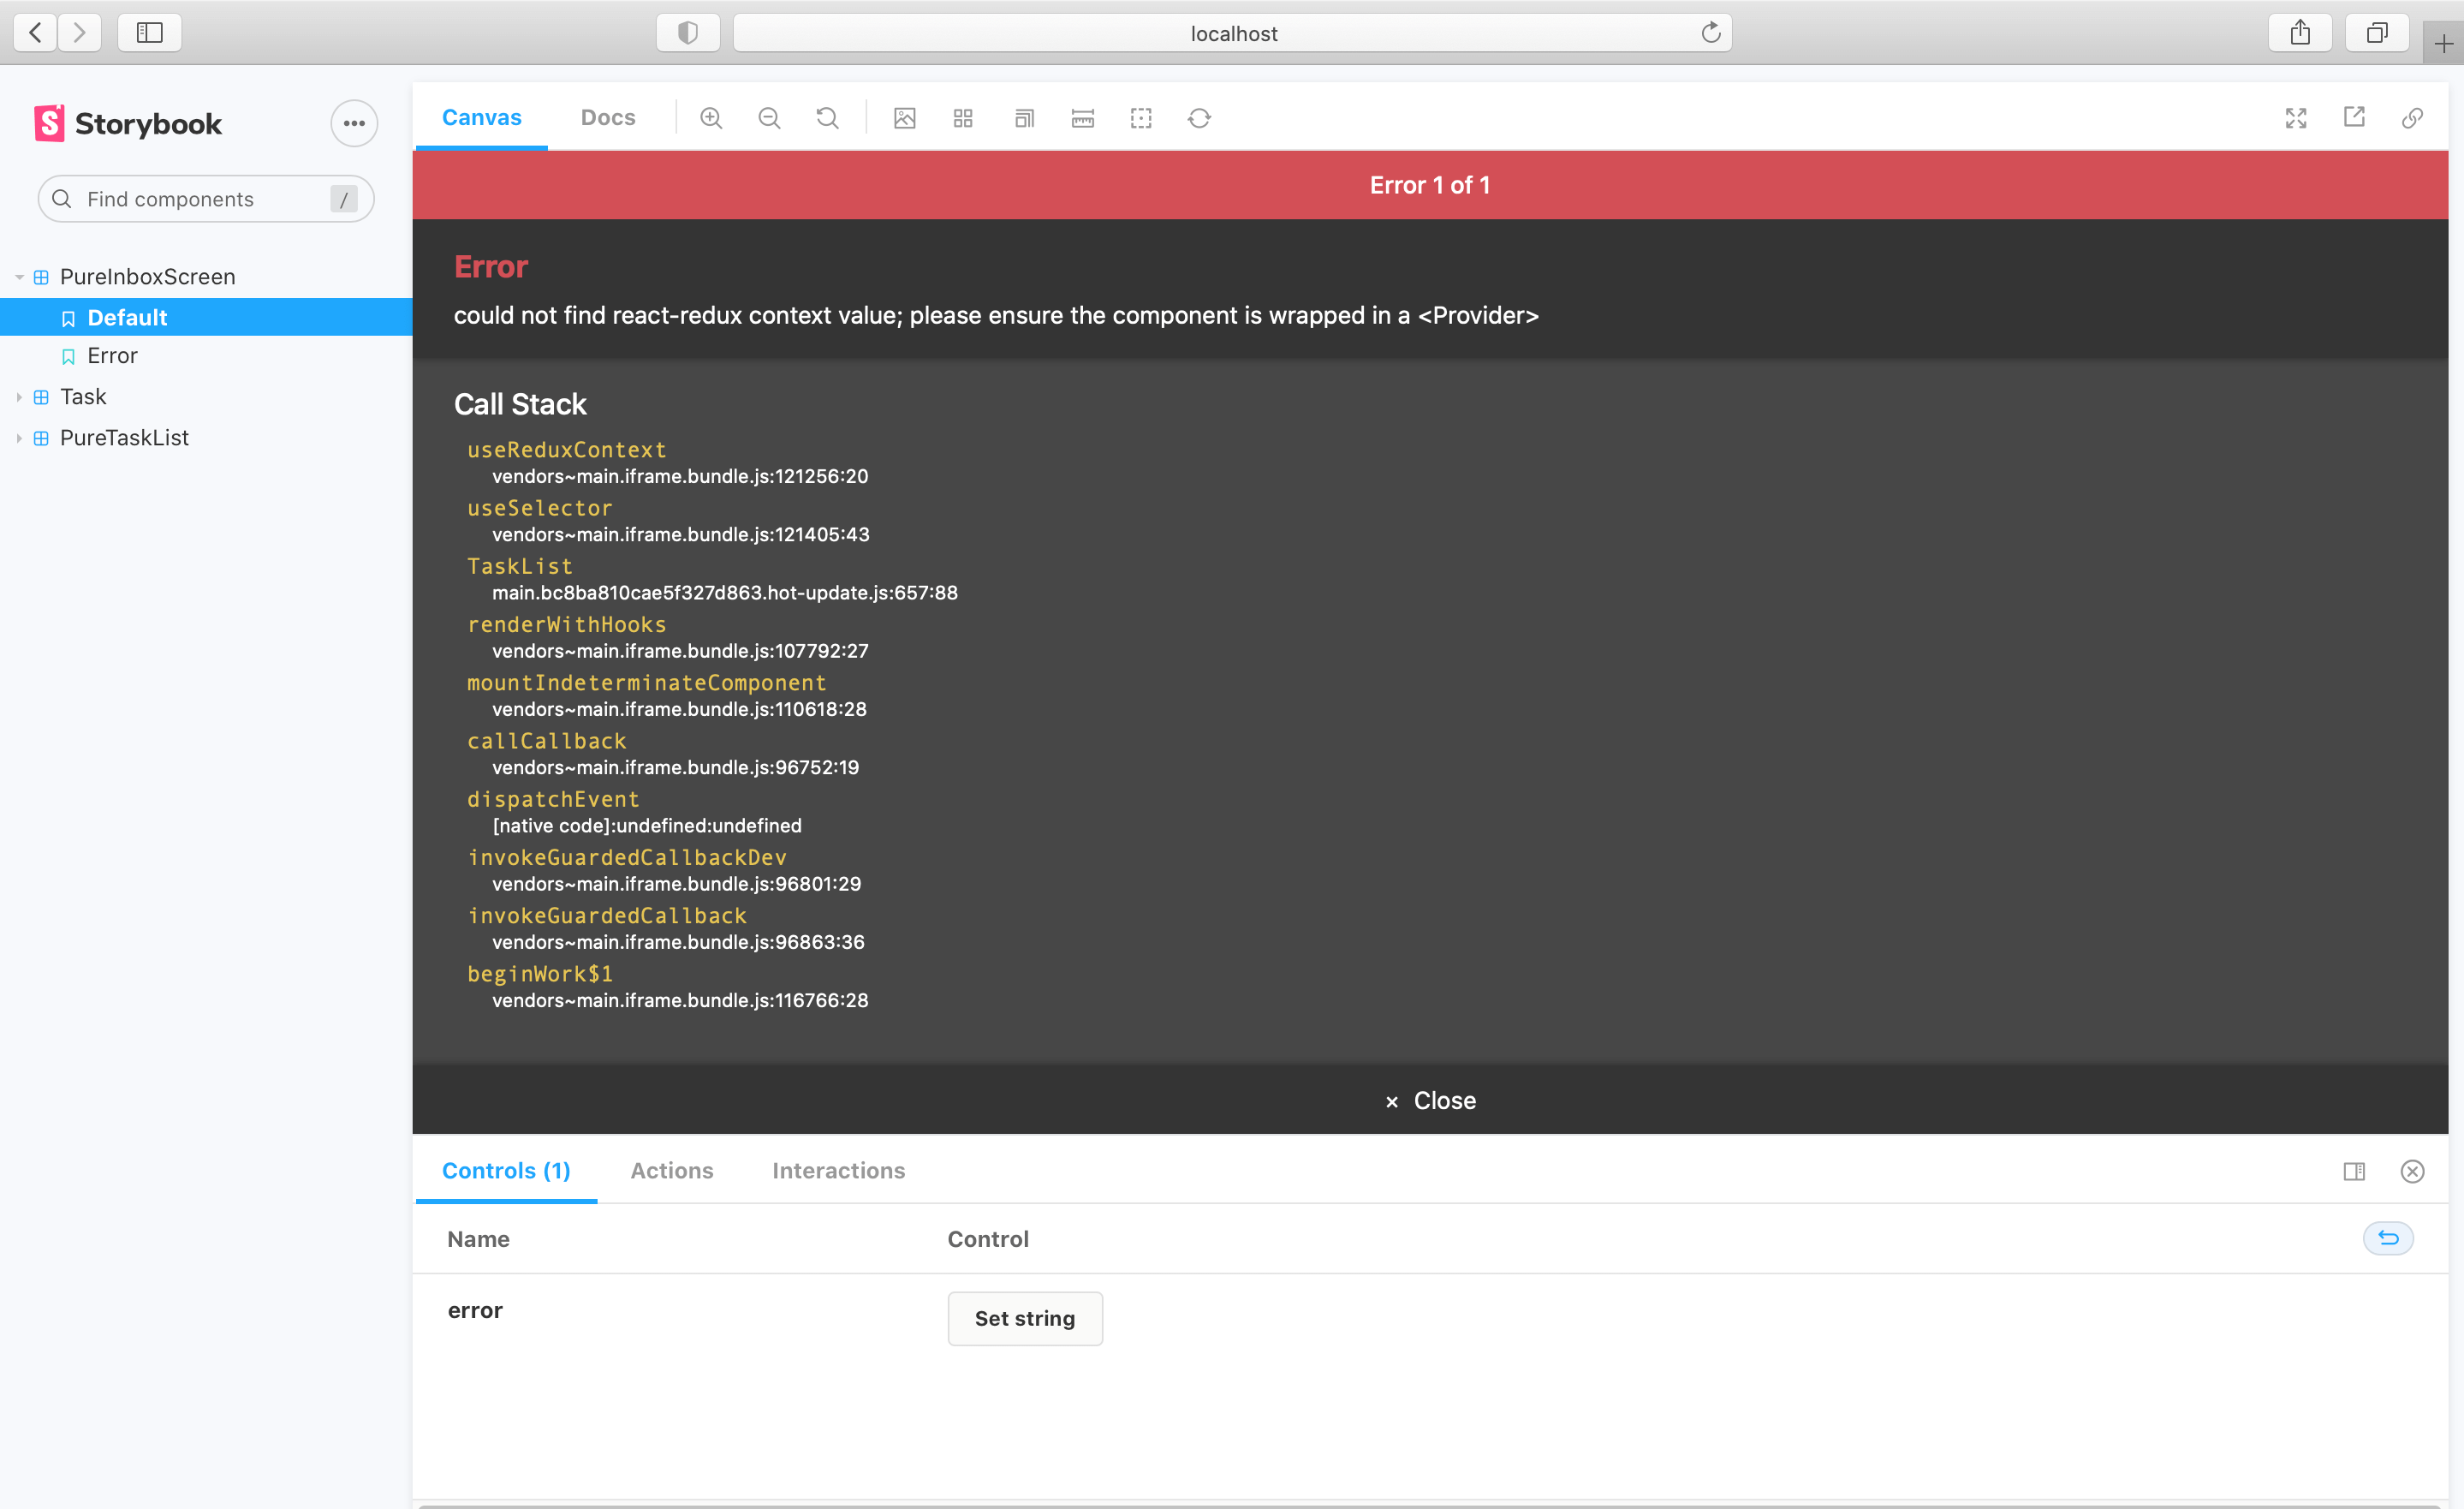
正如我们之前看到的那样TaskList组件是一个 容器, 这使得PureTaskList表示组件. 根据定义,容器组件不能简单地单独呈现; 他们希望通过一些上下文或连接到服务. 这意味着要在 Storybook 中呈现容器,我们必须模拟 (即提供假装版本) 它所需的上下文或服务.
放置TaskList进入 Storybook,我们能够通过简单地渲染PureTaskList,并避开容器来避开这个问题. 我们会渲染PureInboxScreen并在 Storybook 中做类似的事情.
但是,对于PureInboxScreen我们有一个问题,因为虽然PureInboxScreen本身是表现性的,它的孩子,TaskList, 不是. 从某种意义上说PureInboxScreen被"容器"污染了. 所以,当我们设置我们的故事InboxScreen.stories.js:
import React from 'react';

import { PureInboxScreen } from './InboxScreen';

export default {
  component: PureInboxScreen,
  title: 'InboxScreen',
};

const Template = (args) => <PureInboxScreen {...args} />;

export const Default = Template.bind({});

export const Error = Template.bind({});
Error.args = {
  error: 'Something',
};
我们看到了虽然如此error故事工作得很好,我们default故事有一个问题,因为TaskList没有要连接的 Redux Store . (在尝试测试时,您也会遇到类似的问题PureInboxScreen用单元测试) .
避免此问题的一种方法是,永远不要在应用程序中的任何位置呈现容器组件,除非在最高级别,而是将所有要求的数据 传递到 组件层次结构中.
但是,开发人员 将 不可避免地需要在组件层次结构中,进一步渲染容器. 如果我们想要在 Storybook 中渲染大部分或全部应用程序 (我们这样做!) ,我们需要一个解决此问题的方法.
用装饰器提供上下文
好消息是 Redux Store 很容易提供给 一个InboxScreen故事! 我们可以使用 Redux Store 的模拟版本 提供给到装饰器中:
import React from 'react';
import { Provider } from 'react-redux';
import { action } from '@storybook/addon-actions';
import { PureInboxScreen } from './InboxScreen';
import * as TaskListStories from './TaskList.stories';

// A super-simple mock of a redux store
const store = {
  getState: () => {
    return {
      tasks: TaskListStories.Default.args.tasks,
    };
  },
  subscribe: () => 0,
  dispatch: action('dispatch'),
};

export default {
  component: PureInboxScreen,
  decorators: [(story) => <Provider store={store}>{story()}</Provider>],
  title: 'InboxScreen',
};

const Template = (args) => <PureInboxScreen {...args} />;

export const Default = Template.bind({});

export const Error = Template.bind({});
Error.args = {
  error: 'Something',
};
存在类似的方法来为其他数据库提供模拟的上下文,例如阿波罗,Relay和别的.
在 Storybook 中 循环浏览状态 可以轻松测试我们是否已正确完成此操作:
组件驱动开发
我们从底部开始Task,然后进展到TaskList,现在我们在这里使用全屏 UI. 我们的InboxScreen容纳嵌套的容器组件,并包括随附的故事.
组件驱动开发允许您在向上移动组件层次结构时,逐渐扩展复杂性. 其中的好处包括 更集中的开发过程 以及 所有可能的 UI 排列 的覆盖范围. 简而言之,CDD 可帮助您构建 更高质量和更复杂 的用户界面.
我们还没有完成 - 在构建 UI 时,工作不会结束. 我们还需要确保它随着时间的推移保持持久.