깃허브(Github) 액션으로 UI 테스트 자동화하기
개발자는 평균적으로 버그를 고치는데 매주 4-8 시간 정도를 사용한다고 합니다. 버그가 프로덕션(production)에 몰래 끼어들기 시작하면, 상황은 나빠지기만 합니다. 이 경우, 버그를 고치는데에는 5-10배 더 많은 시간이 듭니다. 이러한 이유로 UI 테스팅이 질 높은 사용자 경험을 전달하는데 필수적이지만, 동시에 엄청난 시간 낭비가 될 수 있습니다. 코드를 변경할 때마다 모든 테스트를 수작업으로 하나하나 하려하면 일이 지나치게 커집니다.
이런 작업 흐름(workflow)를 자동화해서 개발자가 코드를 push할 때마다 테스트가 작동하게 만들 수 있습니다. 테스트들은 백그라운드에서 실행되고 완료되면 결과를 보고합니다. 이는 회귀(regressions) 에러를 자동으로 감지할 수 있게 해줍니다.
이 챕터에서는 어떻게 이런 작업 흐름을 Github Actions을 이용해 구축할 수 있는지 보여줍니다. 더불어, 테스트 실행을 최적화하는 방법도 짚어보겠습니다.
지속적인 UI 테스트
코드 리뷰는 개발자가 되는데 중요한 부분입니다. 여러분이 버그를 조기에 발견하고 높은 코드 품질을 유지할 수 있게 돕습니다.
풀 리퀘스트(Pull request)가 프로덕션 코드를 망가트리지 않는다는 걸 보장하기 위해서, 여러분은 보통 코드를 pull 해와서 테스트 스위트를 로컬에서 실행해볼 겁니다. 이런 작업은 작업 흐름을 끊고 시간도 오래 걸립니다. 지속적 통합(CI)을 통해서, 손으로 하나하나 개입하지 않고도 테스트의 이득은 모두 챙길 수 있습니다.
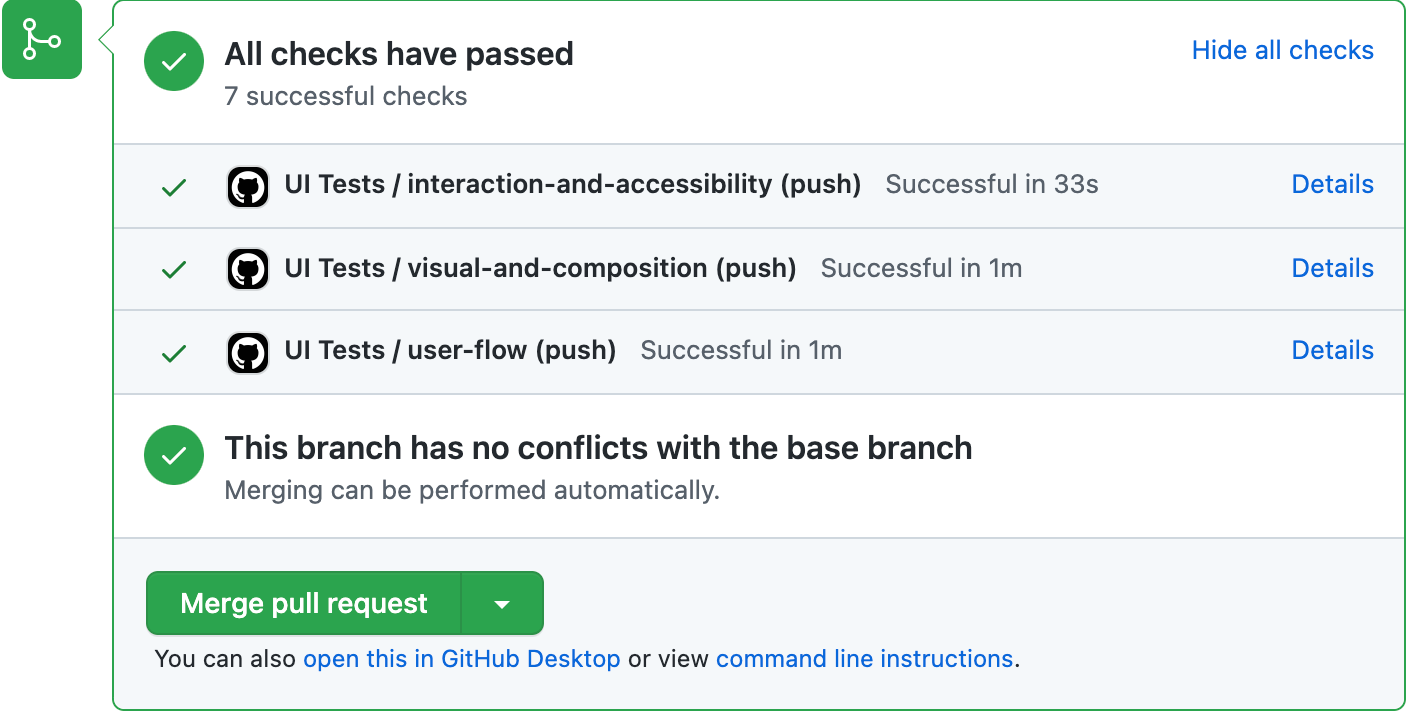
여러분은 UI를 바꿀 수도, 새로운 기능을 만들 수도, 의존성을 최신으로 업데이트할 수도 있습니다. 풀 리퀘스트를 열었을 때, CI 서버는 자동적으로 포괄적인 UI테스트를 -시각적 요소, 구성, 접근성, 상호작용, 사용자 흐름- 실행해줍니다.
테스트 결과로 PR 뱃지를 받게 되고, 이를 통해 모든 검사 결과를 개략적으로 확인할 수 있습니다.
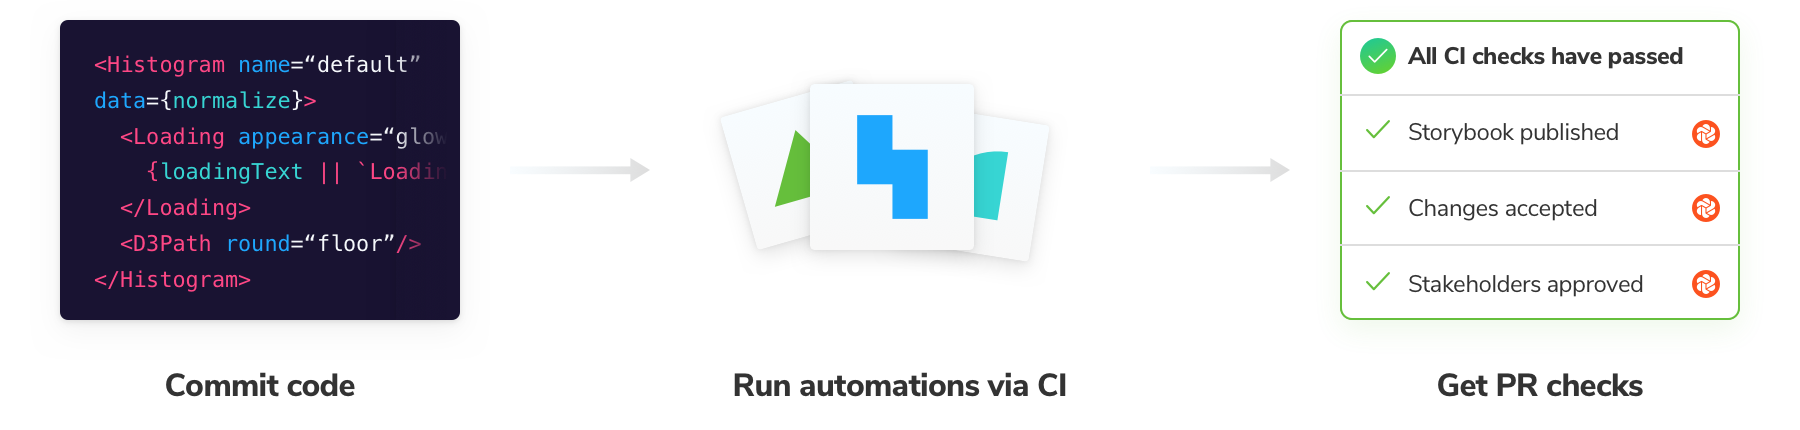
풀 리퀘스트가 모든 품질 검사를 통과했는지 한눈에 알 수 있습니다. 그 답이 "네(yes)"라면 실제 코드를 리뷰하는 단계로 넘어가면 됩니다. 그렇지 못한 경우에는, 로그를 살펴보면서 무엇이 잘못됐는지 찾습니다.
"테스트는 의존성 최신화를 자동화해도 저에게 확신을 줍니다. 테스트가 통과하면, 최신화된 사항을 merge 시키죠."
— Simon Taggart, Twilio 수석 엔지니어(Principal Engineer)
튜토리얼
지난 다섯 챕터들에서는 Taskbox UI의 다양한 면을 어떻게 테스트할 수 있는지 보여주었습니다. 여기에 더해서 우리는 이제 Github Actions를 이용해 지속적 통합(CI)을 구축해볼 것입니다.
CI 구축하기
먼저 저장소에 .github/workflows/ui-tests.yml파일을 만들면서 시작해봅시다. 한 작업 흐름(workflow)은 자동화하고 싶은 여러 작업(jobs)으로 이루어집니다. 작업 흐름은 commit을 push한다던가 풀 리퀘스트를 만드는 것 같은 이벤트(events)에 의해 트리거됩니다.
우리가 만들 작업 흐름은 코드를 저장소의 브랜치에 push하는 순간 실행되고, 3가지 작업(job)을 가지고 있습니다.
- 상호작용 테스트와 접근성 검사를 Jest로 수행합니다.
- 시각적 요소 그리고 구성 테스트를 크로마틱(Chromatic)으로 수행합니다.
- 사용자 흐름(user flow) 테스트를 사이프레스(Cypress)로 수행합니다.
name: 'UI Tests'

on: push

jobs:
  # Run interaction and accessibility tests
  interaction-and-accessibility:
    runs-on: ubuntu-latest
    steps:
      - uses: actions/checkout@v2
      - uses: actions/setup-node@v2
        with:
          node-version: '14.x'
      - name: Install dependencies
        run: yarn
      - name: Install Playwright
        run: npx playwright install --with-deps
      - name: Build Storybook
        run: yarn build-storybook --quiet
      - name: Serve Storybook and run tests
        run: |
          npx concurrently -k -s first -n "SB,TEST" -c "magenta,blue" \
            "npx http-server storybook-static --port 6006 --silent" \
            "npx wait-on tcp:6006 && yarn test-storybook"
  # Run visual and composition tests with Chromatic
  visual-and-composition:
    runs-on: ubuntu-latest
    steps:
      - uses: actions/checkout@v2
        with:
          fetch-depth: 0 # Required to retrieve git history
      - name: Install dependencies
        run: yarn
      - name: Publish to Chromatic
        uses: chromaui/action@v1
        with:
          # Grab this from the Chromatic manage page
          projectToken: ${{ secrets.CHROMATIC_PROJECT_TOKEN }}
  # Run user flow tests with Cypress
  user-flow:
    runs-on: ubuntu-latest
    steps:
      - uses: actions/checkout@v2
      - name: Install dependencies
        run: yarn
      - name: Cypress run
        uses: cypress-io/github-action@v2
        with:
          start: npm start
여기서 몇 가지 주목할 것이 있습니다. 테스트 러너를 위해서, concurrently, http-server 와 wait-on 라이브러리들의 조합을 이용해 테스트를 수행할 스토리북을 빌드하고 서빙합니다.
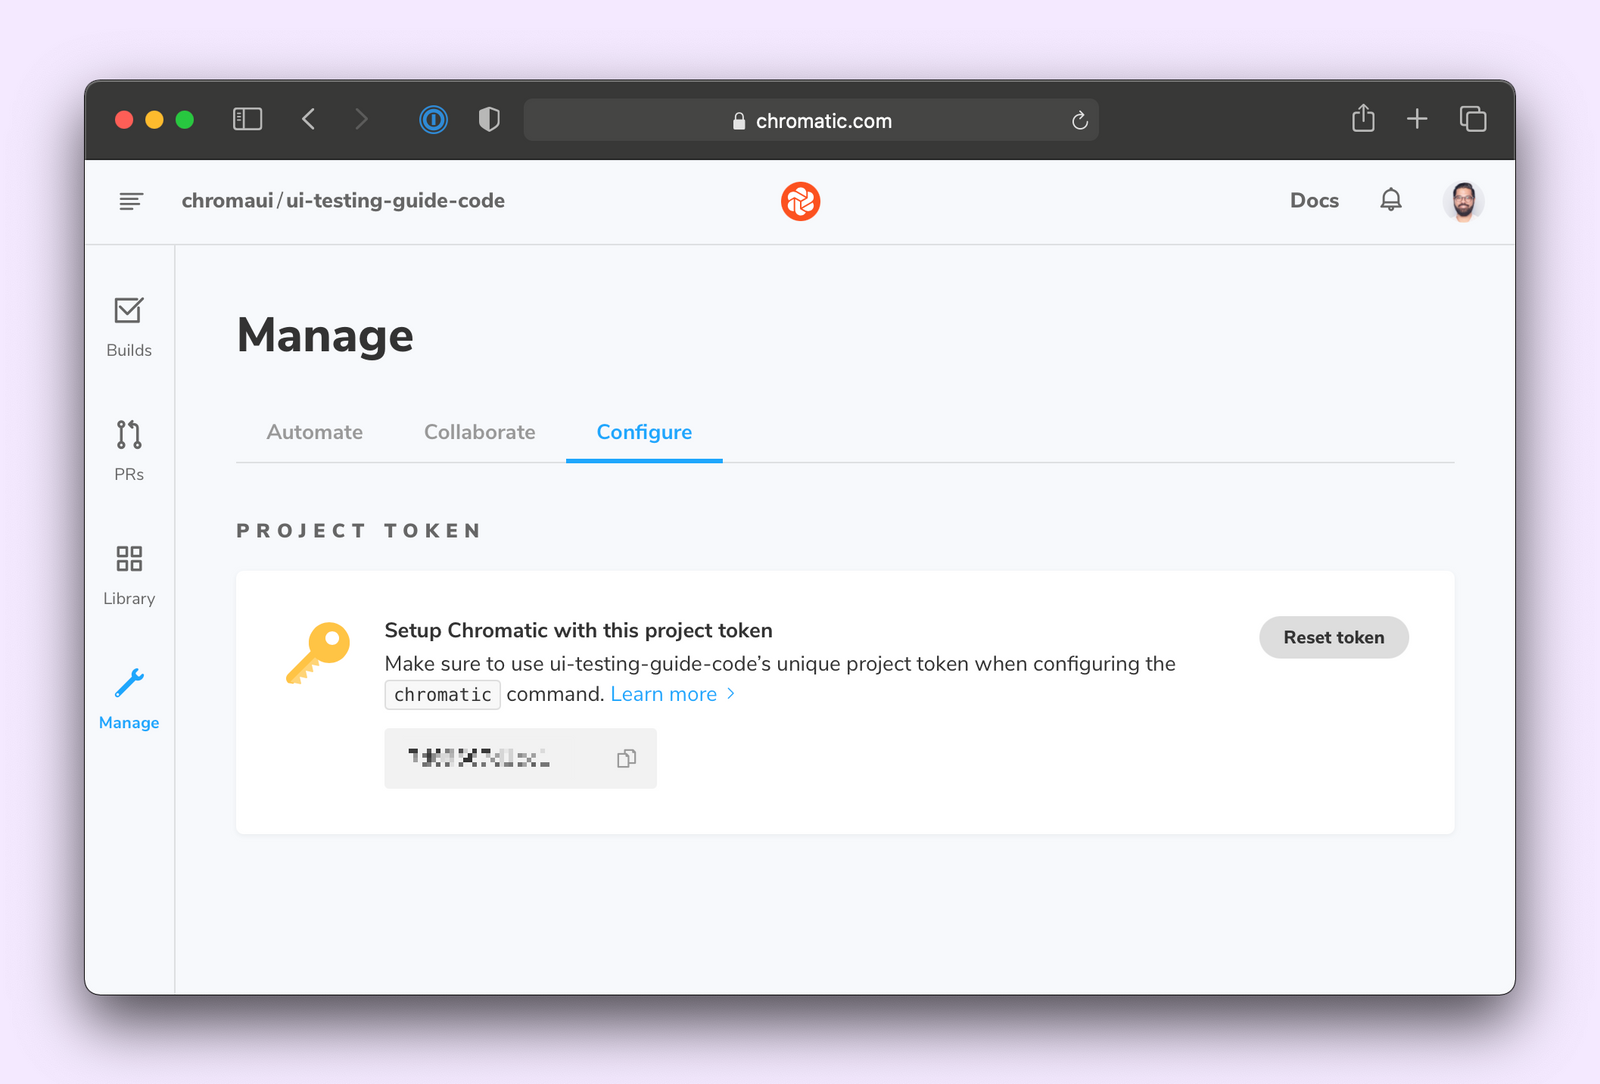
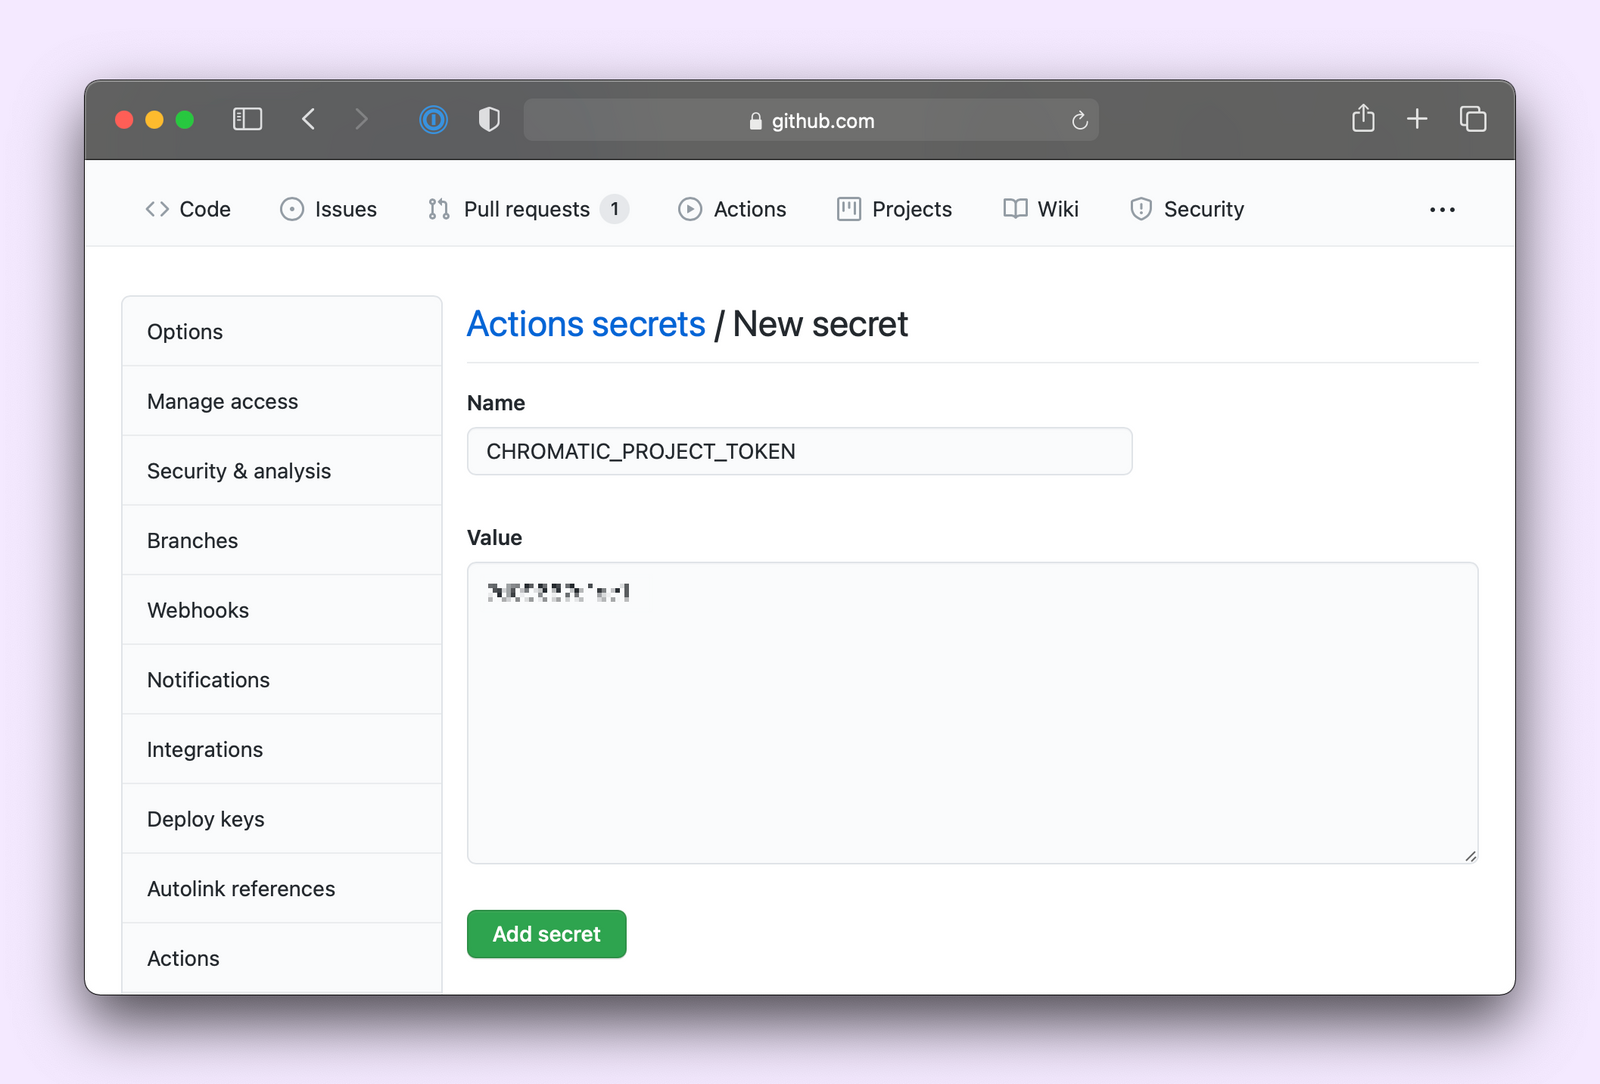
크로마틱을 실행하려면, CHROMATIC_PROJECT_TOKEN이 필요합니다. 이는 크로마틱의 관리 페이지에서 가져올 수 있고 우리의 저장소 secrets에 넣어둬야 합니다. 반면에 GITHUB_TOKEN은 기본적으로 이용할 수 있게 되어 있습니다.
마지막으로, 새 commit을 만들고, 변경사항을 깃허브에 push하면, 작업 흐름이 실행되는 걸 볼 수 있어야 합니다!
의존성 캐시하기
각 작업은 독립적으로 실행되고, 이는 CI 서버가 의존성을 세 작업 모두에서 설치해야 한다는 뜻입니다. 때문에 테스트 실행은 느려집니다. 이를 피하기 위해서 의존성(dependencies)을 캐시해놓고, 오직 lock file이 변경되었을 때에만 yarn install을 실행하도록 할 수 있습니다. 그러면 작업 흐름이 install-cache 작업을 포함해서 수정합니다.
name: 'UI Tests'

on: push

jobs:
  # Install and cache npm dependencies
  install-cache:
    runs-on: ubuntu-latest
    steps:
      - name: Checkout Commit
        uses: actions/checkout@v2
      - name: Cache yarn dependencies and cypress
        uses: actions/cache@v2
        id: yarn-cache
        with:
          path: |
            ~/.cache/Cypress
            node_modules
          key: ${{ runner.os }}-yarn-v1-${{ hashFiles('**/yarn.lock') }}
          restore-keys: |
            ${{ runner.os }}-yarn-v1
      - name: Install dependencies if cache invalid
        if: steps.yarn-cache.outputs.cache-hit != 'true'
        run: yarn
  # Run interaction and accessibility tests
  interaction-and-accessibility:
    runs-on: ubuntu-latest
    needs: install-cache
    steps:
      - uses: actions/checkout@v2
      - uses: actions/setup-node@v2
        with:
          node-version: '14.x'
      - name: Restore yarn dependencies
        uses: actions/cache@v2
        id: yarn-cache
        with:
          path: |
            ~/.cache/Cypress
            node_modules
          key: ${{ runner.os }}-yarn-v1-${{ hashFiles('**/yarn.lock') }}
          restore-keys: |
            ${{ runner.os }}-yarn-v1
     - name: Install Playwright
       run: npx playwright install --with-deps
     - name: Build Storybook
       run: yarn build-storybook --quiet
     - name: Serve Storybook and run tests
       run: |
         npx concurrently -k -s first -n "SB,TEST" -c "magenta,blue" \
           "npx http-server storybook-static --port 6006 --silent" \
           "npx wait-on tcp:6006 && yarn test-storybook"
  # Run visual and composition tests with Chromatic
  visual-and-composition:
    runs-on: ubuntu-latest
    needs: install-cache
    steps:
      - uses: actions/checkout@v2
        with:
          fetch-depth: 0 # Required to retrieve git history
      - name: Restore yarn dependencies
        uses: actions/cache@v2
        id: yarn-cache
        with:
          path: |
            ~/.cache/Cypress
            node_modules
          key: ${{ runner.os }}-yarn-v1-${{ hashFiles('**/yarn.lock') }}
          restore-keys: |
            ${{ runner.os }}-yarn-v1
      - name: Publish to Chromatic
        uses: chromaui/action@v1
        with:
          # Grab this from the Chromatic manage page
          projectToken: ${{ secrets.CHROMATIC_PROJECT_TOKEN }}
  # Run user flow tests with Cypress
  user-flow:
    runs-on: ubuntu-latest
    needs: install-cache
    steps:
      - uses: actions/checkout@v2
      - name: Restore yarn dependencies
        uses: actions/cache@v2
        id: yarn-cache
        with:
          path: |
            ~/.cache/Cypress
            node_modules
          key: ${{ runner.os }}-yarn-v1-${{ hashFiles('**/yarn.lock') }}
          restore-keys: |
            ${{ runner.os }}-yarn-v1
      - name: Cypress run
        uses: cypress-io/github-action@v2
        with:
          start: npm start
나머지 세 작업도 install-cache작업이 끝나고 캐시된 의존성(dependencies)을 사용할 수 있을 때까지 기다리도록 약간 고쳤습니다. 이 작업 흐름을 다시 실행해보기 위해 다른 commit을 push해봅시다.
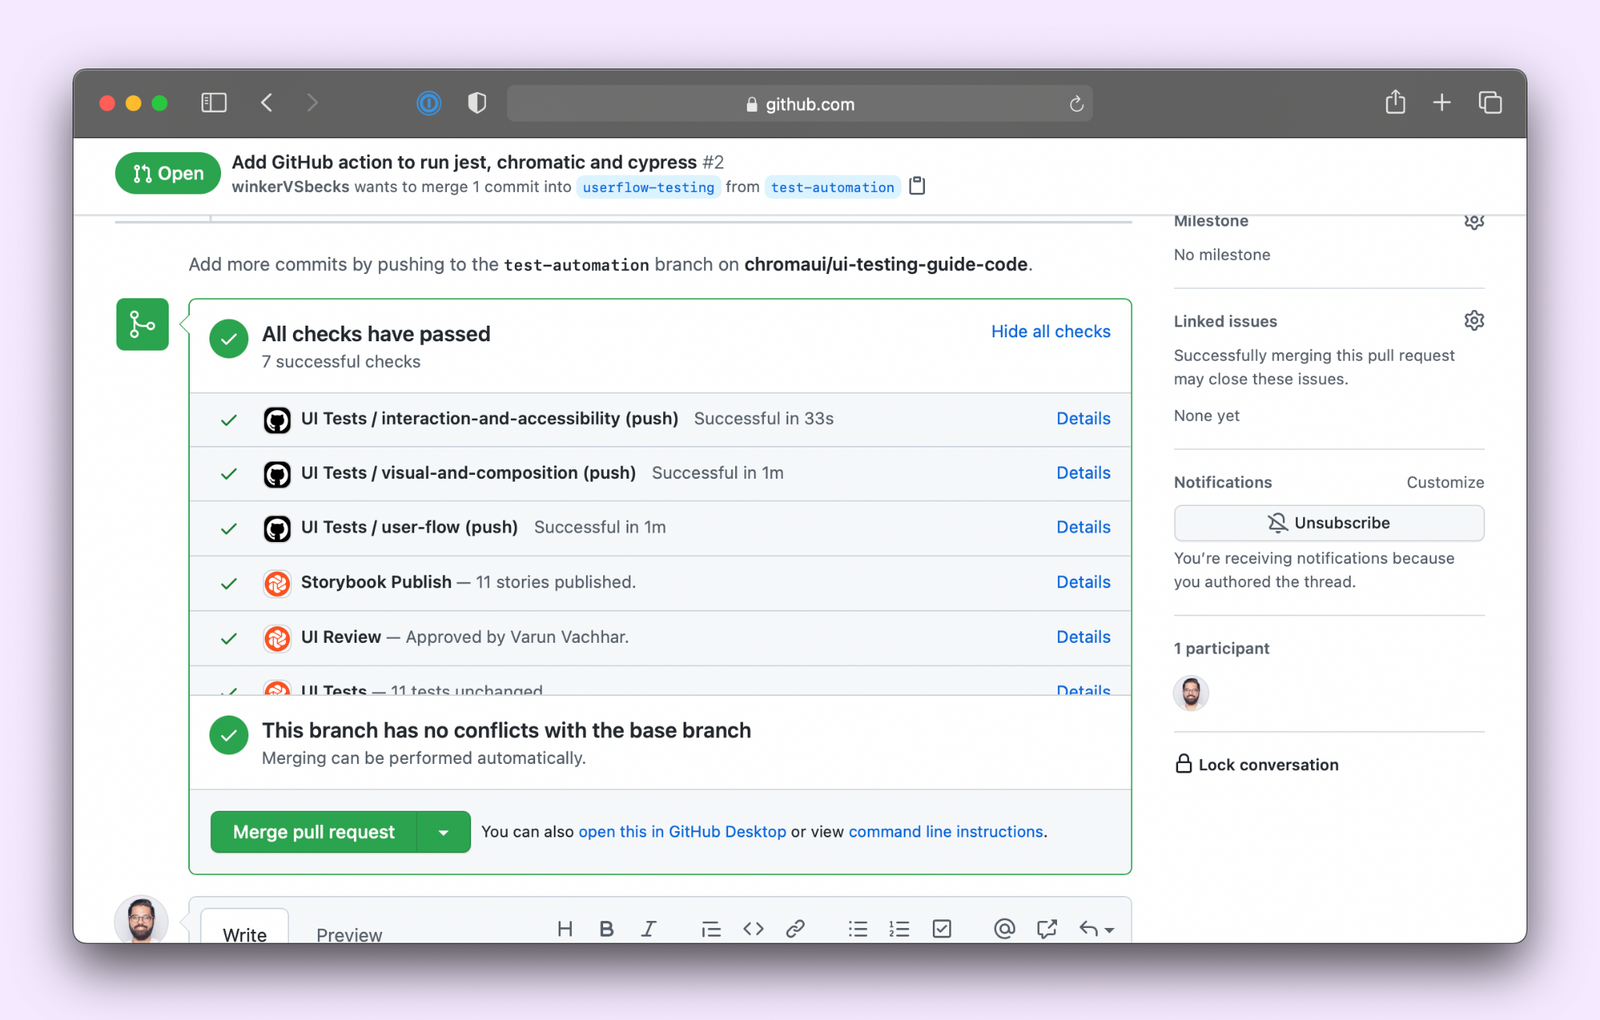
성공! 여러분은 테스팅 작업 흐름을 자동화했습니다. 이제 PR을 열면 알아서 제스트(Jest), 크로마틱 그리고 사이프레스를 병렬로 실행하고 PR 페이지에 그 결과를 보여줄 것입니다.
UI 테스팅 작업 흐름을 정복하기
테스트 작업 흐름은 스토리북을 이용해 컴포넌트를 분리시키는 것에서부터 시작합니다. 코드를 짜는 동안 검사를 실행하면서 더 빠른 피드백 고리(feedback loop)를 만들 수 있습니다. 마지막으로 여러분의 모든 테스트 스위트를 지속적 통합(Continuous Integration)을 이용해서 실행해보도록 합시다.
8장에서는 이러한 완전한 작업 흐름을 실제로 보여줍니다. 이제 새 기능을 프로덕션에 올리기 전에 어떻게 테스트할 수 있는지 보겠습니다.