
Build a Next.js app in Storybook with React Server Components and Mock Service Worker
Develop, document, and test RSC applications in isolation, using MSW to mock network requests

Storybook 8 (our next major release) brings React Server Component (RSC) compatibility to Storybook for the very first time, letting you build, test and document Next.js server applications in isolation.
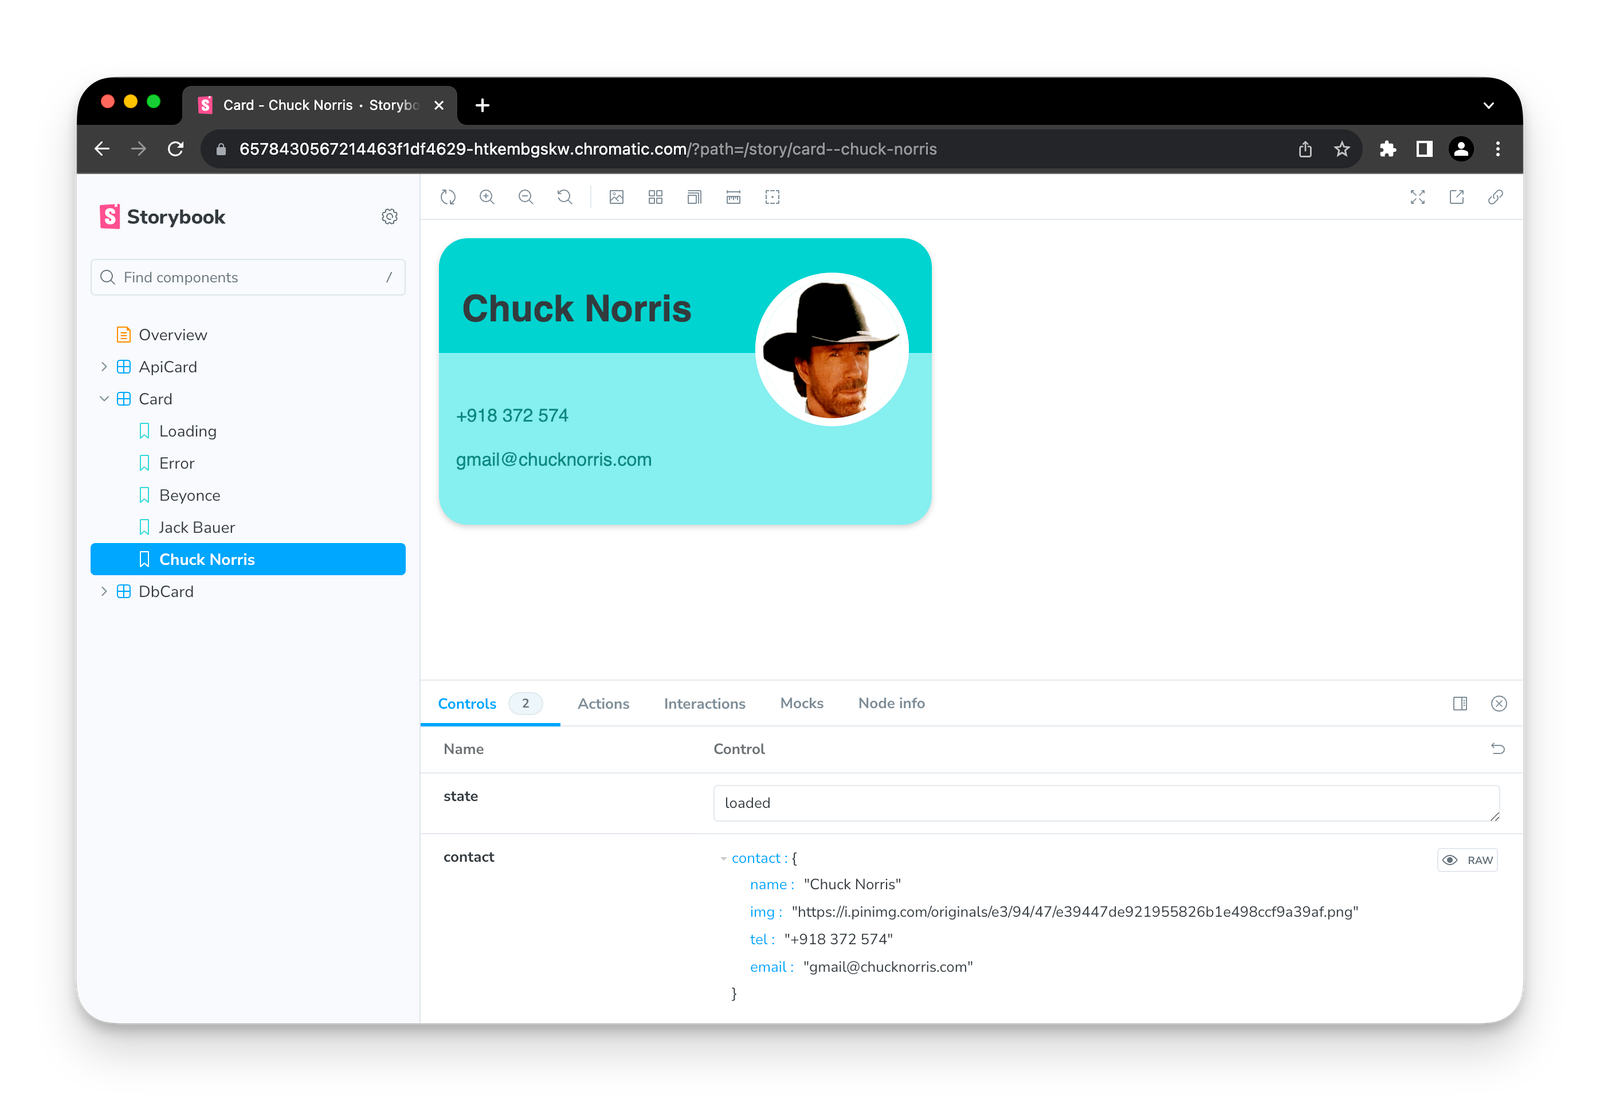
In our first demo, we used Storybook to develop a contact card RSC, which accessed contact data both asynchronously and from a file system while simulating server code through module mocks.
Next, we’ll explore how to build an entire app in isolation with the Next.js App Router, by rebuilding the Hacker Next example in Storybook with the help of Mock Service Worker.

Why build pages in isolation?
It’s amazing how much UI fits into just two pages. Consider the data states your pages need. Then, multiply them by responsive layouts, logged-in views, themes, browsers, locales, and accessibility. It doesn’t take much for a handful of pages to become hundreds of variants.
Storybook solves this complexity by letting you teleport to any UI state by isolating it as a story! If you’re new to Storybook, here’s how stories work.
Writing stories for Hacker Next
First, install Storybook in your Next.js project:
npx storybook@next init
Then, add the experimentalRSC flag to Storybook’s main.ts, and point it to the new stories we’re about to write:
// main.ts

const config: StorybookConfig = {
- stories: ['../stories/**/*.mdx', '../stories/**/*.stories.@(js|jsx|mjs|ts|tsx)'],
+ stories: ['../app/**/*.stories.tsx'],
  // ... existing config
+ features: { experimentalRSC: true }
}
Now, let’s write stories for Hacker Next’s two components: the news homepage and the item page! Here’s what a simple story could look like for the news page:
// app/news/[page]/index.stories.tsx

import type { Meta, StoryObj } from '@storybook/react';
import News from './page';

const meta = {
  title: 'app/News',
  component: News,
} satisfies Meta<typeof News>;
export default meta;

type Story = StoryObj<typeof meta>;

export const Home: Story = {
  args: { params: { page: 1 } },
}
Though this works, you’ll notice that it’s missing styling. We can fix that by adding a decorator to our .storybook/preview.tsx:
// .storybook/preview.tsx

import Layout from '../app/layout.tsx';

export default {
  // other settings
  decorators: [(Story) => <Layout><Story /></Layout>],
}
That’s more like it! Now, try doing this for app/item/[id]/(comments)/page.tsx. If you get stuck, check our repo.
Mock ‘n’ roll with Mock Service Worker
Rather than using real data, we want to be able to control the data. This lets us test different states and generate consistent results.
Hacker Next fetches data from a network API, so we’ll mock its requests with Mock Service Worker (MSW).
First, let’s add Storybook’s MSW addon to our project. We’ll use the canary version that supports MSW 2.0’s dramatically improved API.
pnpx storybook add msw-storybook-addon@2.0.0--canary.122.06f0c92.0
pnpx msw init public
Next, update .storybook/preview.tsx to initialize MSW with the onUnhandledRequest option. This ensures our existing story continues to work.
// .storybook/preview.tsx
// ... existing imports
+ import { initialize, mswLoader } from 'msw-storybook-addon';
+ initialize({ onUnhandledRequest: 'warn' });
const preview: Preview = {
+ loaders: [mswLoader],
decorators: [(Story) => <Layout><Story /></Layout>],
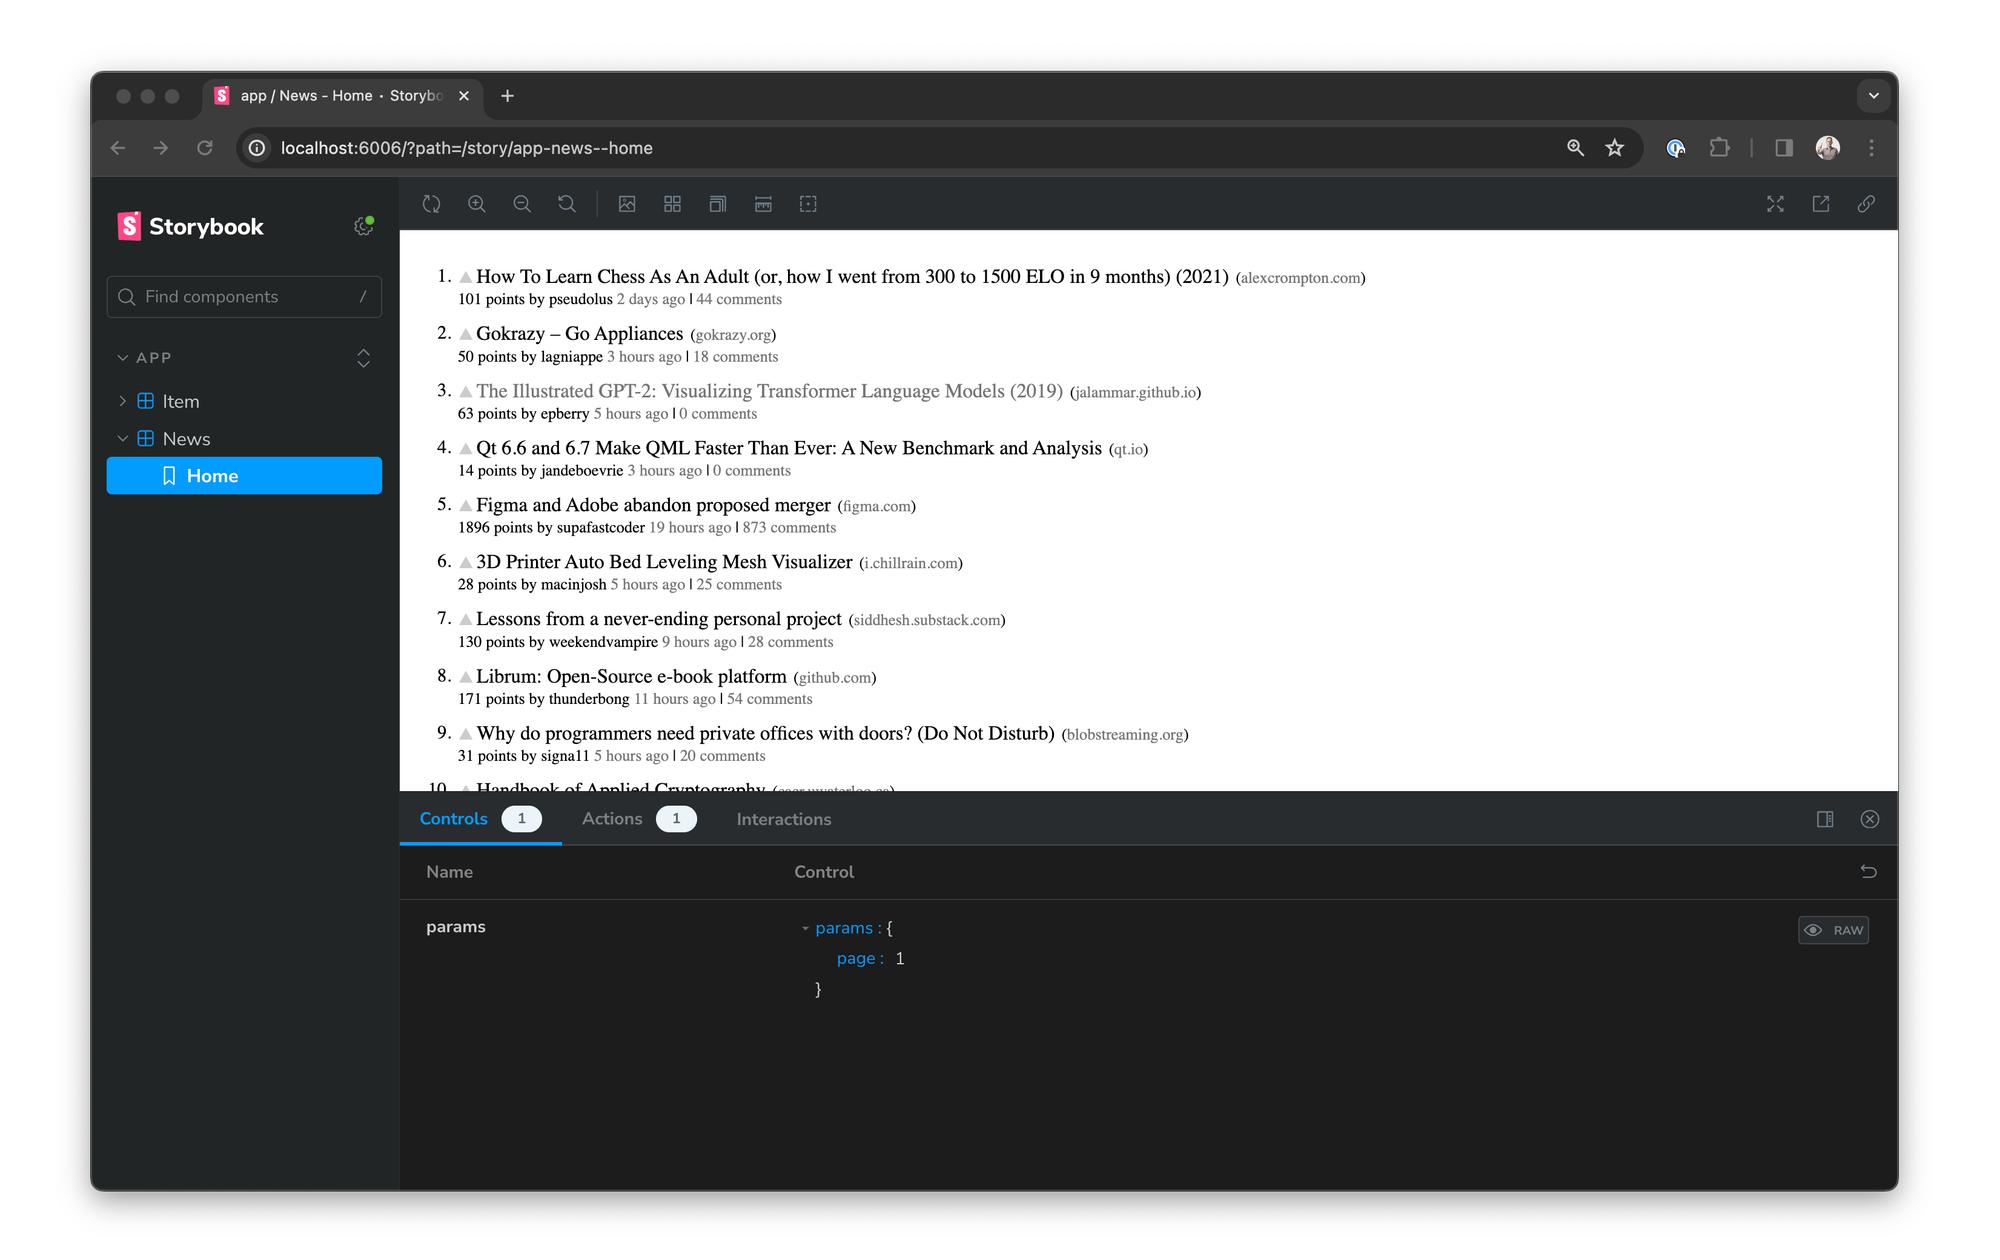
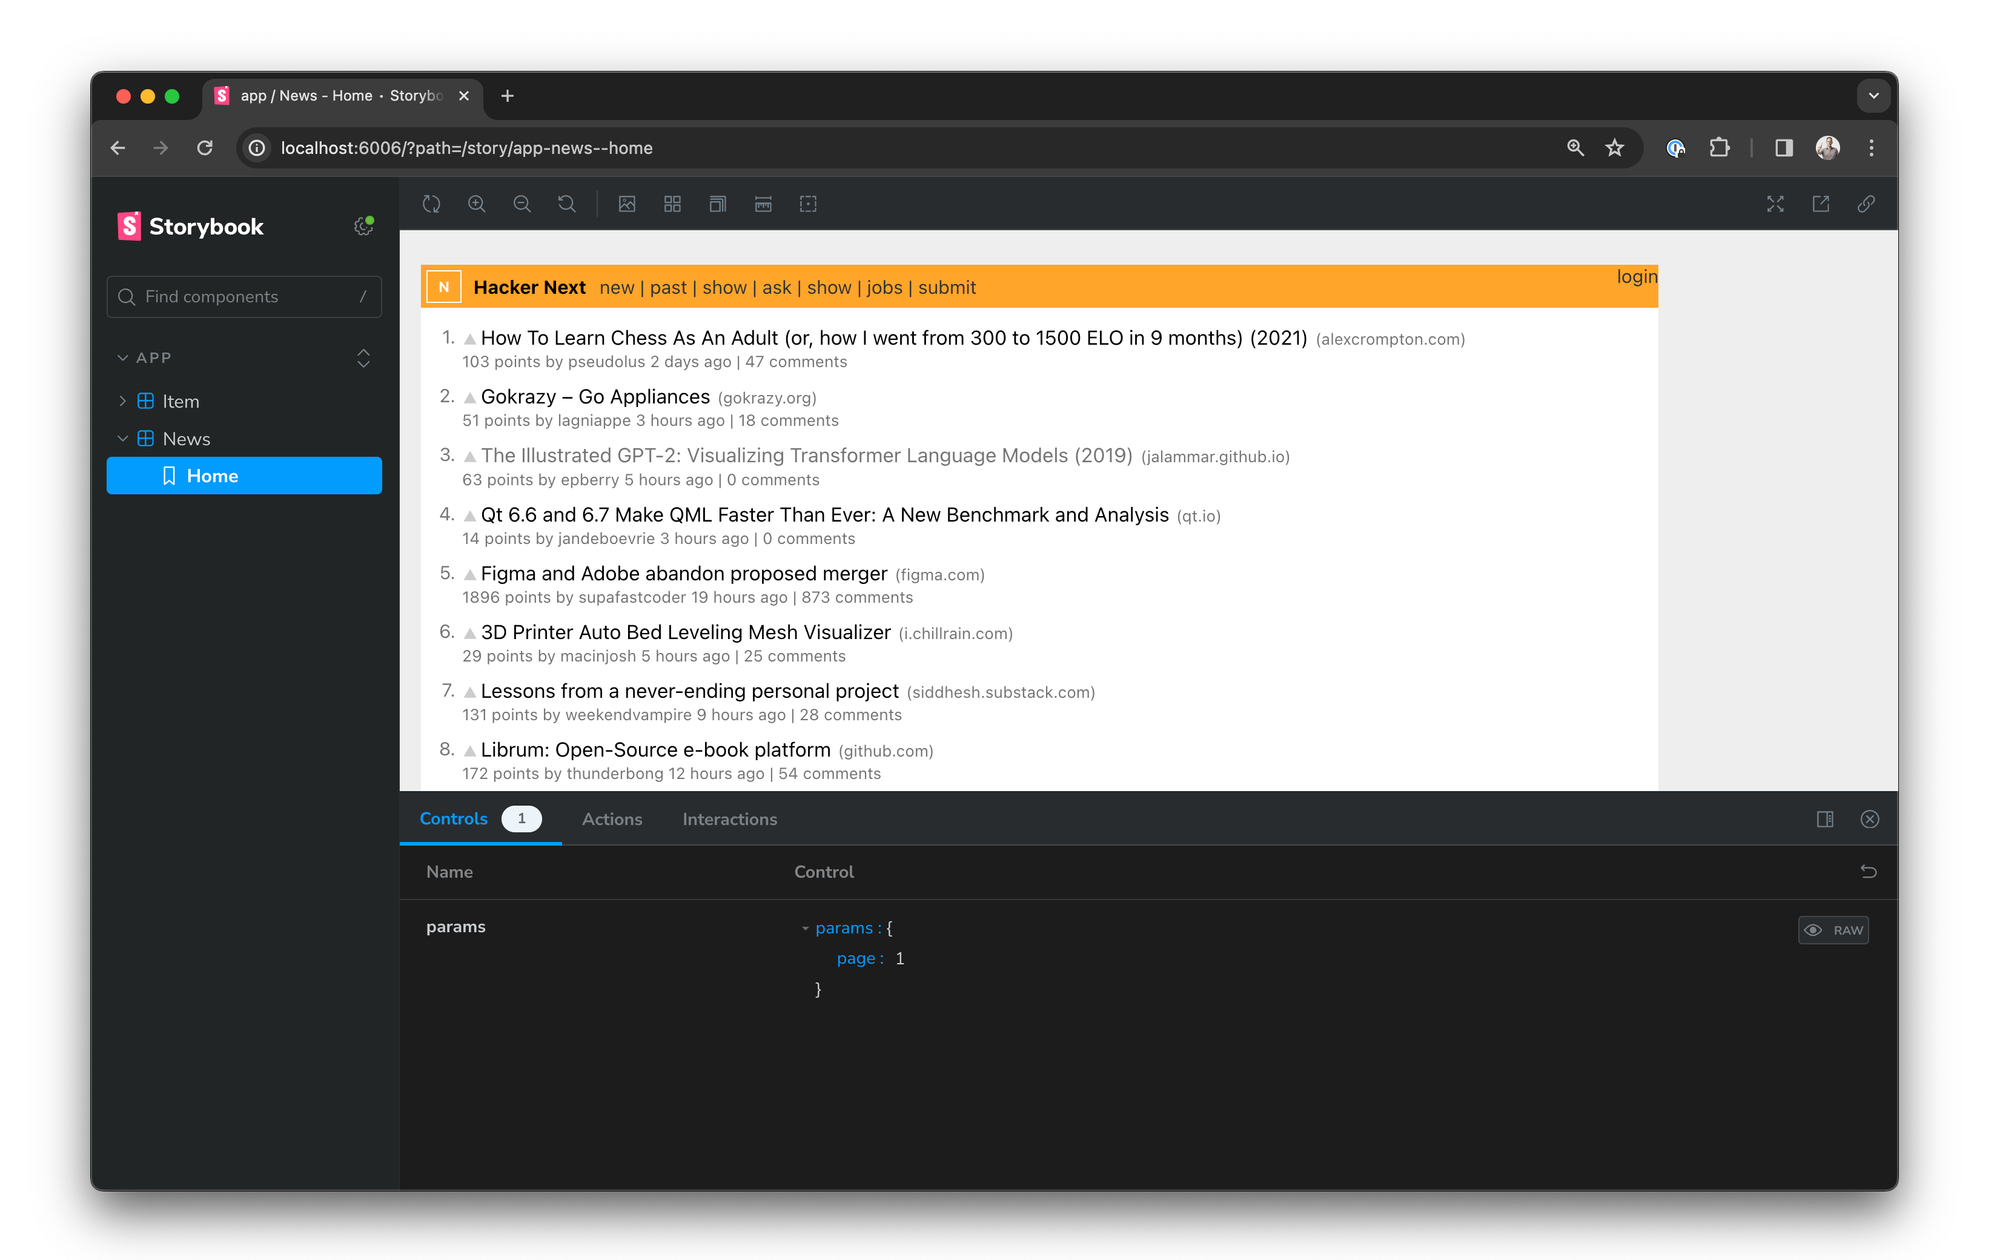
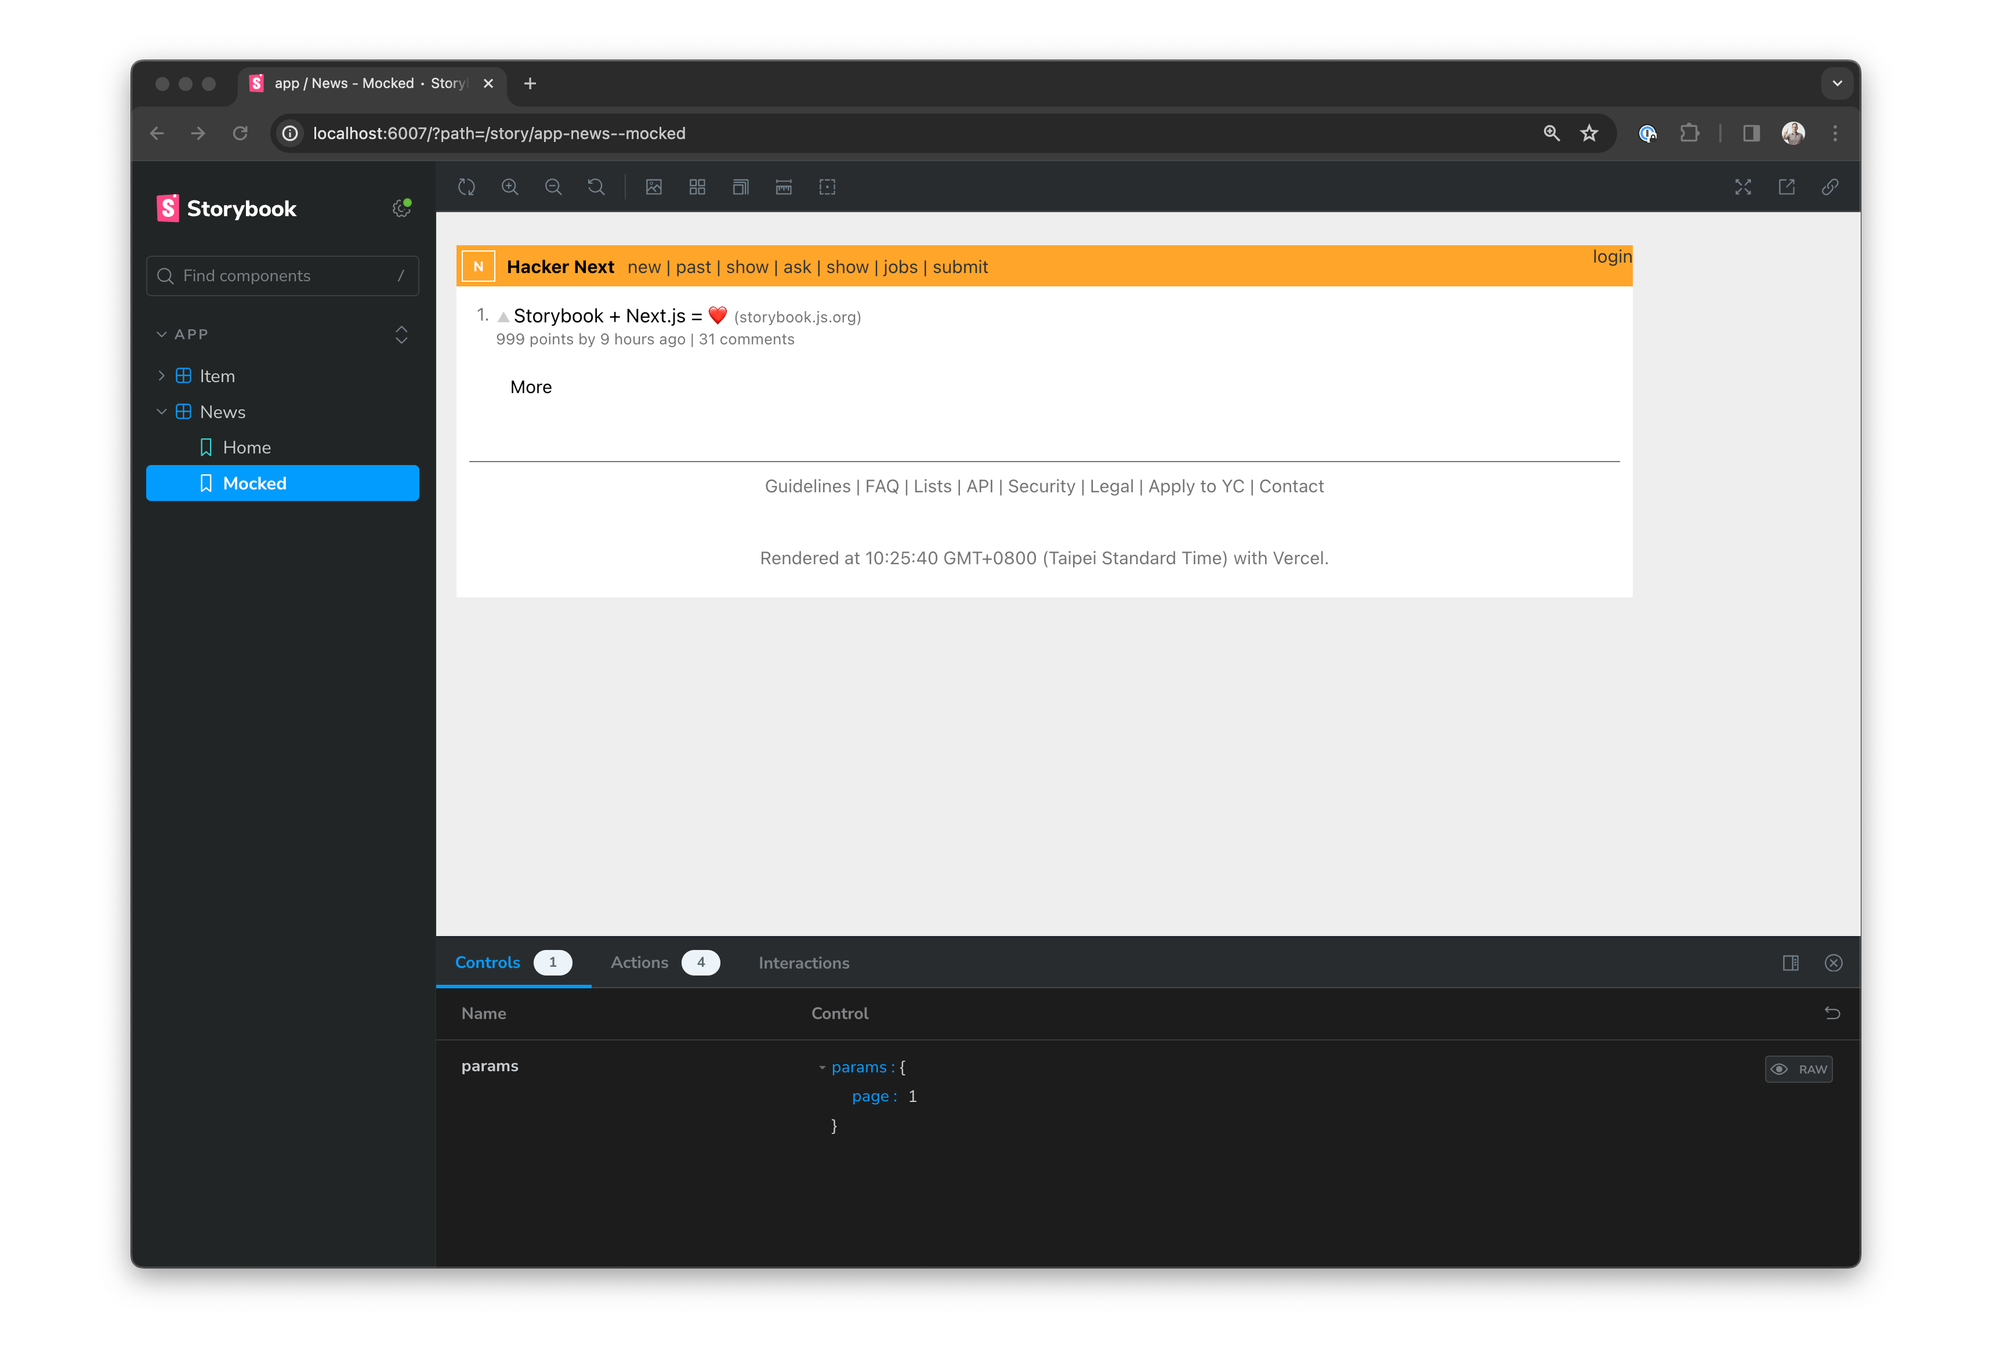
}Now, let’s create a story for Hacker Next’s homepage, featuring a single post:
// app/news/[page]/index.stories.tsx
import { http, HttpResponse } from 'msw'

// ...existing meta/story

export const Mocked = {
  ...Home,
  parameters: {
    msw: {
      handlers: [
        http.get('https://hacker-news.firebaseio.com/v0/topstories.json', () => {
          return HttpResponse.json([1]);
        }),
        http.get('https://hacker-news.firebaseio.com/v0/item/1.json', () => {
          return HttpResponse.json({
            id: 1,
            time: Date.now(),
            user: 'shilman',
            url: 'http://storybook.js.org',
            title: 'Storybook + Next.js = ❤️',
            score: 999,
          });
        }),
      ],
    },
  },
};
By mocking two REST API requests from the frontend and hard-coding the responses, we get the following story:
MSW data factories
Hard-coded API responses are difficult to scale. So, let’s write a story that controls page content with a higher level argument! We’ll need to:
- Build a simplified in-memory database
- Create MSW handlers that read from the database and generate the desired network responses
- Write stories to populate the database with test cases
Step 1: Build the database
First, let’s create the database using @mswjs/data (MSW’s data factory library) and Faker.js.
// data.mock.ts

import { faker } from '@faker-js/faker'
import { drop, factory, primaryKey } from '@mswjs/data

let _id;
const db = factory({
  item: {
    id: primaryKey(() => _id++),
    time: () => faker.date.recent({ days: 2 }).getTime() / 1000,
    user: faker.internet.userName,
    title: faker.lorem.words,
    url: faker.internet.url,
    score: () => faker.number.int(100),
  }
})

/** Reset the database */
export const reset = (seed?: number) => {
  _id = 1
  faker.seed(seed ?? 123)
  return drop(db)
}

/** Create a post. Faker will fill in any missing data */
export const createPost = (item = {}) => db.item.create(item);

/** Utility function */
export const range = (n: number) => Array.from({length: n}, (x, i) => i);

/** Return all the post IDs */
export const postIds = () => db.item.findMany({}).map((p) => p.id);

/** Return the content of a single post by ID */
export const getItem = (id: number) => db.item.findFirst({ where: { id: { equals: id }}});
This lets you specify the posts exactly as you want them to appear. When we leave any data unspecified, Faker fills in the gaps. This way, you can create tens or hundreds of posts with minimal code!
Step 2: Create MSW handlers
Next, we’ll update .storybook/preview.tsx with MSW handlers that read from the database. These handlers are available across all your stories and read whatever’s in the database. This means a story’s only job is to fill the database with useful data!
// .storybook/preview.tsx

import { postIds, getItem } from '../lib/data.mock.ts';
import { http, HttpResponse } from 'msw'

const preview: Preview = {
  // ...existing configuration
  parameters: { msw: { handlers: [
    http.get(
      'https://hacker-news.firebaseio.com/v0/topstories.json',
      () => HttpResponse.json(postIds())
    ),
    http.get<{ id: string }>(
      'https://hacker-news.firebaseio.com/v0/item/:id.json',
      ({ params }) => HttpResponse.json(getItem(parseInt(params.id, 10)))
    )
  ] } },
};
Step 3: Write stories
Finally, we’ll write stories for our new setup.
First, replace your existing Mocked story with a new version using a loader (a function that runs before a story renders). This loader calls our createPost helper function, which 1) instantiates a post and 2) adds it to the in-memory database.
// app/news/[page]/index.stories.tsx
import { createPost } from '../../../lib/data.mock';
// ...existing meta/story
export const MockedNew = {
...Home,
loaders: [() => {
createPost({
id: -1,
user: 'shilman',
url: 'http://storybook.js.org',
title: 'Storybook + Next.js = ❤️',
score: 999,
});
}],
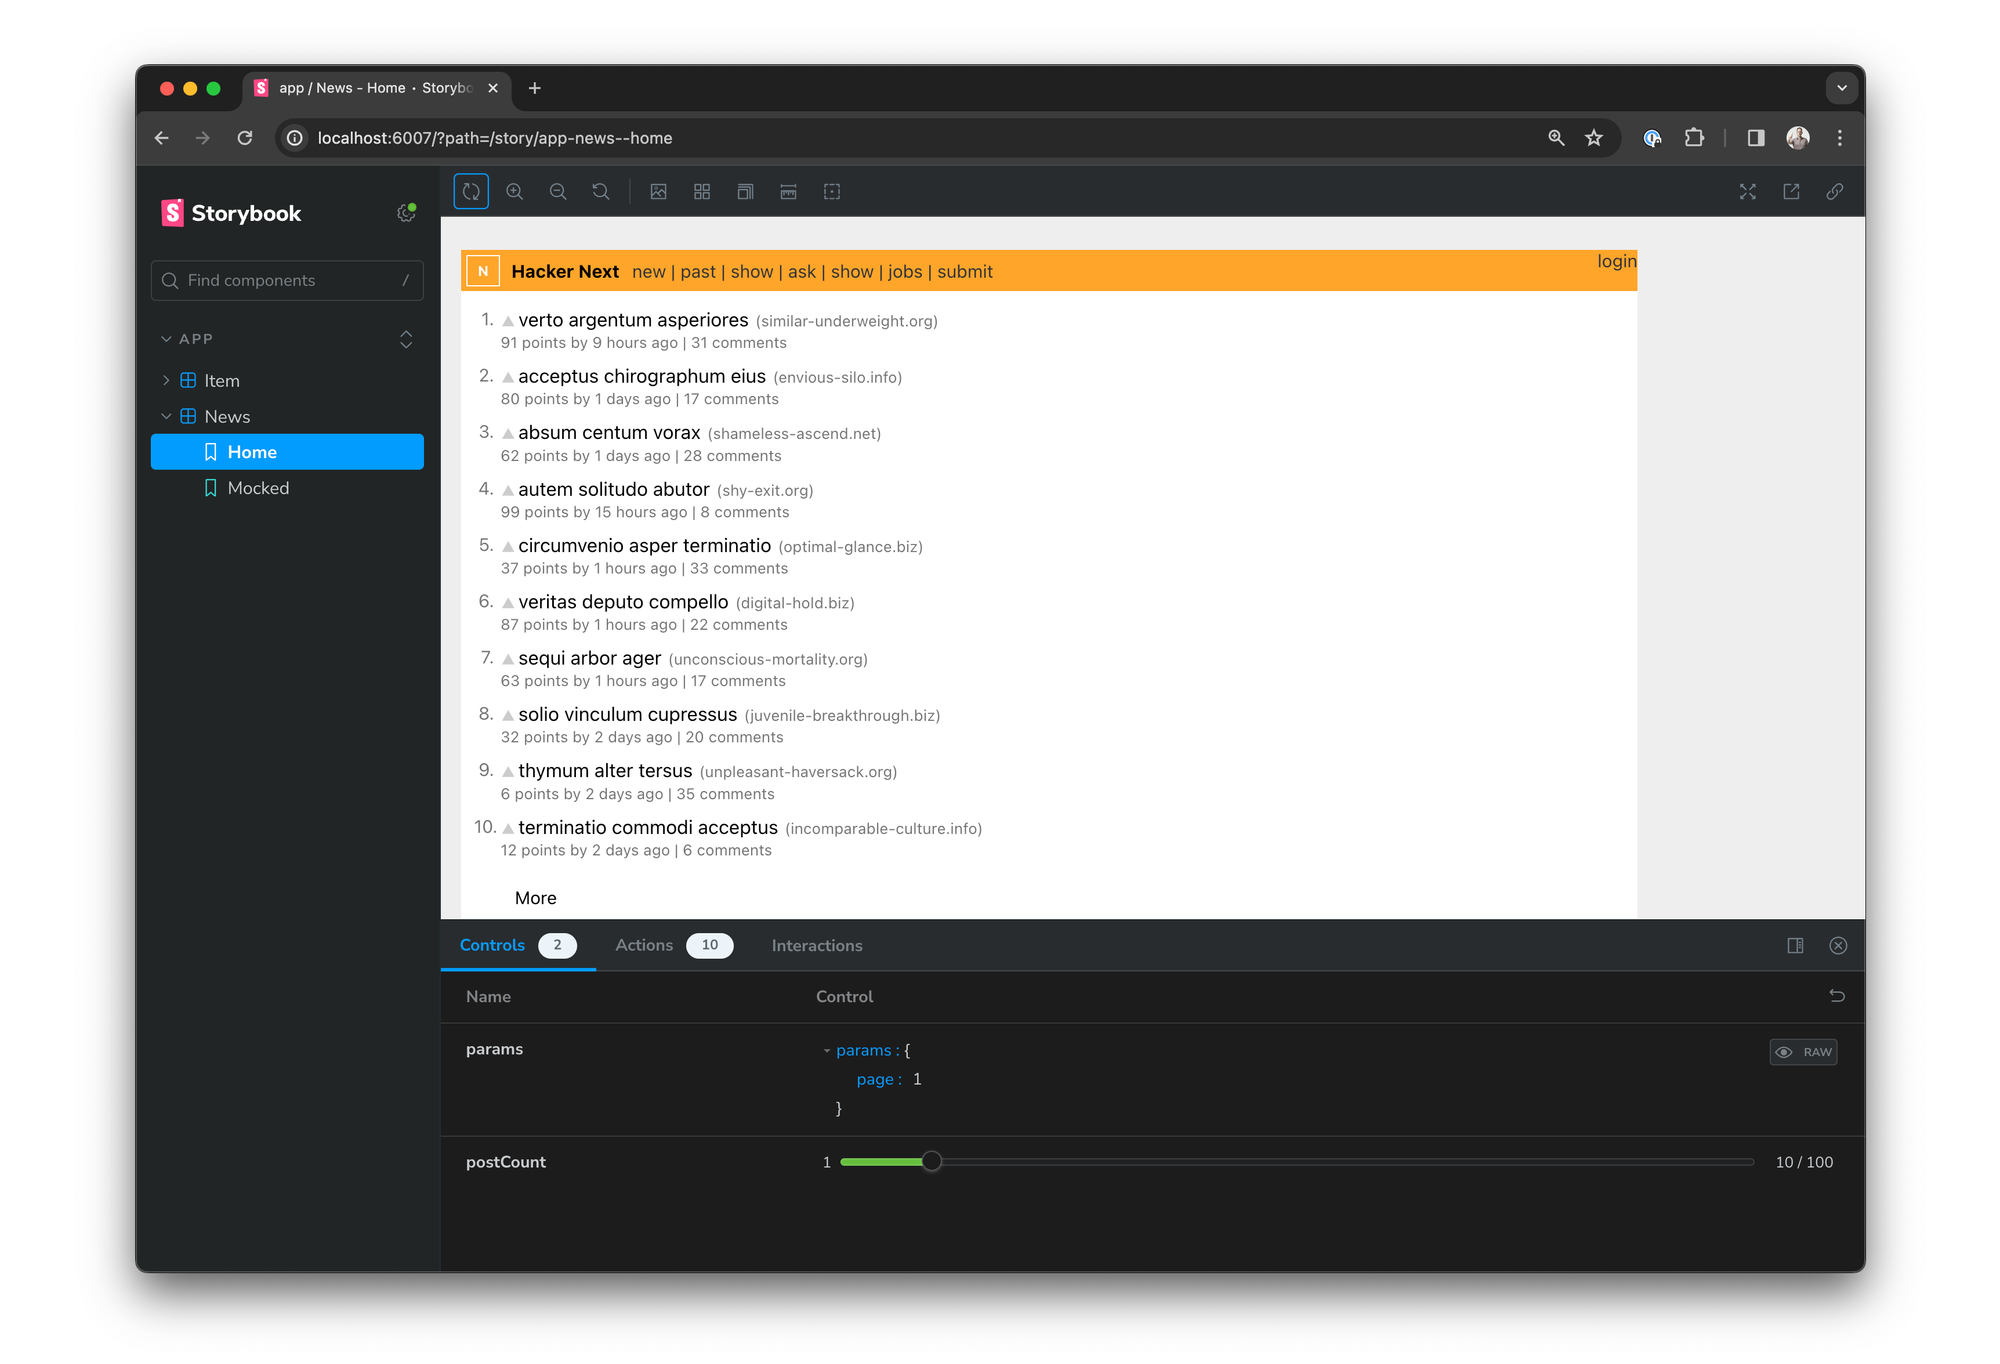
};This scheme really shines when you need to create a lot of data at once. To demonstrate this, let’s create a homepage showing 30 posts. And to make it even more powerful, we can allow the number of posts to be controlled interactively in Storybook’s UI:
// app/news/[page]/index.stories.tsx

import { createPost, range, reset  } from '../../../lib/data.mock'

export const FullPage = {
  args: {
    postCount: 30,
  },
  loaders: [({ args: { postCount } }) => {
    reset();
    range(postCount).forEach(() => createPost());
  }];
}
It’s time to test
Congratulations! You’ve built Hacker Next in Storybook with data that you can customize for different tests. Alternatively, view a demo Storybook (shared via Chromatic) or our repo.
As well as bringing your UI into one place, you’re able to test Hacker Next in ways you couldn’t otherwise.
For example, you can write stories for Hacker Next’s upvote and collapsing comment states by using Storybook’s play function. This is a code snippet that simulates user interactions and runs immediately after a story renders. It can interact with the DOM using Testing-Library and assert using Vitest’s expect and spies.
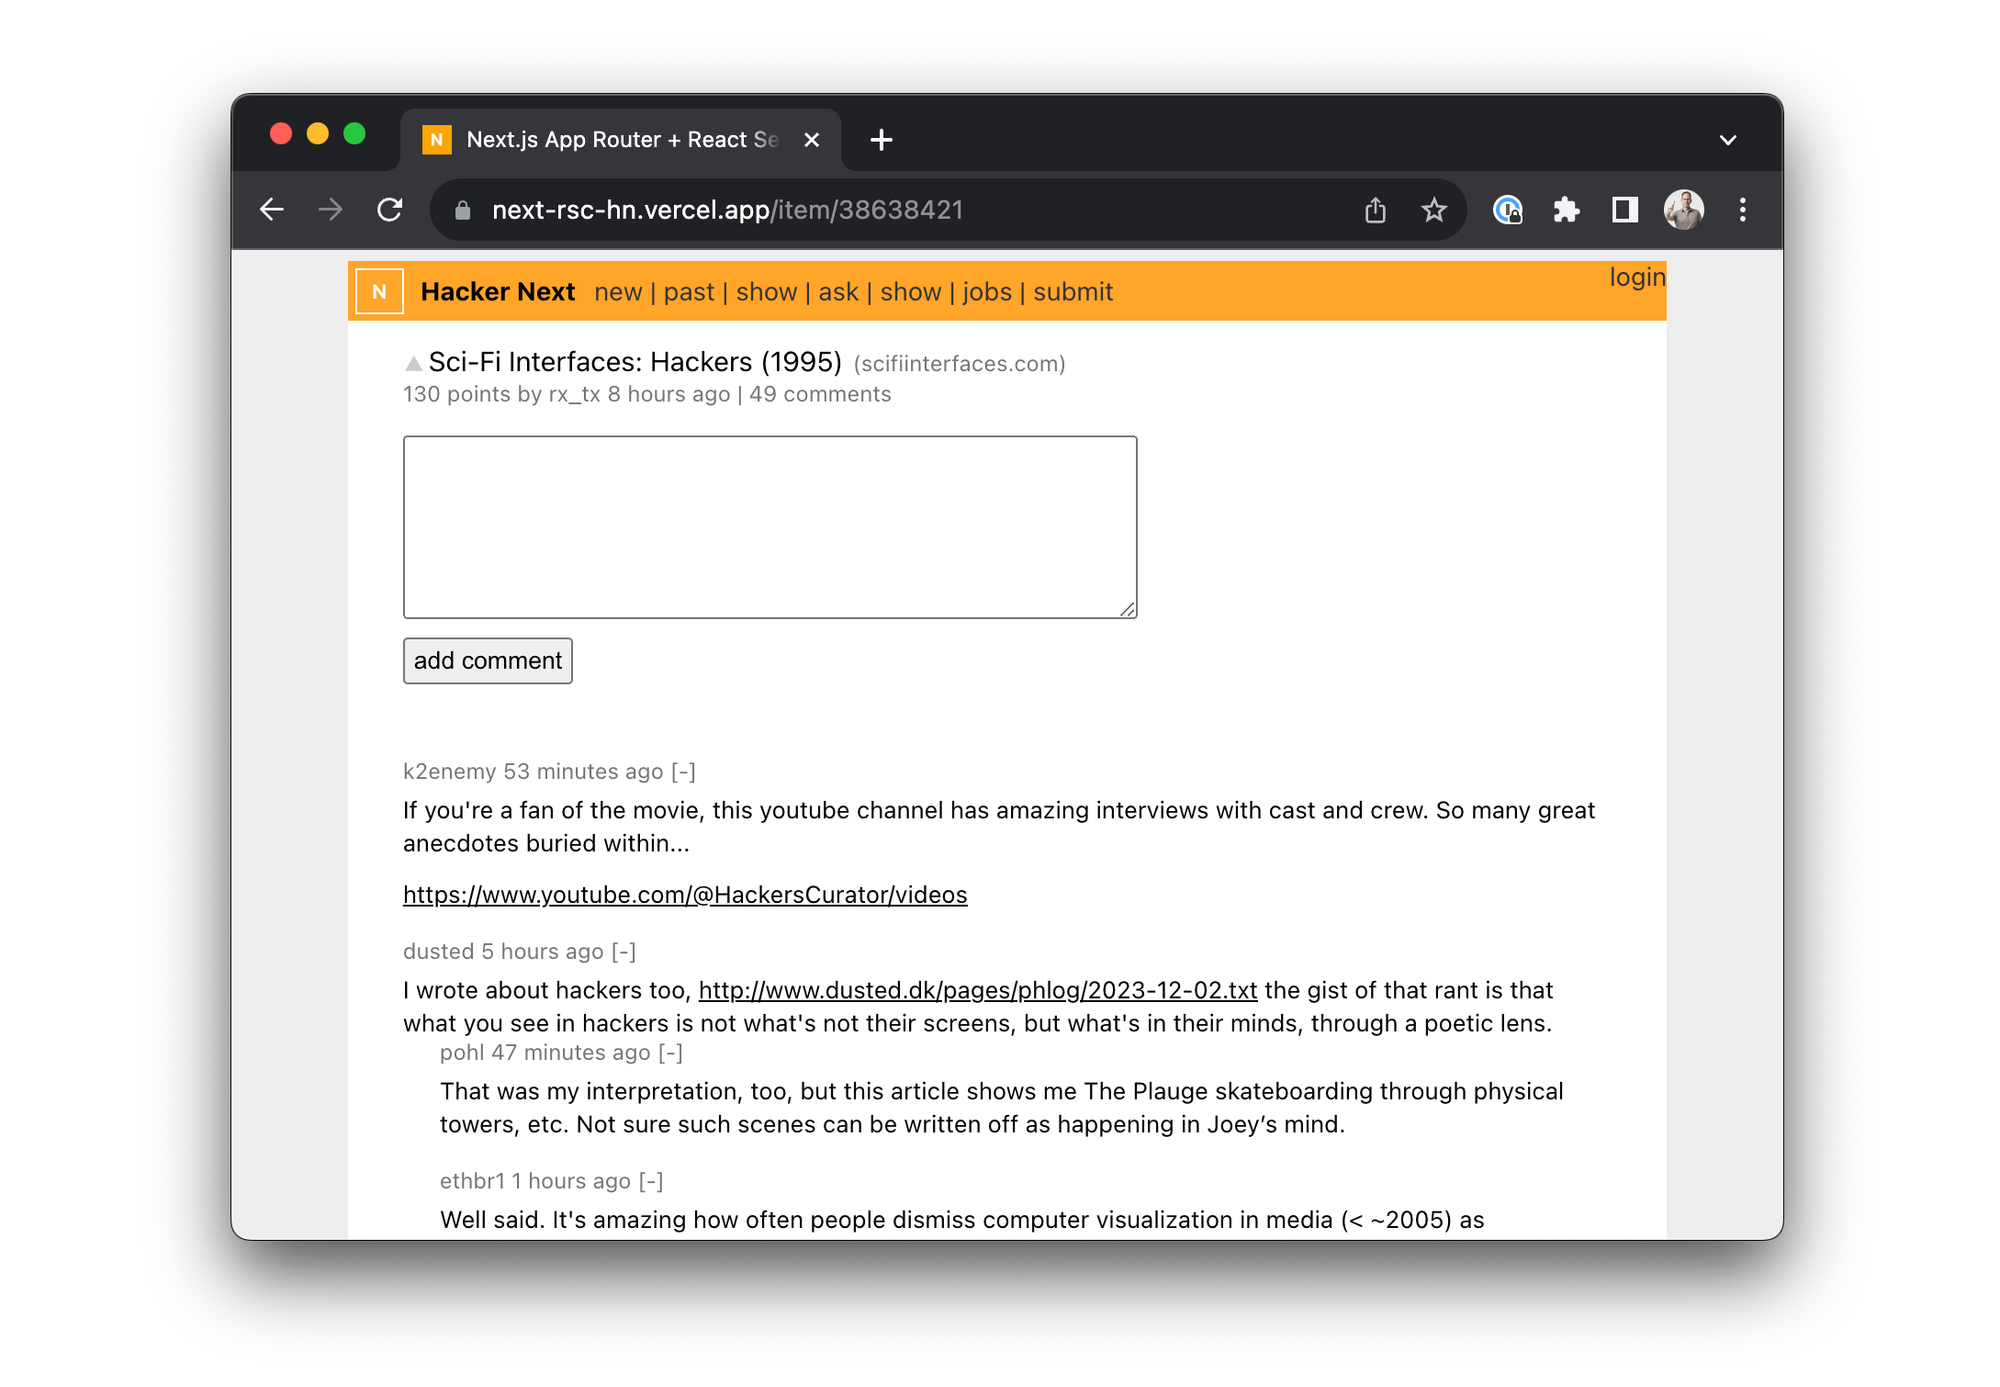
Here’s a story that uses a play function to upvote the first post on the homepage:
// app/news/[page]/index.stories.tsx

import { within, userEvent } from '@storybook/test';

export const Upvoted: Story = {
  ...FullPage,
  play: async ({ canvasElement }) => {
    const canvas = within(canvasElement)
    const votes = await canvas.findAllByText('▲')
    await userEvent.click(votes[0])
  }
}
Bringing it all together
In this exercise, we’ve cataloged the key UI states of a Next.js application. Once we have this all in Storybook, we can:
- Develop against mocked data even if our backend is under development
- Develop hard-to-reach UI states such as a ‘credit card expired’ screen
- Instantly run visual regression and a11y tests on every screen, testing across browsers and different resolutions
- View production stories next to their design files to ensure smooth handoff
- Onboard new developers with living and comprehensive documentation of the entire frontend architecture
- Learn more about using Next.js with Storybook
Storybook revolutionized the development of reusable components. Now, you can apply those same benefits to the pages of your applications.
In our next RSC post, we’ll explore module mocking to handle real-world cases where it’s impossible or impractical to mock network requests.
Storybook 8 (our next major release) brings React Server Components support to Storybook!
— Storybook (@storybookjs) January 18, 2024
In our new tutorial, learn how to build, document and test an RSC app in isolation with @nextjs, Storybook, and @ApiMocking ≫https://t.co/SVZ3TNJw1I
Credits
Thanks to Artem Zakharchenko (MSW’s core maintainer) and the Next.js team for their review and guidance!