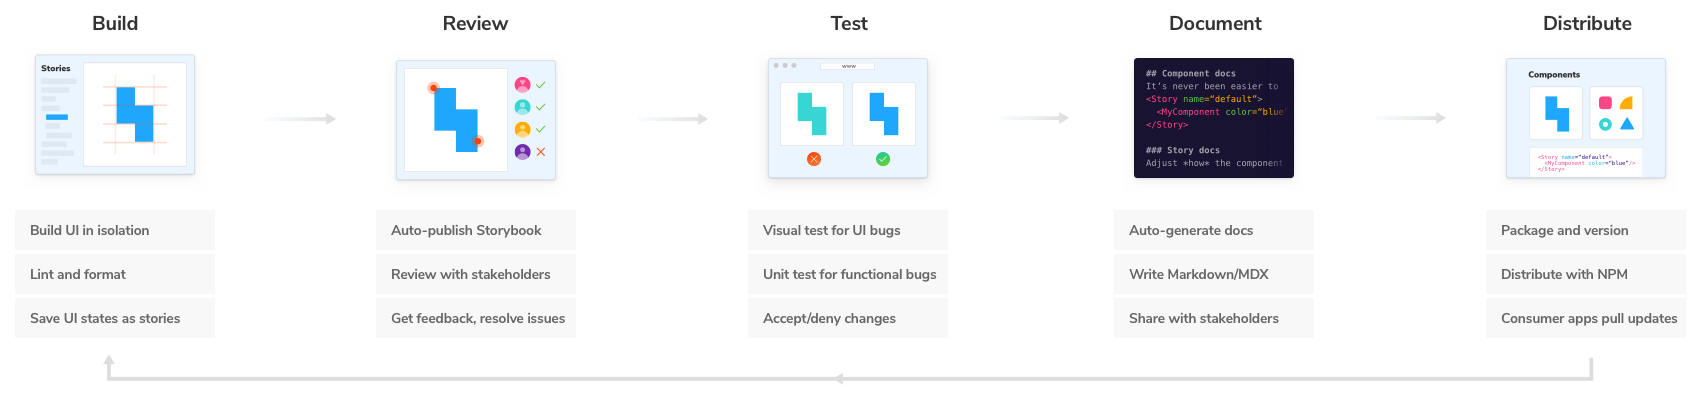
设计系统的工作流程
前端工具如何协同工作去实现最终目标对设计团队和开发团队有着非常重大的意义。如果做得好,开发和重用组件应该是无缝衔接的。
这一章我们将演示通过五步工作流程去开发一个新的 AvatarList 组件。
编写
AvatarList 是一个显示多个 avatar 的组件。和其他设计系统的组件一样,AvatarList 组件被粘贴到各个项目中。因此,我们必须将该组件添加到我们的设计系统中去。在此案例中,我们假设组件已经在其他项目中被开发完成了。
![]()
首先,在 git 上创建一个新的分支来追踪后续工作:
git checkout -b create-avatar-list-component
下载 AvatarList 组件到您本地机器,并将它保存在 /src 目录:
Storybook 被配置为默认识别以 \*.stories.js 结尾的文件,并将他们显示到 UI 中。
![]()
赞!我们来看一下 AvatarList 支持的 UI 状态。乍一看,它支持一些和 Avatar 组件一样的属性(如: small 和 loading)。
export const smallSize = () => <AvatarList users={users.slice(0, 2)} size="small" />;
export const loading = () => <AvatarList loading />;
![]()
由于它是一个列表,所以应该显示多个头像。让我们添加 stories 去分别演示很多个头像和只有几个头像的情况。
export const ellipsized = () => <AvatarList users={users} />;
export const bigUserCount = () => <AvatarList users={users} userCount={100} />;
export const empty = () => <AvatarList users={[]} />;
![]()
添加您的修改并提交.
git commit -am "Added AvatarList and stories"
文档
感谢 Storybook Docs 插件,我们只需要花一点点时间便可以得到内容可自定义的文档。它可以帮助其他人通过浏览 Storybook 的 Docs 页签去学习如何使用 AvatarList。
![]()
最小可行的文档!让我们添加如何使用 AvatarList 的上下文来让它更加易读:
/**
 * A list of Avatars, ellipsized to at most 3. Supports passing only a subset of the total user count.
 */
export function AvatarList({ loading, users, userCount, size, ...props }) {
添加一些组件支持属性的详细信息:
AvatarList.propTypes = {
  /**
   * Are we loading avatar data from the network?
   */
  loading: PropTypes.bool,
  /**
   * A (sub)-list of the users whose avatars we have data for. Note: only 3 will be displayed.
   */
  users: PropTypes.arrayOf(
    PropTypes.shape({
      id: PropTypes.string.isRequired,
      name: PropTypes.string,
      avatarUrl: PropTypes.string,
    })
  ),
  /**
   * The total number of users, if a subset is passed to `users`.
   */
  userCount: PropTypes.number,
  /**
   * AvatarList comes in four sizes. In most cases, you’ll be fine with `medium`.
   */
  size: PropTypes.oneOf(Object.keys(sizes)),
};
太简单了! 到目前为止我们的文档已经足够详细了 —— 我们可以使用 MDX 随时添加更多的自定义内容。
![]()
文档不需要花费太多精力,有了自动化工具,我们可以删除一些无用的信息然后直接添加我们想要的内容即可。
提交您的修改到 GitHub 上:
git commit -am “Improved AvatarList docs”
创建一个 pull request
让我们将 AvatarList 分支提交到 GitHub 上并创建一个 pull request :
git push -u origin `create-avatar-list-component`
然后打开 GitHub 创建一个 pull request :
![]()
审查
此时,AvatarList 作为设计系统的候选组件,干系人需要审查它来确定是否在功能和外观上达到了他们的期望。
设计系统的 Storybook 在每次提交请求后都会自动发布,这让审查变得格外简单。您可以在 pull request 的底部找到部署后的 Storybook 链接。
![]()
在线上的 Storybook 中找到 AvatarList,它应该和您本地运行的 Storybook 一模一样。
![]()
线上版本的 Storybook 是一个团队通用的参考样例,将 AvatarList 的链接分享给其他干系人来更快的获得反馈。您的团队成员会非常喜欢您,因为他们不用直接查看代码或者安装开发环境。
和团队的成员达成共识往往可能是徒劳的,因为他们可能参考了过时的代码,或者没有开发环境,或者将反馈散布在不同的工具上。通过在线的 Storybook 让审查变得像分享链接一样简单。
测试
我们的测试套件会在每次提交之后在后台运行。AvatarList 是一个简单的显示组件,所以不需要单元测试。但是如果我们查看提交请求检查,我们会发现视觉测试工具 Chromatic 已经识别出需要被审查的变化。
![]()
因为 AvatarList 是一个新的组件且未被视觉测试覆盖到,我们则需要为每个 story 去添加新的基准。在 Chromatic 中接受 “新 stories” 去扩大我们的视觉测试覆盖率。
![]()
当您操作完成后,Chromatic 的检查便会通过。
![]()
依次更新 GitHub 中的合并提交检查。
![]()
测试被成功的更新了。在以后,回溯将很难偷偷摸摸地就被加入到设计系统中。
发布
我们有一个正在进行的 pull request 去把 AvatarList 添加到设计系统中。我们已经编写了相关的 stories,测试已经通过并且也有相关的文档。最后,我们准备好使用 Auto 和 npm 来打包设计系统。
给 pull request 添加 minor 标签,这可以告诉 Auto 此次更新是一个小版本的更新。

现在合并您的 pull request 到主分支,您可以在 npm 网站中打开您的软件包并稍等几分钟(上传软件包)去查看新的版本。

成功了! 您的设计系统包已经成功上传。您不需要任何和命令行操作或使用繁杂的 npm。在实例中更新您的 learnstorybook-design-system 依赖项,然后开始使用 AvatarList。
开始您的旅程
针对开发人员的设计系统 着重介绍了专业团队使用的端到端的工作流程,帮助您能在开发自己的设计系统时先行一步。伴随着您的设计系统的发展、整理,您可以扩展这些工具来满足您团队的需求。
在第九章,我们将以完整的示例代码、有用的学习资源和回答开发常见问题作为结尾。