시각적 테스트 자동화
자연스러운 개발 과정에서 버그(bug)가 생기는 것을 막을 수는 없습니다. 시각적 테스트 자동화는 기계를 사용해 사용자가 검토할 UI 외관의 변화를 감지합니다.
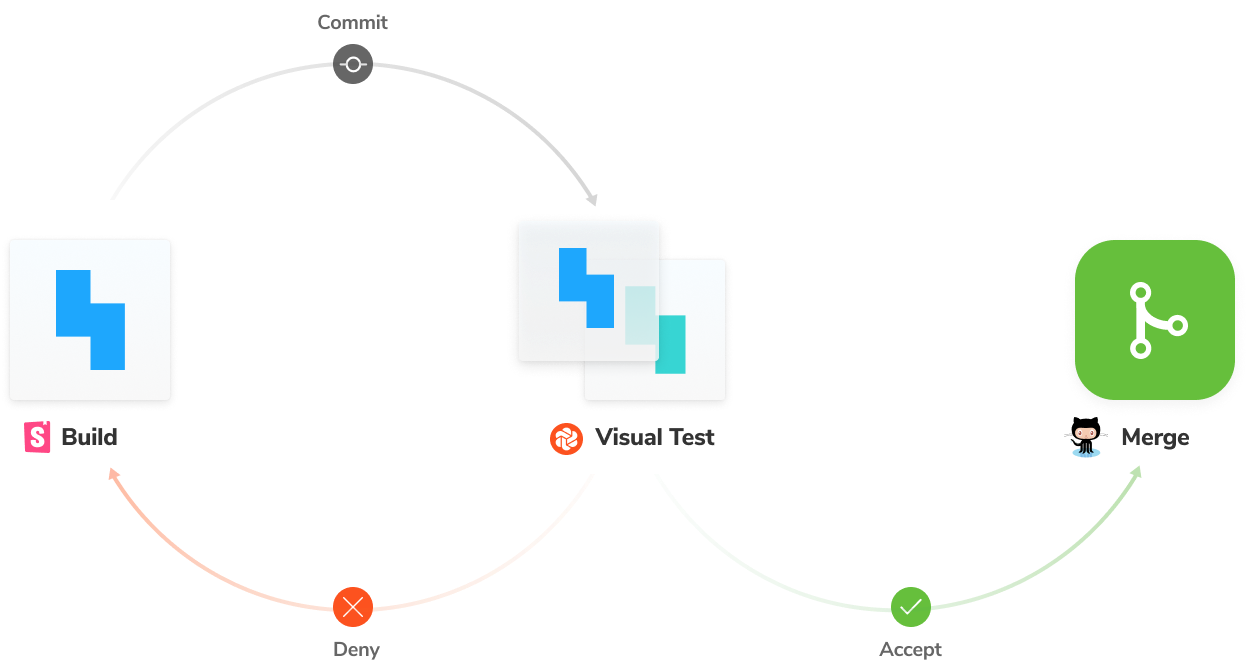
핵심만 말하자면, 각 컴포넌트의 변화형(variation)마다 이미지 스냅샷을 찍습니다. 이는 시각적 테스트의 '기준선(baseline)'으로 쓰입니다. 각 commit마다, 새 스냅샷을 찍고, 이 기준선과 픽셀 하나하나를 비교합니다. 혹시 UI에 변한 부분이 있으면, 버그인지 의도적인 변경인지 검토해달라고 알림을 받습니다.
깃허브(Github) 저장소를 구축하기
시작하기 전에, 로컬 CommentList 코드가 원격 버전 관리 서비스와 동기화되어야 합니다.
깃허브에 접속하여 프로젝트 여기)의 새로운 저장소를 만듭니다. 지역 프로젝트와 마찬가지로 저장소(repo)의 이름을 "commentlist"로 지정합니다.
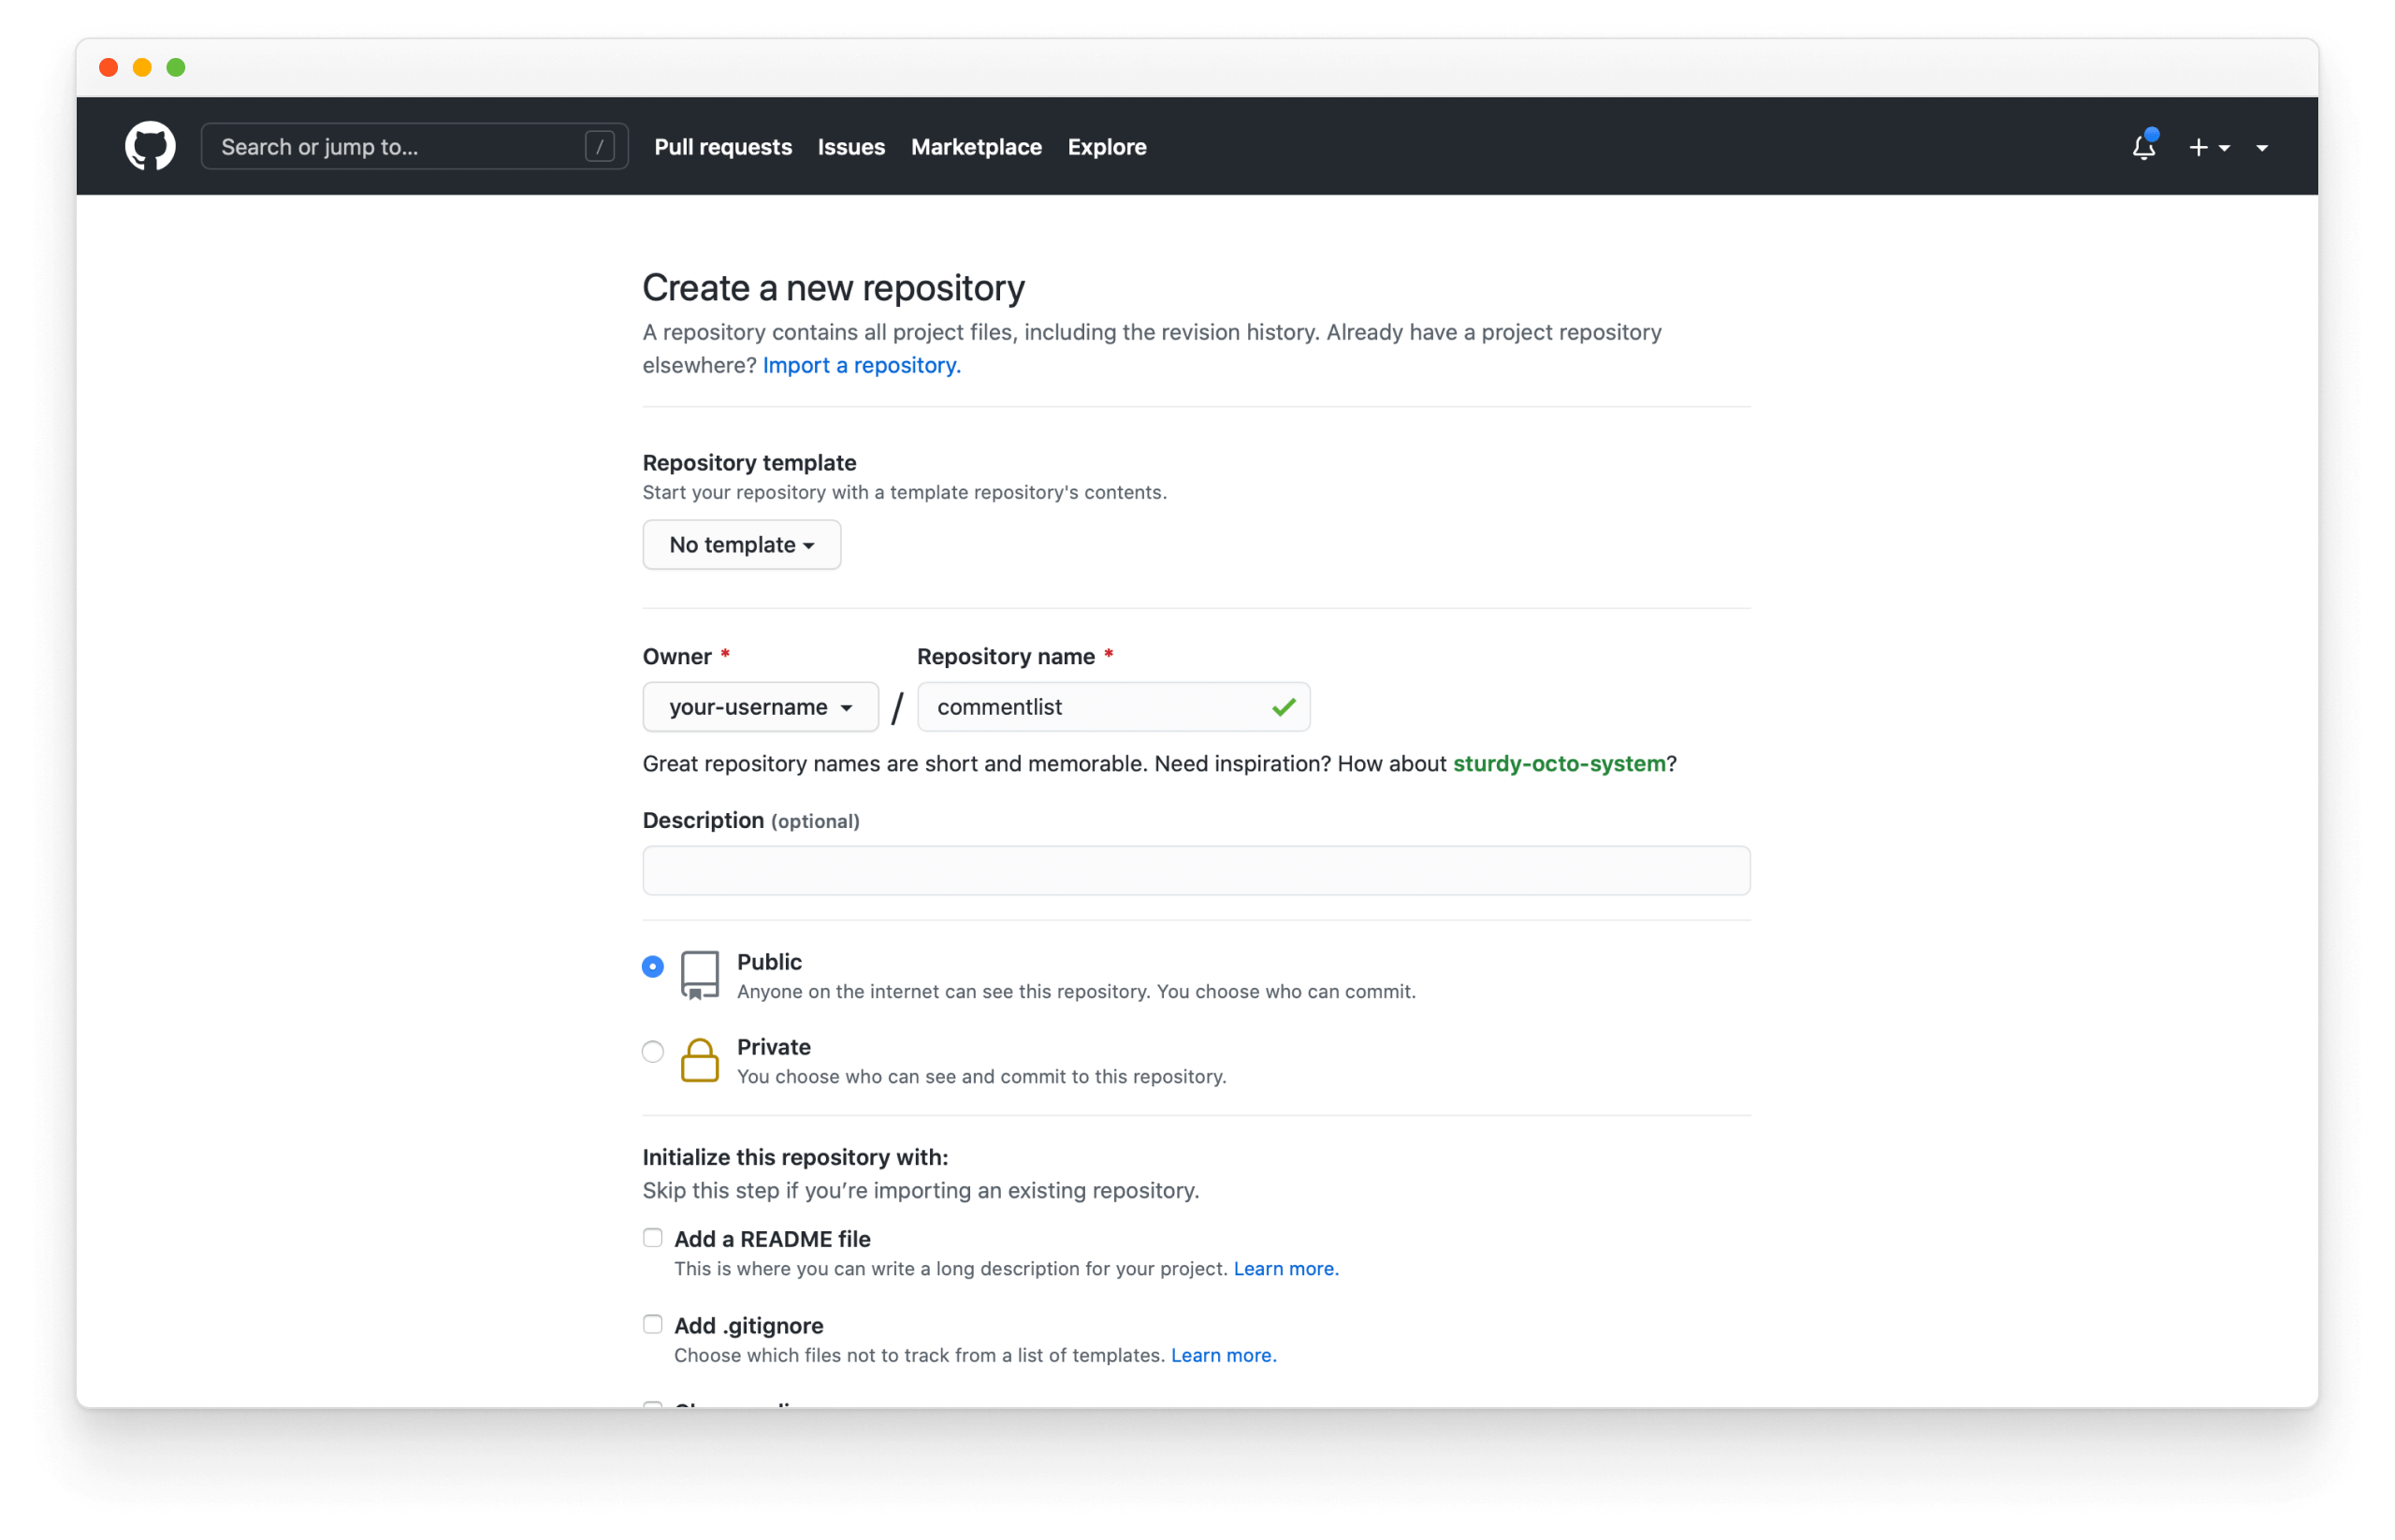
그런 다음 지침에 따라 저장소를 설정합니다. your-username을 깃허브 계정명으로 바꿉니다.
git init
git add .
git commit -m "first commit"
git branch -M main
git remote add origin https://github.com/your-username/commentlist.git
git push -u origin main
크로마틱(Chromatic) 설정
Chromatic by Storybook maintainers를 사용하여 이미지 스냅샷 프로세스를 시연합니다. chromatic.com)에 접속하여 깃허브 계정으로 가입하세요.
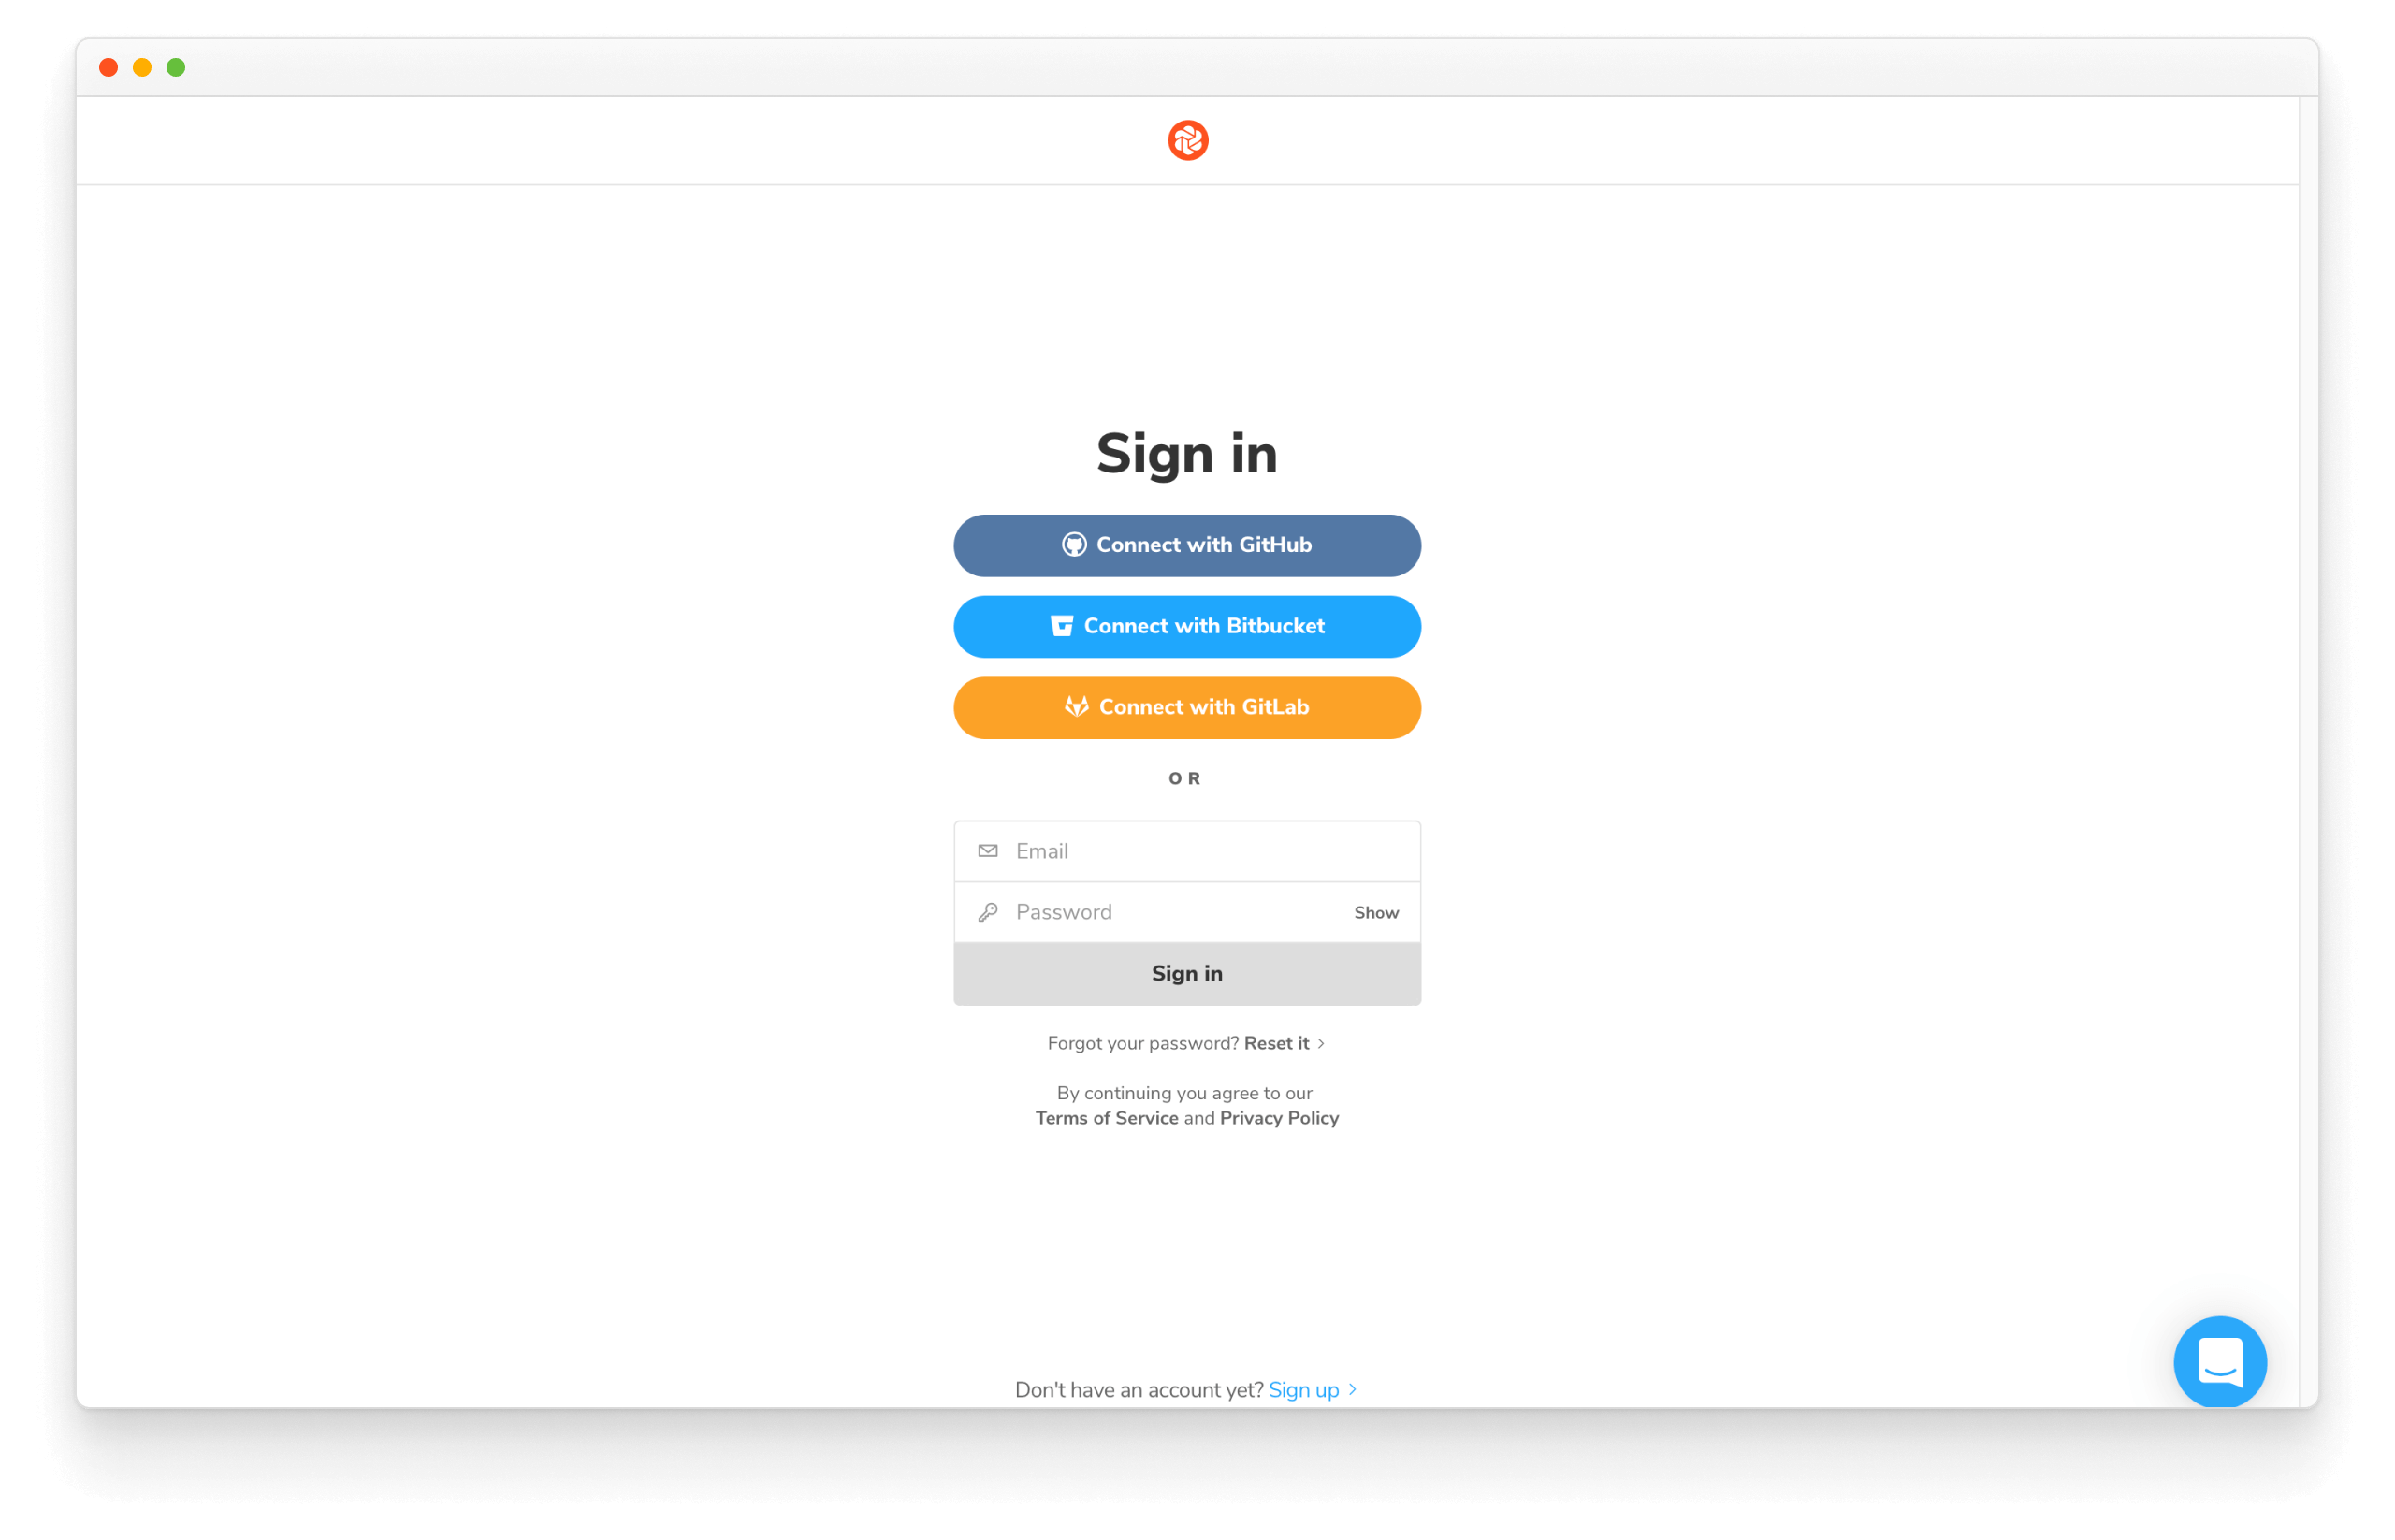
여기서 방금 만든 저장소를 선택합니다.
UI 테스트는 클라우드 브라우저 환경의 모든 스토리의 이미지 스냅샷을 캡처합니다. 코드를 push할 때마다 크로마틱은 새 스냅샷 집합을 생성하여 기준선과 비교합니다. 시각적 변화가 있는 경우 의도적인 것인지 확인합니다.
기준선 설정
프로젝트에 개발 패키지로 크로마틱을 추가합니다 -
yarn add -D chromatic
설치가 완료되면 필요한 모든 것을 얻을 수 있습니다. 지금이야말로 변경을 리모트 저장소로 commit하고 push할 절호의 기회입니다.
git add .
git commit -m "Added Chromatic"
git push
크로마틱 명령어로 스토리북을 제작하여 퍼블리싱하세요. 웹사이트에서 project-token 를 하나의 크로마틱 공급 장치로 교체하는 것을 잊지 마세요.
yarn chromatic --project-token=<project-token>
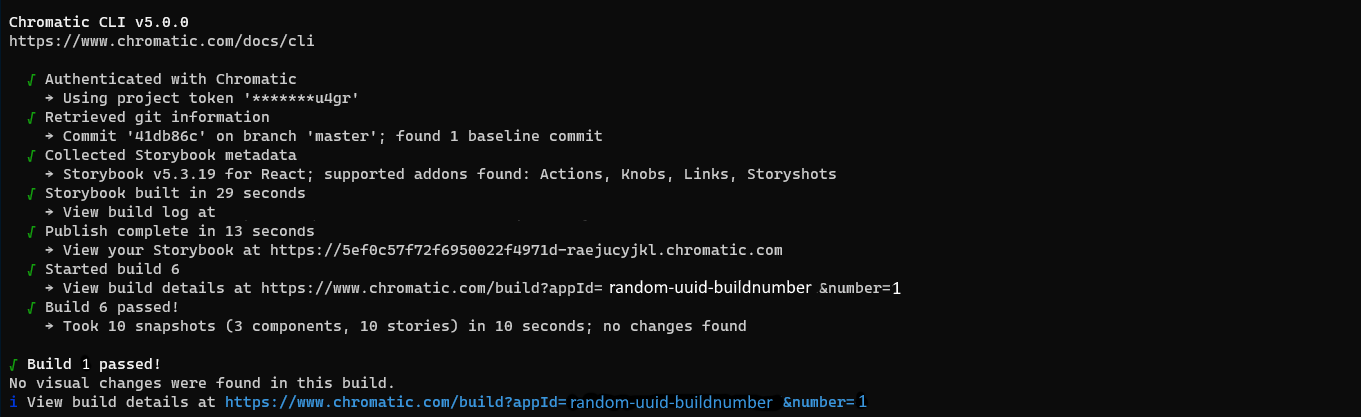
이 명령어 하나로 스토리북을 퍼블리싱하고 크로매틱이 각 스토리(story)(표준 클라우드 브라우저에서)의 이미지 스냅샷을 캡처하고 스냅샷을 기준으로 설정하도록 했습니다.
이후 빌드(build)는 UI 변경을 감지하기 위해 기존 기준선과 비교되는 새 스냅샷을 생성합니다.
테스트를 실행하기
풀 리퀘스트(PR)가 UI 변경을 포함하고 있다면, 크던 작던, 시각적 테스트를 실행하는 게 유용합니다. 크로마틱은 새 스냅샷들을 이전 빌드에서 만들었던 기존의 기준선과 비교할 겁니다.
그럼 이 개념을 설명하기 위해 UI를 약간 변경해 보겠습니다.
git checkout -b change-commentlist-outline
CommentList 컴포넌트를 약간 뒤틀어봅니다.
import styled, { createGlobalStyle } from 'styled-components';

interface Author {
  name: string;
  avatar: string;
}

interface Comment {
  text: string;
  author: Author;
}

export interface CommentListProps {
  /**
   * Is the component in the loading state
   */
  loading?: boolean;

  /**
   * Total number of comments
   */
  totalCount?: number;

  /**
   * List of comments
   */
  comments?: Comment[];
}

const CommentListWrapper = styled.div`
  font-family: "Nunito Sans", "Helvetica Neue", Helvetica, Arial, sans-serif;
  color: #333;
  display: inline-block;
  vertical-align: top;
  width: 265px;
`;

const CommentItem = styled.div`
  font-size: 12px;
  line-height: 14px;
  clear: both;
  height: 48px;
  margin-bottom: 10px;
  box-shadow: rgba(0, 0, 0, 0.2) 0 0 10px 0;
  background: linear-gradient(
    120deg,
    rgba(248, 248, 254, 0.95),
    rgba(250, 250, 250, 0.95)
  );
  border-radius: 48px;
+ border: 4px solid red;
+ font-weight: bold;
`;

const Avatar = styled.div`
  float: left;
  position: relative;
  overflow: hidden;
  height: 48px;
  width: 48px;
  margin-right: 14px;
  background: #dfecf2;
  border-radius: 48px;
`;

const AvatarImg = styled.img`
  position: absolute;
  height: 100%;
  width: 100%;
  left: 0;
  top: 0;
  z-index: 1;
  background: #999;
`;

const Message = styled.div`
  overflow: hidden;
  padding-top: 10px;
  padding-right: 20px;
`;

const Author = styled.span`
  font-weight: bold;
`;

const CommentText = styled.span``;

const GlobalStyle = createGlobalStyle`
   @import url('https://fonts.googleapis.com/css?family=Nunito+Sans:400,400i,800');
 `;

/**
* The Commentlist component should display the comments from the user.
*/
export default function CommentList({
  loading = false,
  comments = [],
  totalCount = 10,
}: CommentListProps) {
  if (loading) {
    return <div>loading</div>;
  }
  if (comments.length === 0) {
    return <div>empty</div>;
  }
  return (
    <>
      <GlobalStyle />
      <CommentListWrapper>
        {comments.map(({ text, author: { name, avatar } }) => (
          <CommentItem key={`comment_${name}`}>
            <Avatar>
              <AvatarImg src={avatar} />
            </Avatar>
            <Message>
              <Author>{name}</Author> <CommentText>{text}</CommentText>
            </Message>
          </CommentItem>
        ))}
      </CommentListWrapper>
    </>
  );
}
변경사항을 commit하고, 저장소에 push한 뒤에 크로마틱을 실행합니다.
git commit -am "make CommentList sparkle"
git push -u origin change-commentlist-outline
yarn chromatic --project-token=<project-token>
깃허브 저장소에서 새 브랜치를 위한 풀 리퀘스트를 엽니다.
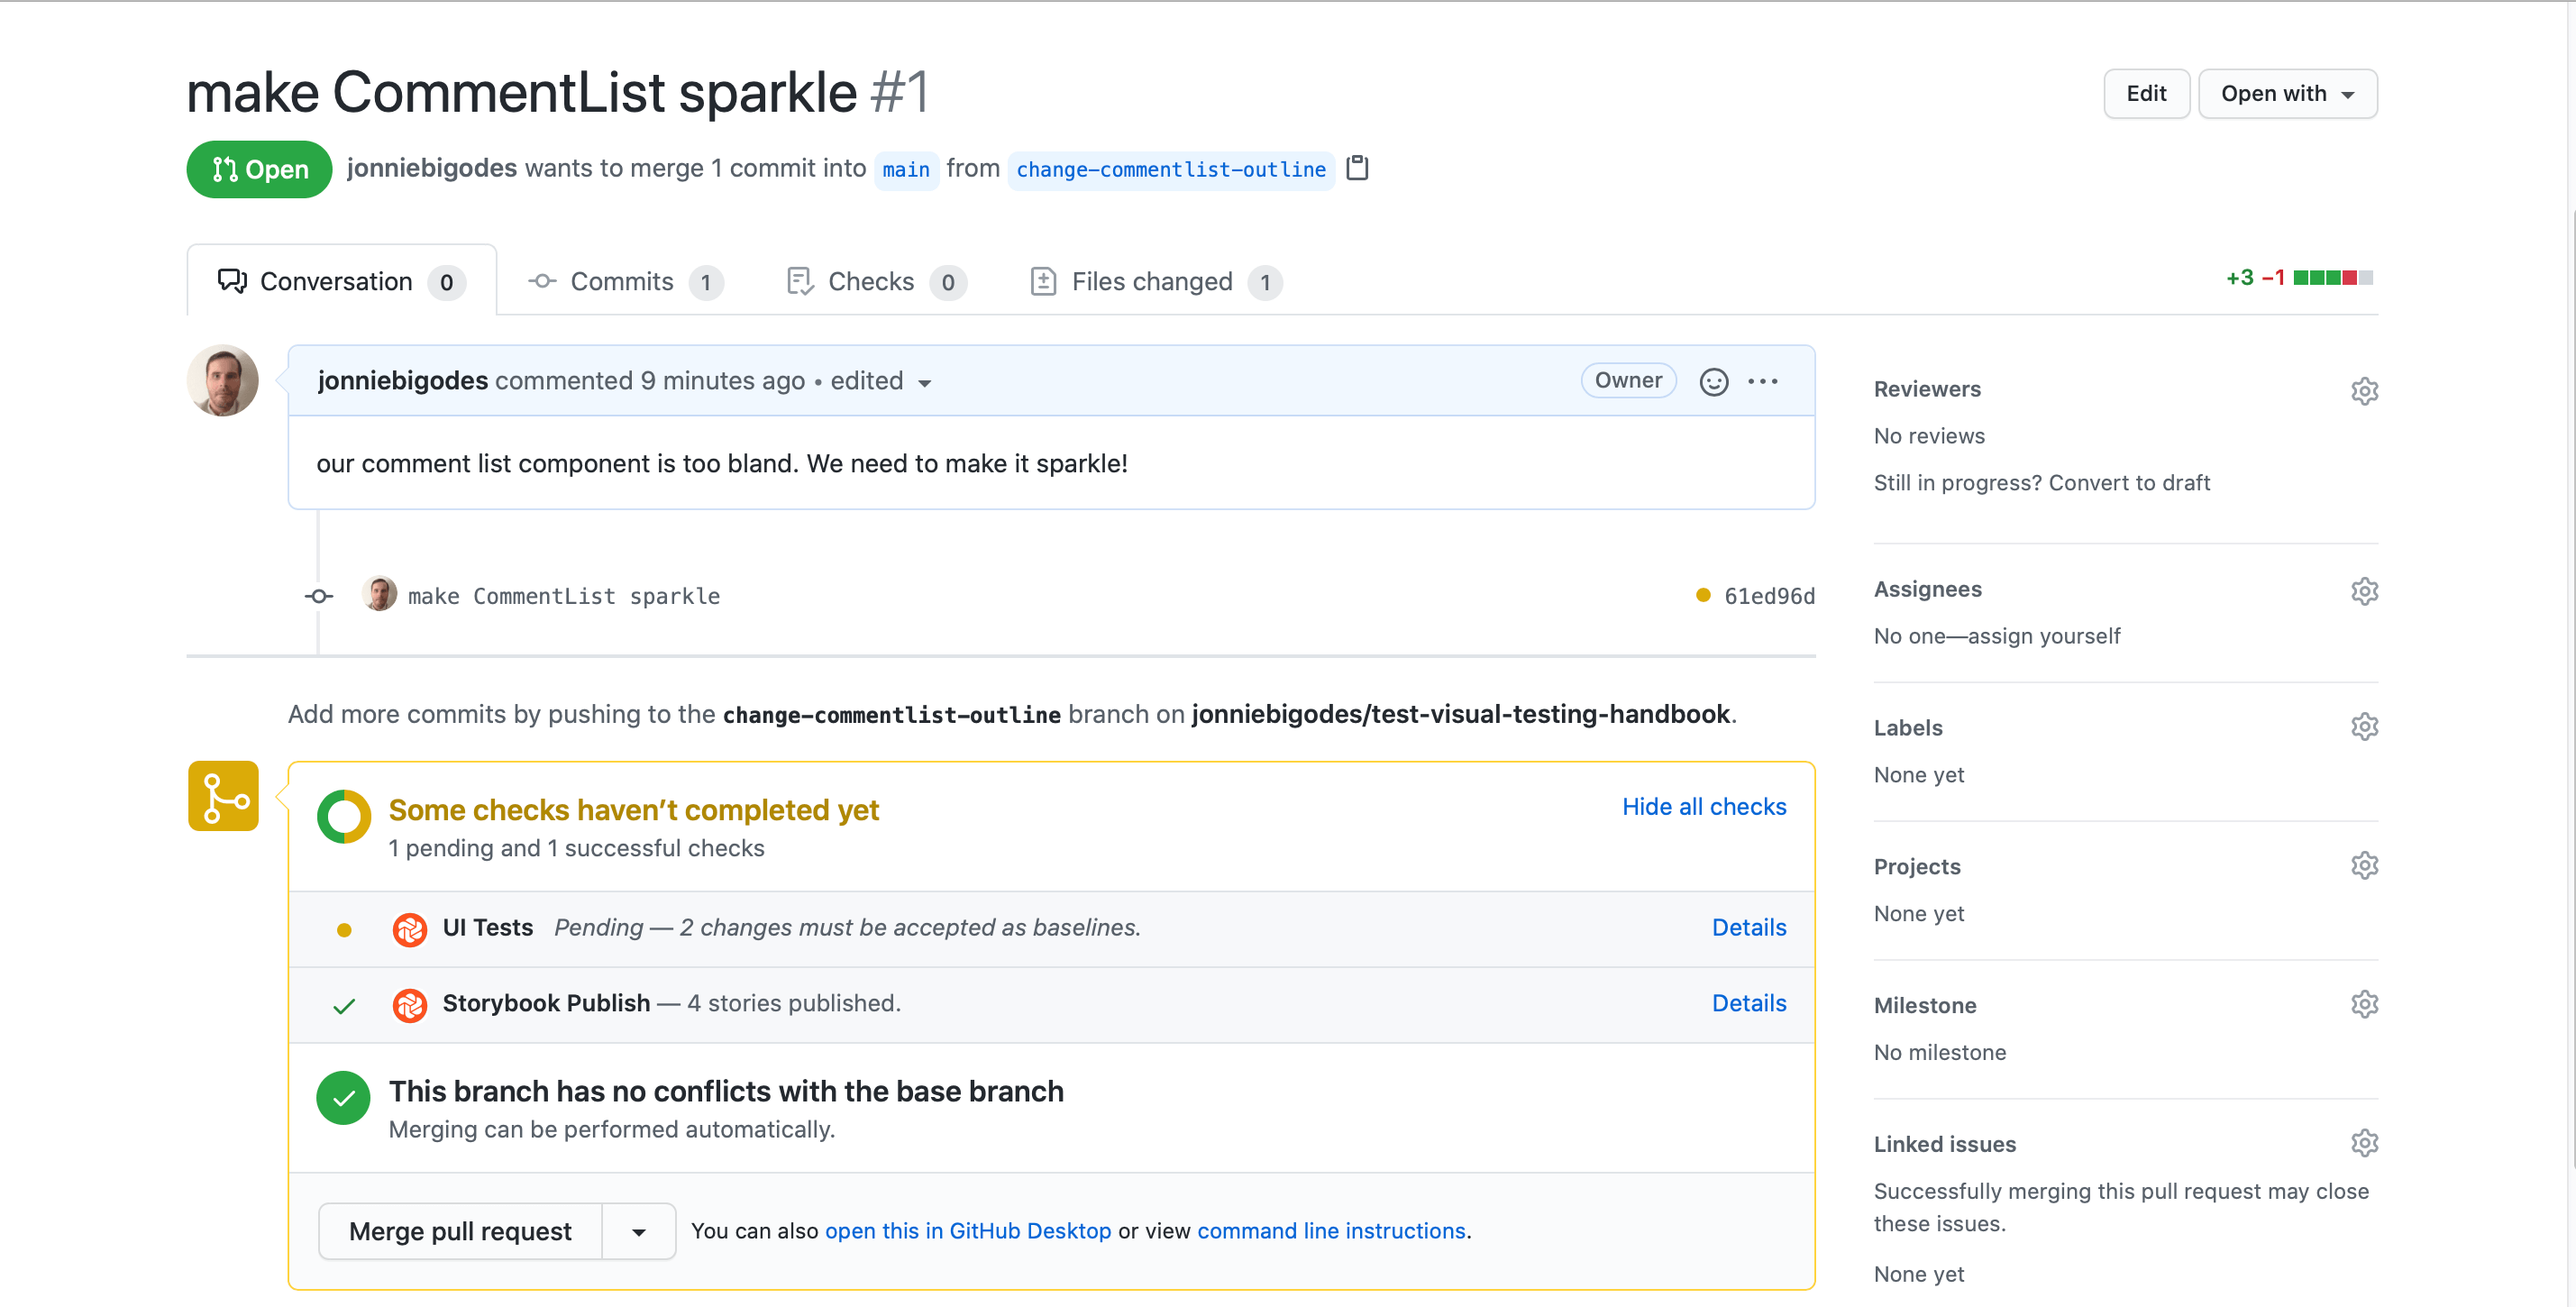
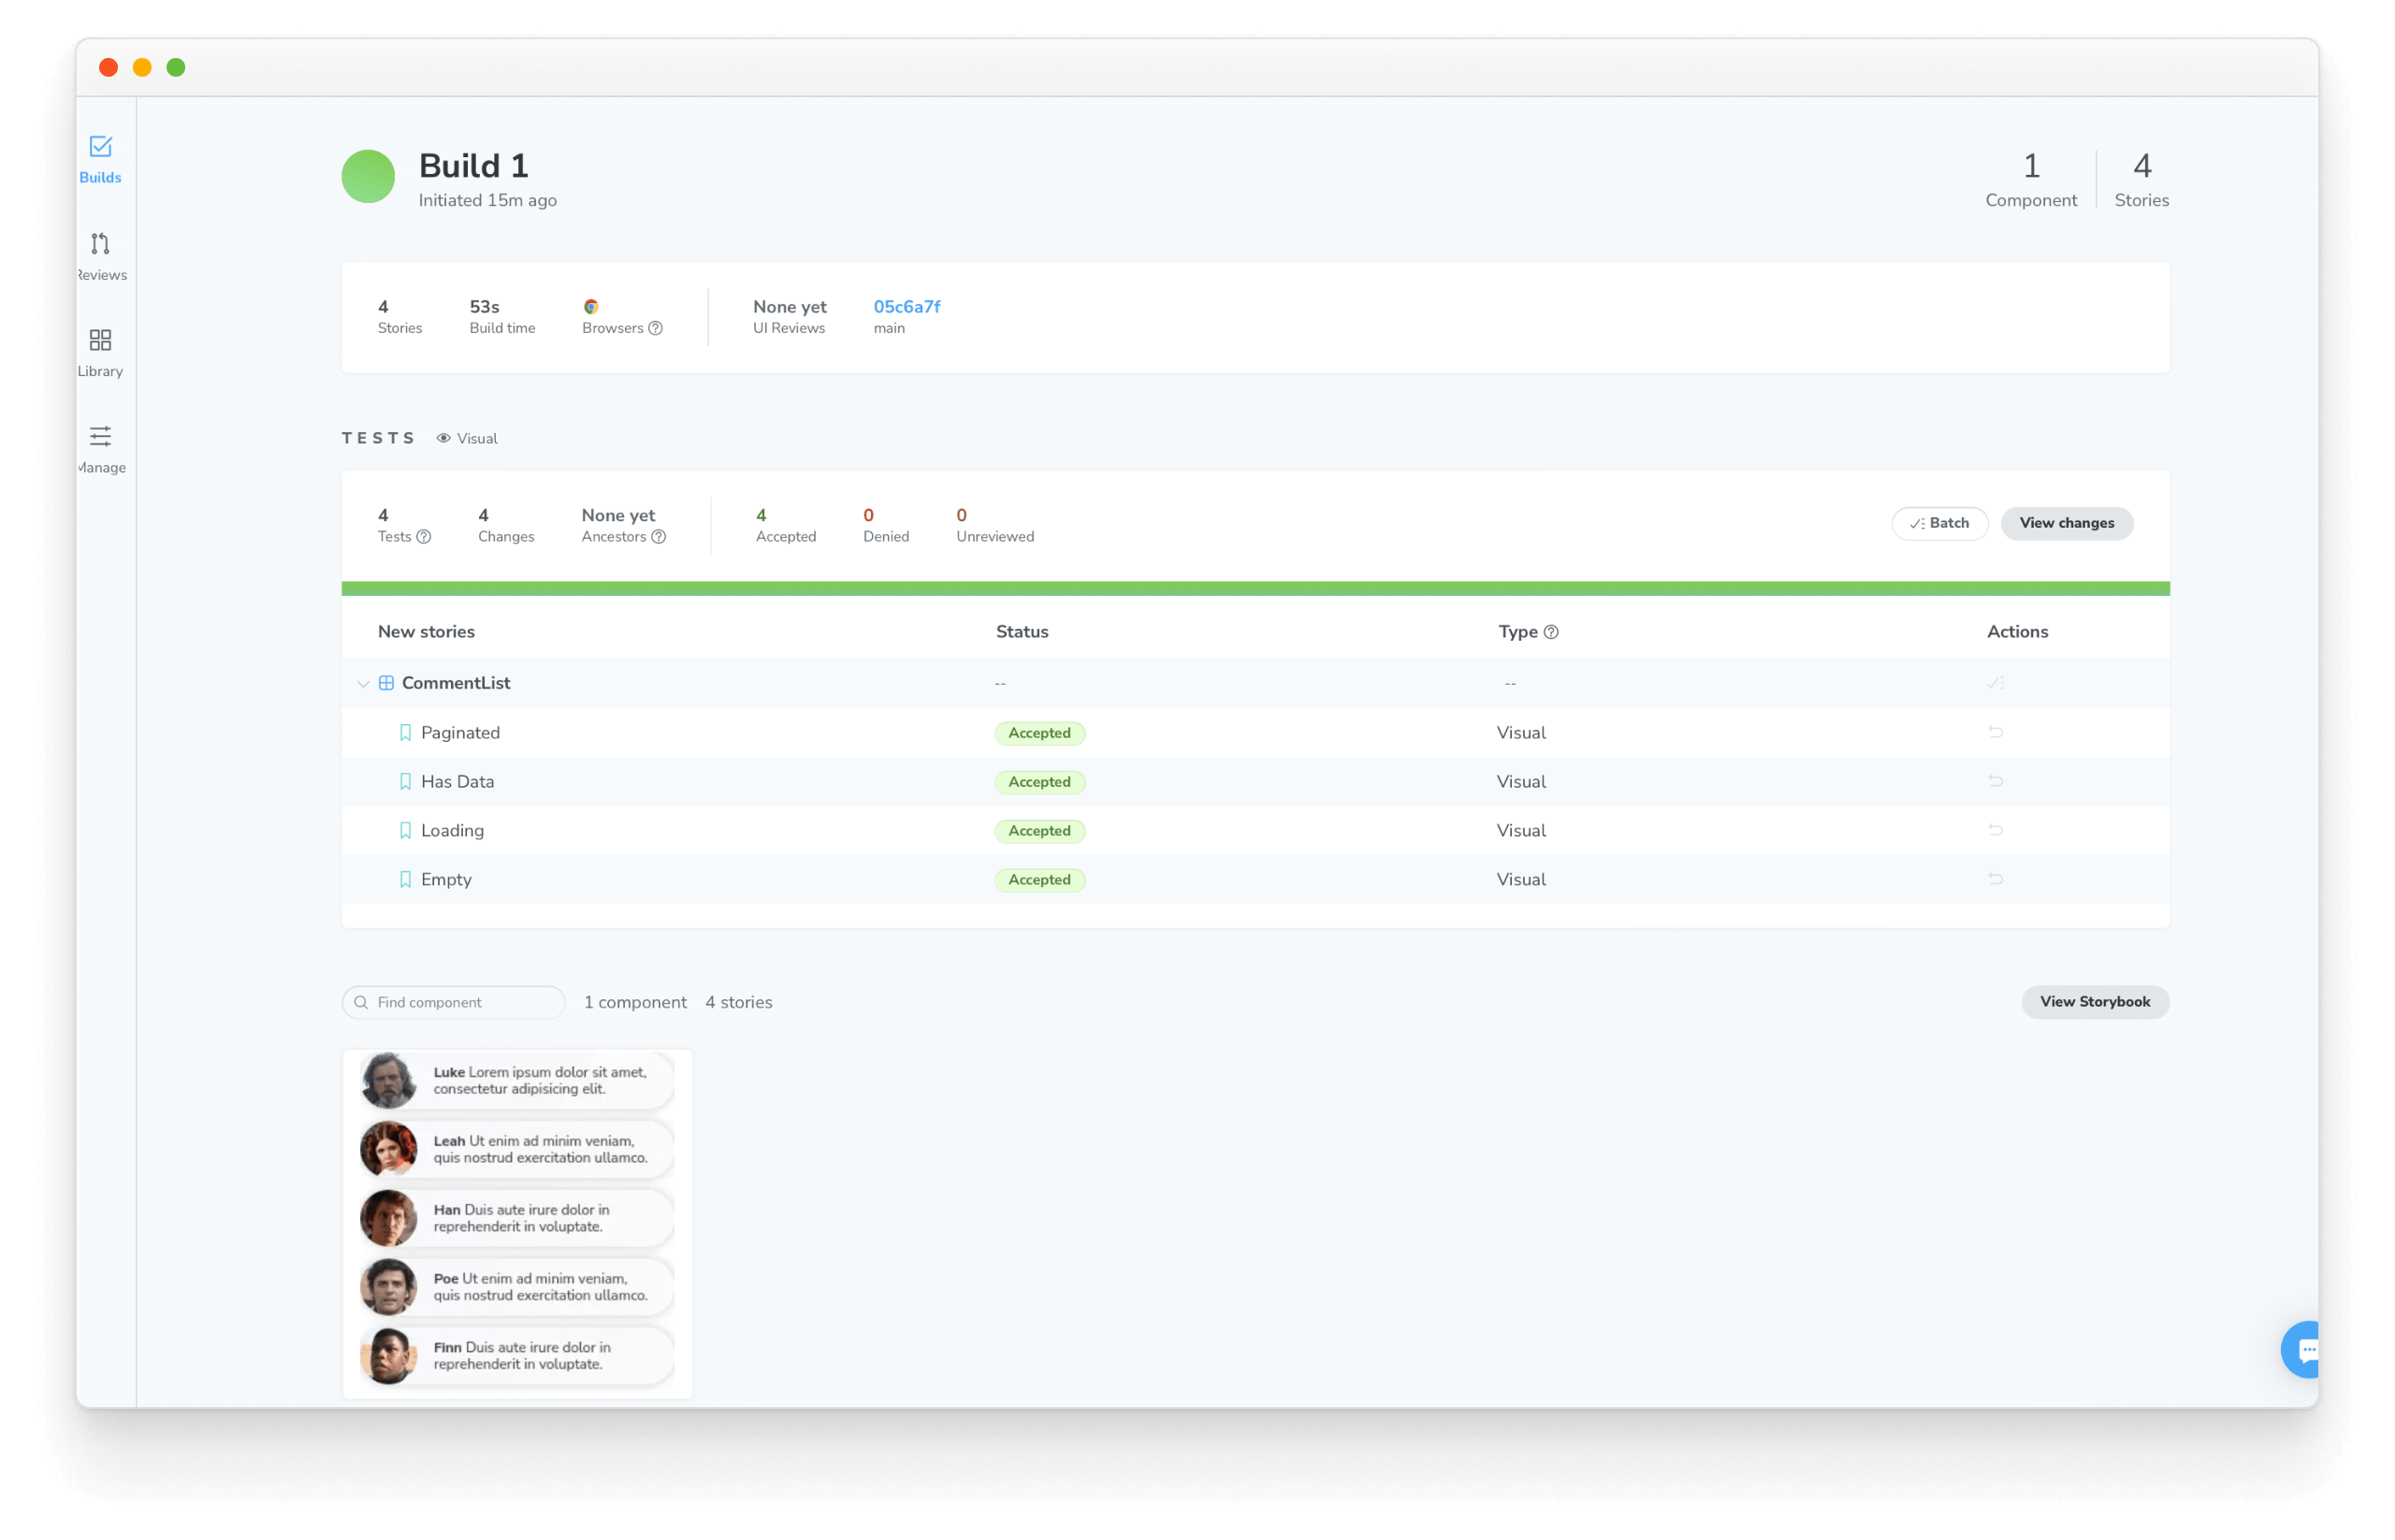
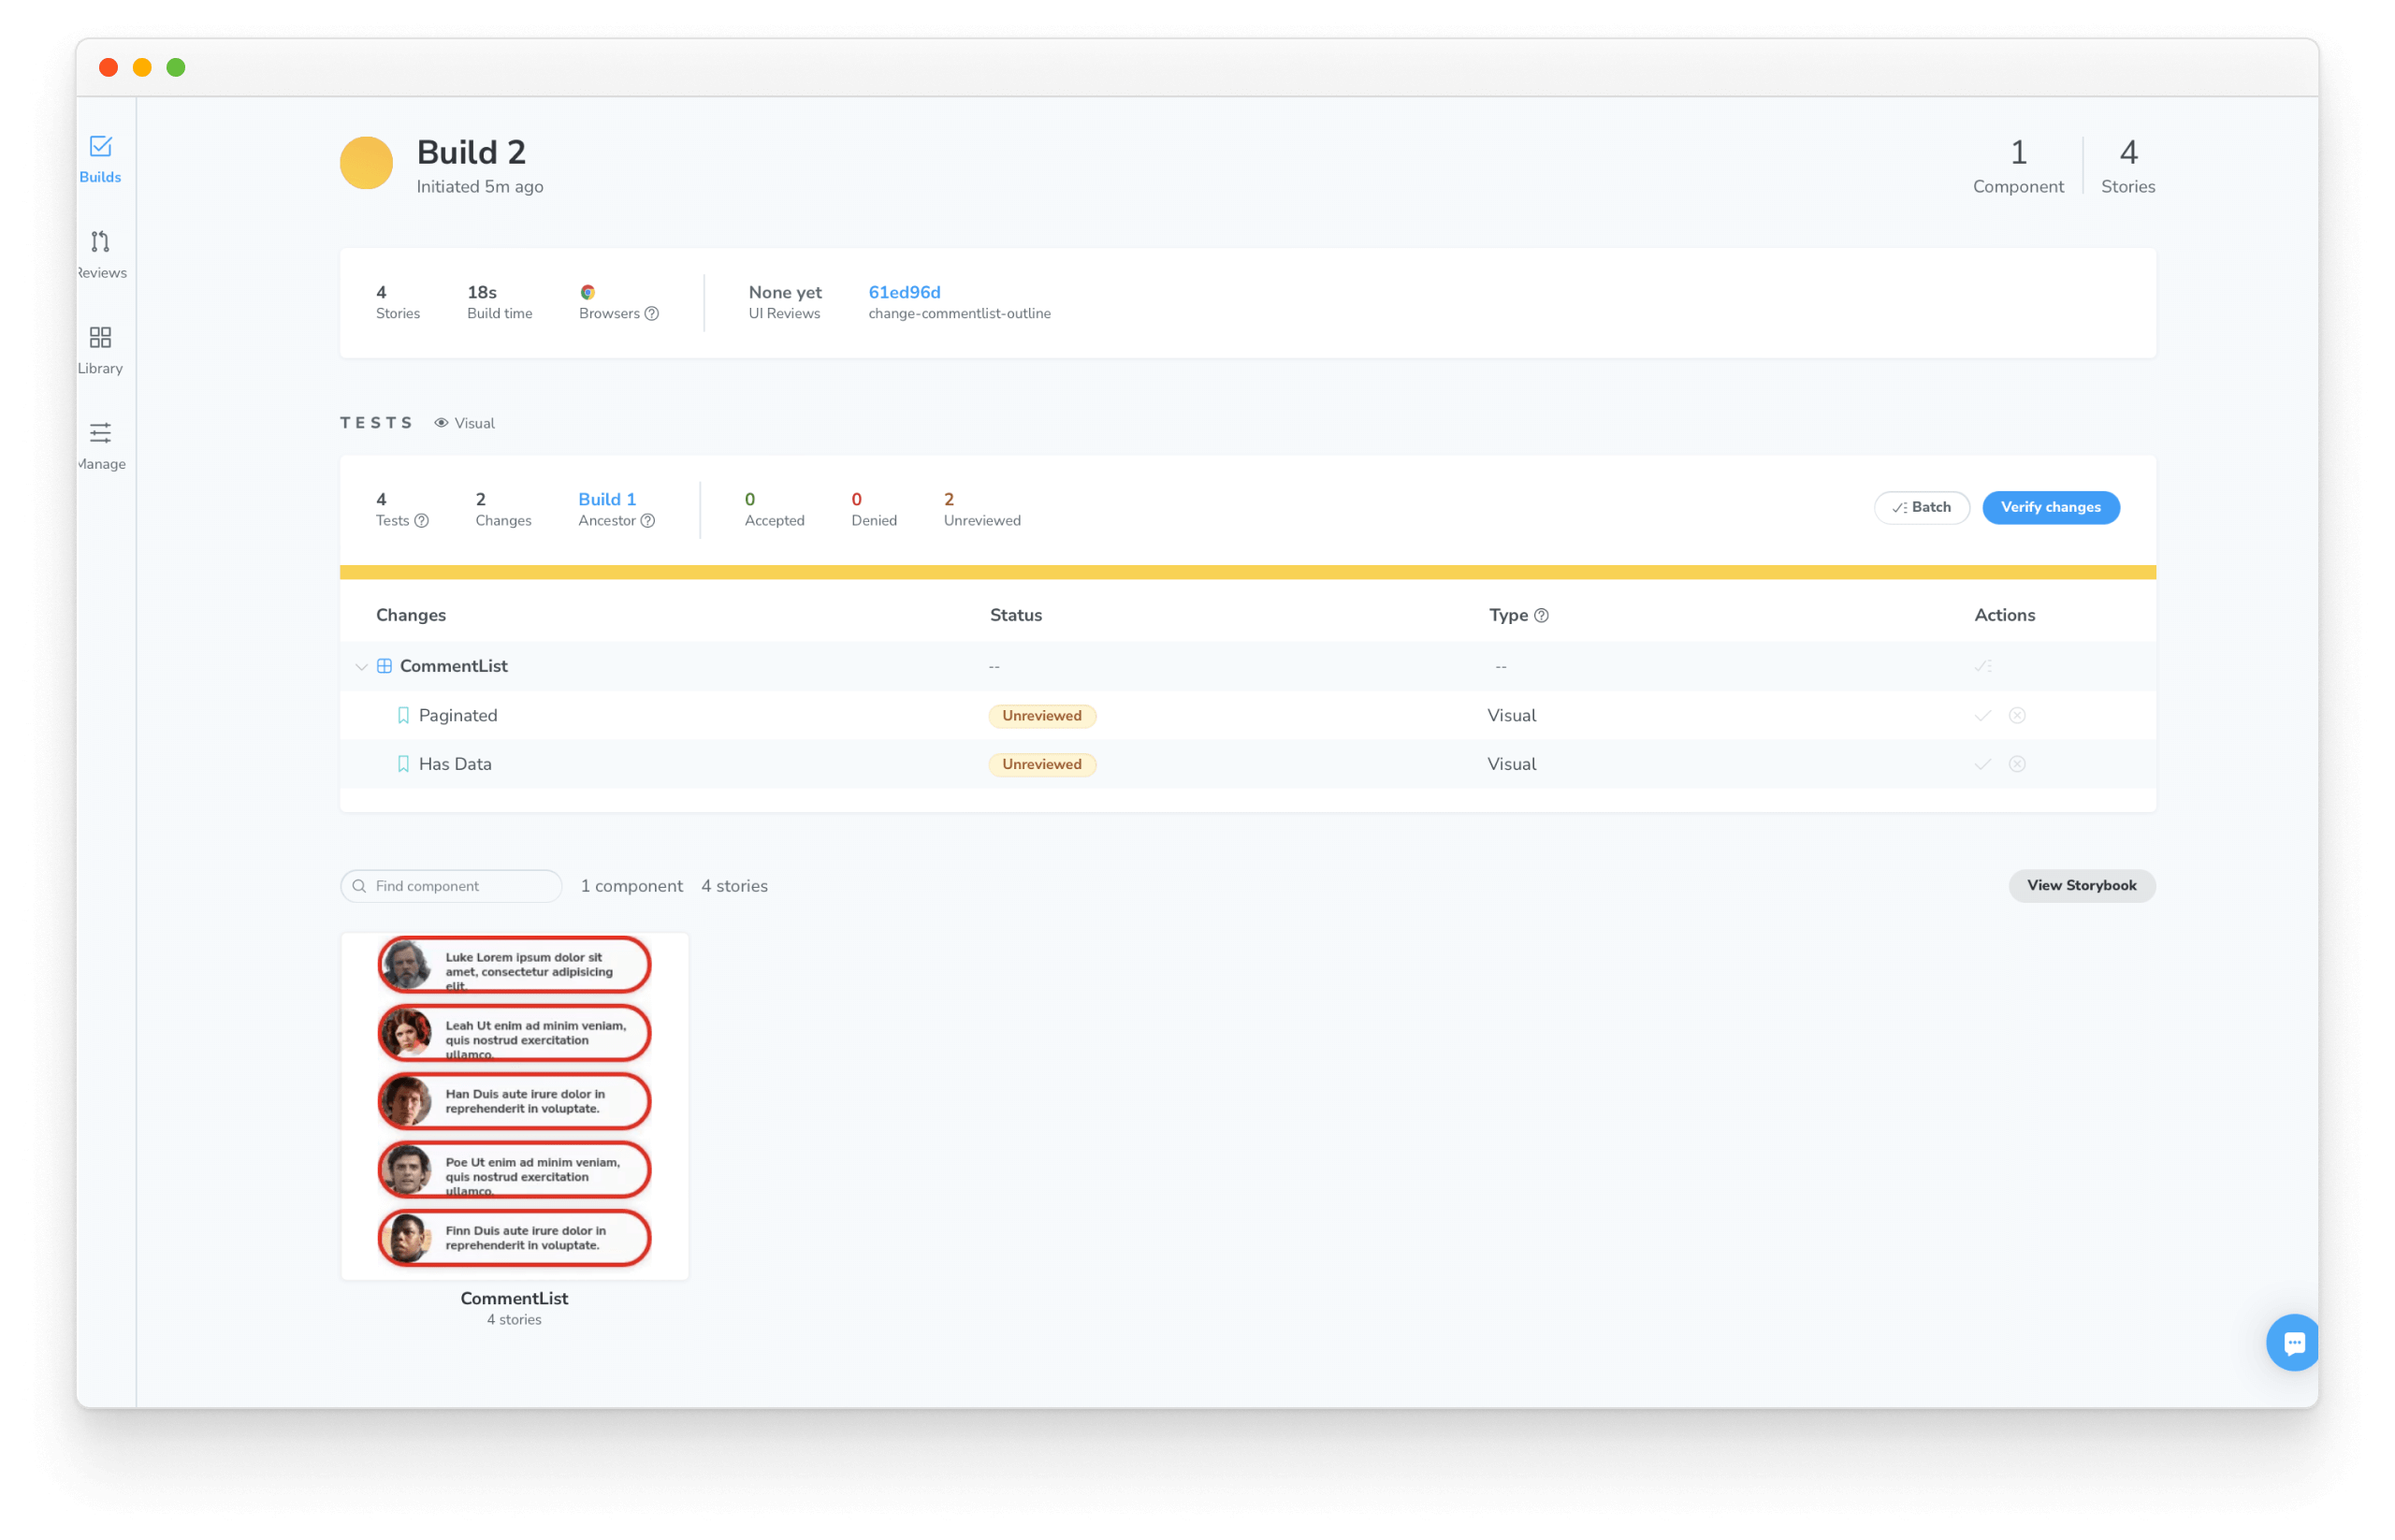
사용자가 검토할 UI 변경 사항을 크로마틱으로 감지했습니다! 변경 사항 목록을 보려면 PR checks로 가서 "🟡 UI Test"를 클릭하세요. 이번 빌드는 "unreviewed"라고 표시되고 변경 사항들은 "Tests" 테이블에 나열됩니다.
 Chromatic
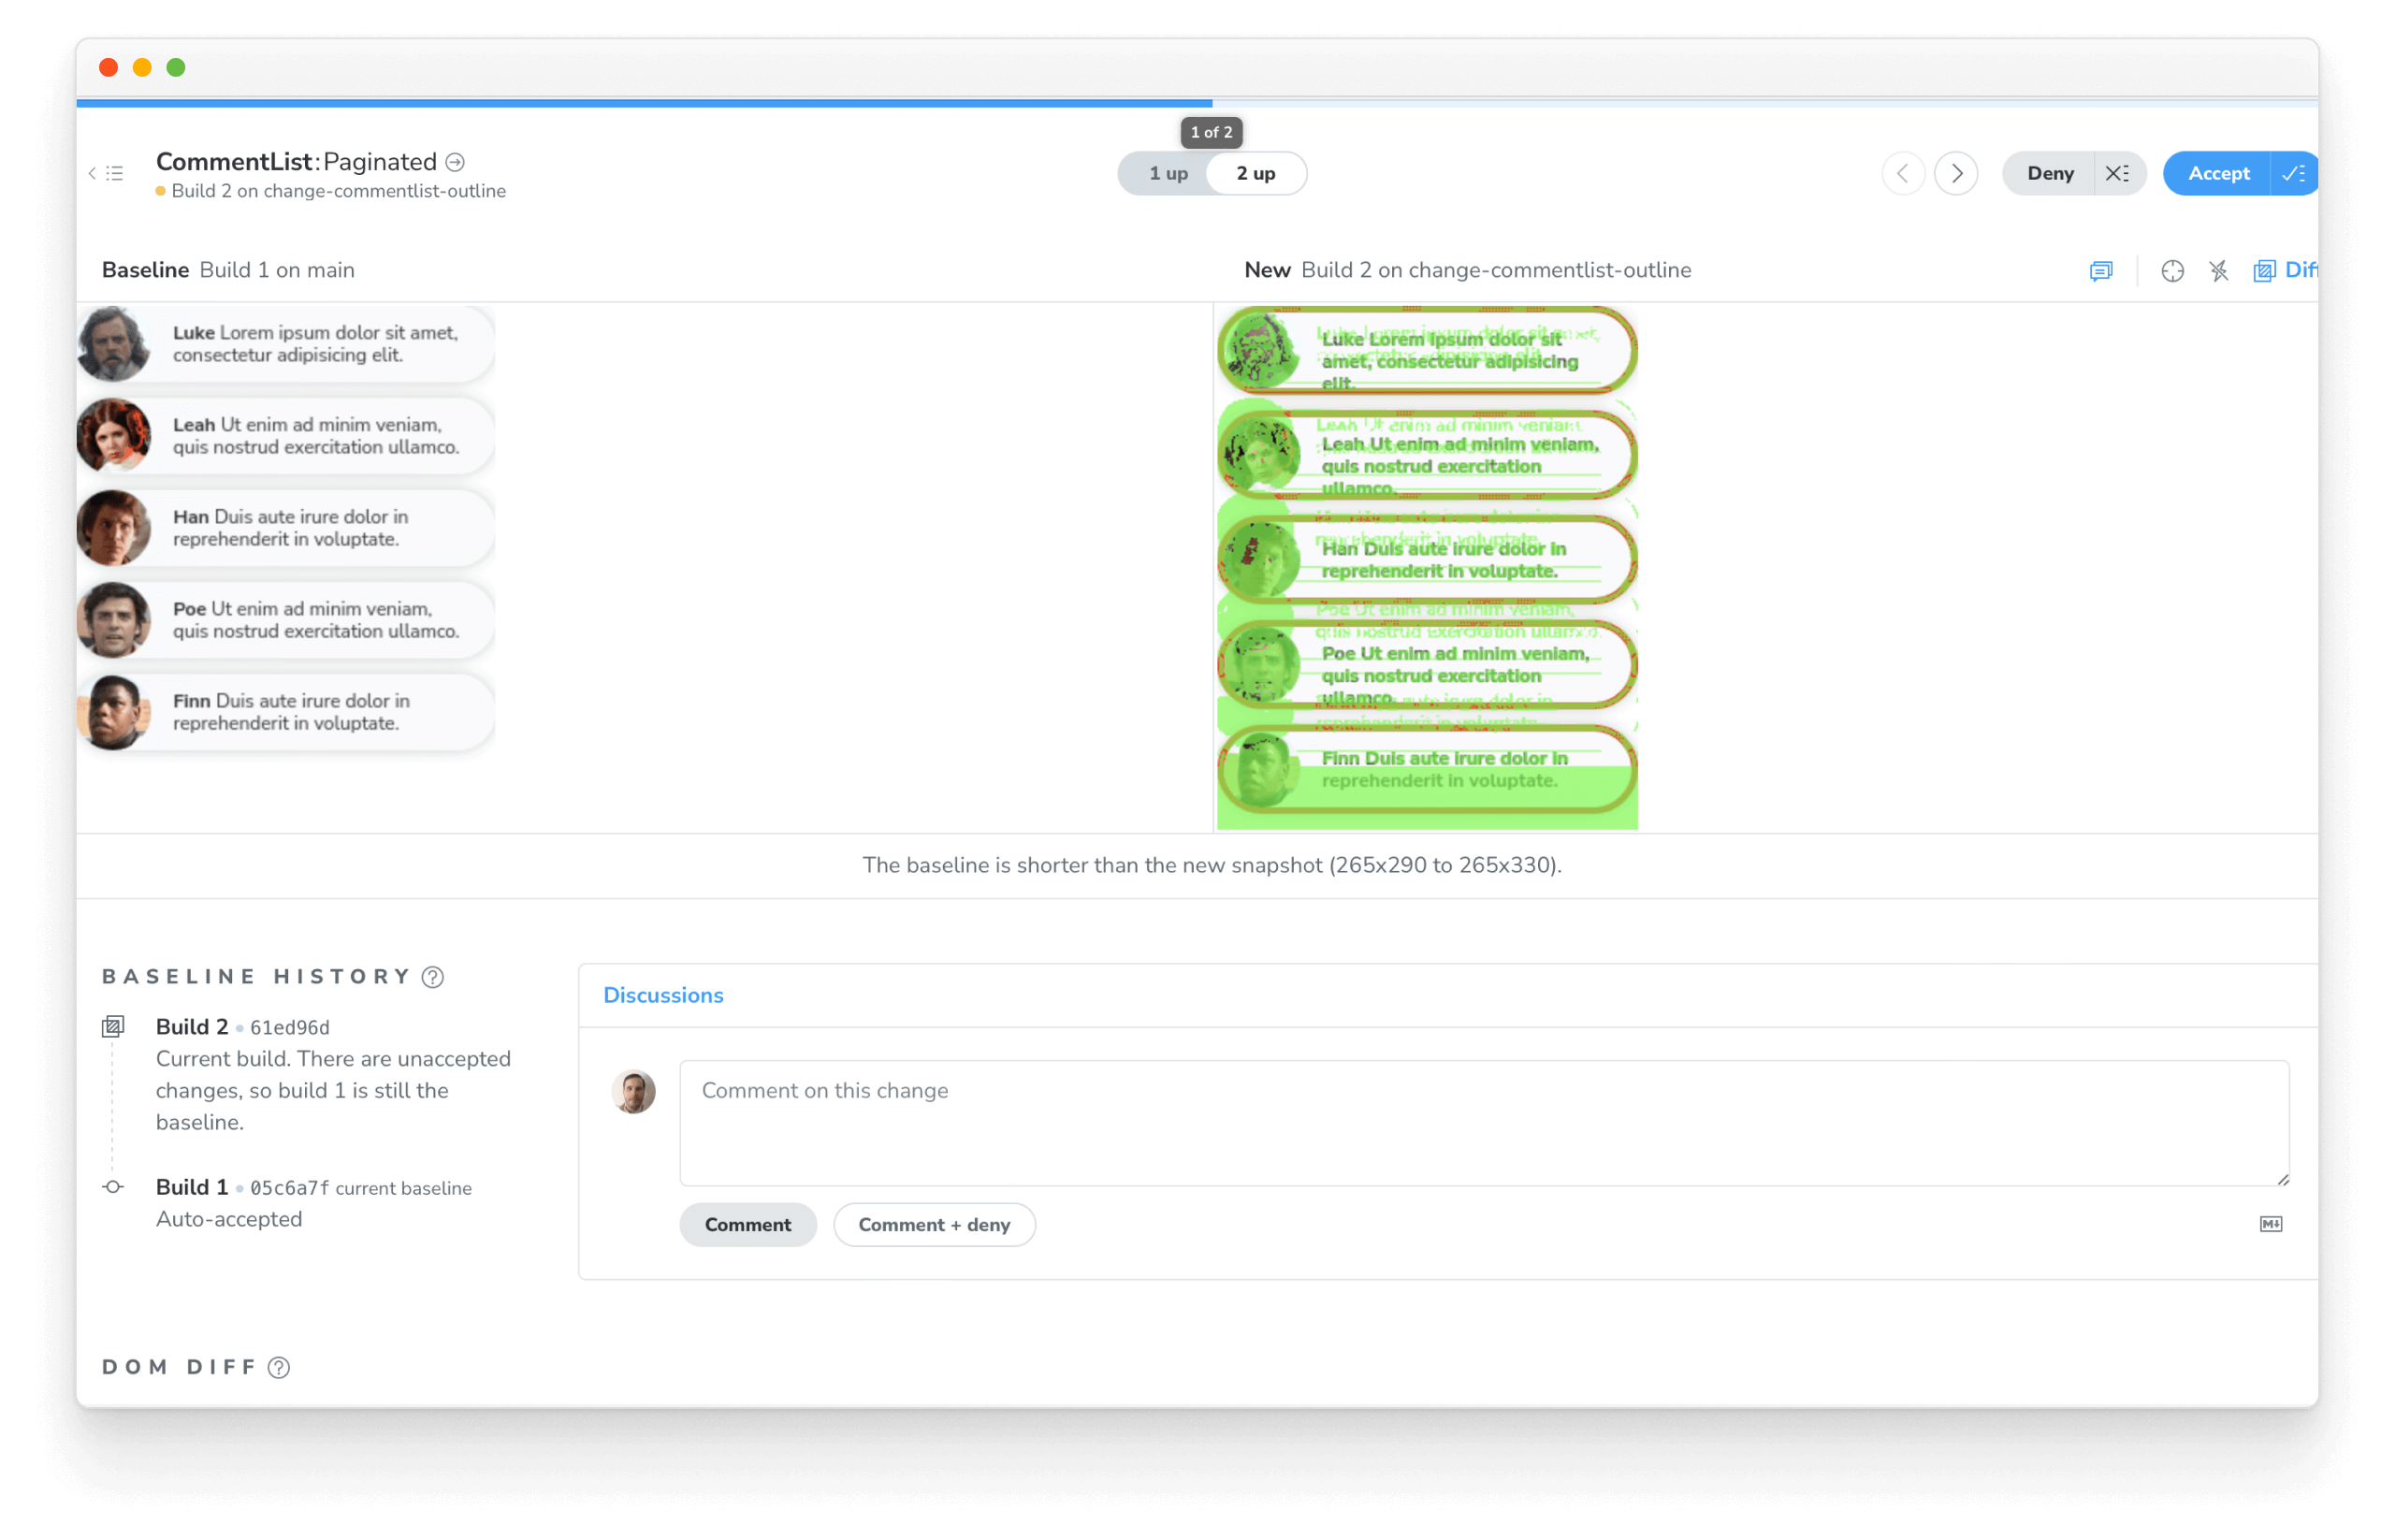
변경 내용 확인
시각 테스트를 자동화하여 컴포넌트가 실수로 변경되지 않도록 합니다. 그러나 변경이 의도적인 것인지 아닌지 결정 여부는 여전히 개발자들에게 달려 있습니다.
의도적으로 변경한 경우에는 스냅샷을 받아들여 기준선을 업데이트합니다.따라서 미래의 테스트는 빨간 테두리를 두른 CommentList를 기준으로 비교하게 됩니다.
의도하지 않은 변경이라면 고쳐야 합니다. 우리 디자이너는 이 ✨장엄한✨ 빨간 테두리가 끔찍하다고 생각하니 변경을 취소하겠습니다.
변경 사항을 merge하기
버그가 수정되고 기준선이 최신 상태가 되면, 코드를 target 브랜치로 다시 merge할 수 있습니다. 크로마틱은 브랜치 사이에서 승인된 기준선을 전송하므로 기준선을 한 번만 승인해주면 됩니다.
지속적 통합
변경사항을 만들 때마다 이 명령어를 로컬에서 실행하는 건 귀찮습니다. 프로덕션 팀은 코드를 CI/CD 파이프라인에 push할 때마다 시각적 테스트가 실행되게 트리거(trigger)를 설정합니다. 이 튜토리얼에서는 설정하지 않지만크로마틱의 CI docs에서 자세한 내용을 확인할 수 있습니다.
여정의 시작
시각적 테스팅 핸드북은 주요 프런트엔드 팀이 UI 외관을 테스트하는 방법을 보여주는 쇼케이스였습니다. 시각적 테스팅은 UI가 의도한 설계와 일치하고 시간이 지남에 따라 버그가 발생하지 않는지 확인하는 실용적인 방법입니다.
이 가이드가 당신의 시각적 테스트 전략에 도움이 되기를 바랍니다. 마지막 장에서는 완전한 샘플 코드와 유용한 자료들 소개로 마무리하겠습니다.