Test addon
(⚠️ Experimental)
While this addon is experimental, it is published as the @storybook/experimental-addon-test package and the API may change in future releases. We welcome feedback and contributions to help improve this feature.
Storybook's Test addon allows you to test your components directly inside Storybook. On its own, it transforms your stories into component tests, which test the rendering and behavior of your components in a real browser environment. It can also calculate project coverage provided by your stories.
If your project is using other testing addons, such as the Visual tests addon or the Accessibility addon, you can run those tests alongside your component tests.
When tests are run for a story, the status is shown in the sidebar. The sidebar can be filtered to only show failing stories, and you can press the menu button on a failing story to see debugging options.
You can also run tests in watch mode, which will automatically re-run tests when you make changes to your components or stories. To activate, press the watch mode toggle (the eye icon) in the test module.
Install and set up
Before installing, make sure your project meets the following requirements:
- Storybook ≥ 8.5
- A Storybook framework that uses Vite (e.g.
vue3-vite,react-vite, 'sveltekit`, etc.), or the Storybook Next.js framework with Vite - Vitest ≥ 2.1
- If you're not yet using Vitest, it will be installed and configured for you when you install the addon
- (optional) MSW ≥ 2.0
- If MSW is installed, it must be v2.0.0 or later to not conflict with Vitest's dependency
Using with Next.js — The Test addon is supported in Next.js ≥ 14.1 projects, but you must be using the @storybook/experimental-nextjs-vite framework. When you run the setup command below, you will be prompted to install and use the framework if you haven't already.
If you're not yet using Storybook 8.5, you can upgrade your Storybook to the prerelease version:
npx storybook@next upgradeAutomatic setup
Run the following command to install and configure the addon, which contains the plugin to run your stories as tests using Vitest:
npx storybook add @storybook/experimental-addon-testThat add command will install and register the test addon. It will also inspect your project's Vite and Vitest setup, and install and configure them with sensible defaults, if necessary. You may need to adjust the configuration to fit your project's needs. The full configuration options can be found in the API section, below.
Manual setup
For some project setups, the add command may be unable to automate the addon and plugin setup and ask you to complete additional setup steps. Here's what to do:
- Make sure Vite and Vitest are configured in your project.
- Configure Vitest to use browser mode.
- Install the addon,
@storybook/experimental-addon-test, in your project and register it in your Storybook configuration. - Create a test setup file,
.storybook/vitest.setup.ts. You can use the example setup file as a guide. - Adjust your Vitest configuration to include the plugin and reference the setup file. You can use the example configuration files as a guide.
Example configuration files
When the addon is set up automatically, it will create or adjust your Vitest configuration files for you. If you're setting up manually, you can use the following examples as a reference when configuring your project.
Example Vitest setup file
Storybook stories contain configuration defined in .storybook/preview.js|ts. To ensure that configuration is available to your tests, you can apply it in a Vitest setup file. Here's an example of how to do that:
import { beforeAll } from 'vitest';
// 👇 If you're using Next.js, import from @storybook/nextjs
//   If you're using Next.js with Vite, import from @storybook/experimental-nextjs-vite
import { setProjectAnnotations } from '@storybook/react';
import * as previewAnnotations from './preview';

const annotations = setProjectAnnotations([previewAnnotations]);

// Run Storybook's beforeAll hook
beforeAll(annotations.beforeAll);
The setProjectAnnotations function is part of the portable stories API, which is used internally by the Vitest plugin to transform your stories into tests.
Example Vitest config file
The most simple application of the plugin is to include it in your Vitest configuration file:
import { defineConfig, mergeConfig } from 'vitest/config';
import { storybookTest } from '@storybook/experimental-addon-test/vitest-plugin';
import path from 'node:path';
import { fileURLToPath } from 'node:url';

const dirname =
  typeof __dirname !== 'undefined' ? __dirname : path.dirname(fileURLToPath(import.meta.url));

import viteConfig from './vite.config';

export default mergeConfig(
  viteConfig,
  defineConfig({
    plugins: [
      storybookTest({
        // The location of your Storybook config, main.js|ts
        configDir: path.join(dirname, '.storybook'),
        // This should match your package.json script to run Storybook
        // The --ci flag will skip prompts and not open a browser
        storybookScript: 'yarn storybook --ci',
      }),
    ],
    test: {
      // Enable browser mode
      browser: {
        enabled: true,
        name: 'chromium',
        // Make sure to install Playwright
        provider: 'playwright',
        headless: true,
      },
      setupFiles: ['./.storybook/vitest.setup.ts'],
    },
  })
);
Example Vitest workspace file
If you're using a Vitest workspace, you can define a new workspace project:
import { defineWorkspace } from 'vitest/config';
import { storybookTest } from '@storybook/experimental-addon-test/vitest-plugin';
import path from 'node:path';
import { fileURLToPath } from 'node:url';

const dirname =
  typeof __dirname !== 'undefined' ? __dirname : path.dirname(fileURLToPath(import.meta.url));

export default defineWorkspace([
  // This is the path to your existing Vitest config file
  './vitest.config.ts',
  {
    // This is the path to your existing Vite config file
    extends: './vite.config.ts',
    plugins: [
      storybookTest({
        // The location of your Storybook config, main.js|ts
        configDir: path.join(dirname, '.storybook'),
        // This should match your package.json script to run Storybook
        // The --ci flag will skip prompts and not open a browser
        storybookScript: 'yarn storybook --ci',
      }),
    ],
    test: {
      name: 'storybook',
      // Enable browser mode
      browser: {
        enabled: true,
        name: 'chromium',
        // Make sure to install Playwright
        provider: 'playwright',
        headless: true,
      },
      setupFiles: ['./.storybook/vitest.setup.ts'],
    },
  },
]);
Usage
There are multiple ways to run tests using the addon.
We recommend (and configure, by default) running Vitest in browser mode, using Playwright's Chromium browser. Browser mode ensures your components are tested in a real browser environment, which is more accurate than simulations like JSDom or HappyDom. This is especially important for testing components that rely on browser APIs or features.
Storybook UI
The easiest way to run tests is through the Storybook UI. With a click, you can run multiple types of tests for all stories in your project, a group of stories, or a single story.
To run all tests for your whole project, press the Run tests button in the test module at the bottom of the sidebar.
Alternatively, you can expand the test module to run specific types of tests individually. For those test types which have a watch mode (which will automatically re-run relevant tests upon code changes), you can toggle that on or off.
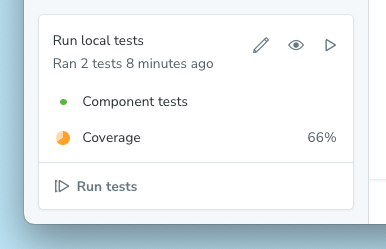
If you have the Visual tests addon installed, you'll see an option to run Visual tests alongside Component tests.
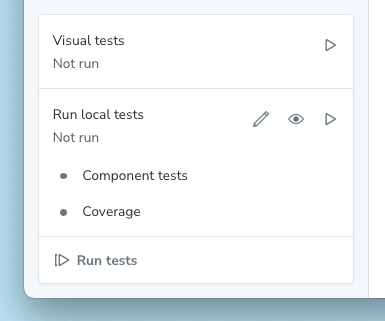
Other addons, such as a11y, may also provide test types that can be run from the test module and affect the status indicators on stories and components.
To run tests for a specific story or group of stories, press the menu button (three dots) that appears on hover of a sidebar item. You can then select the test type you want to run.
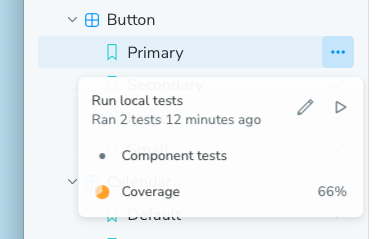
After running your tests, you will now see status indicators on stories and components for their pass, fail, or error state. You can press on the menu button when hovering a story to see the test results for that story. Selecting a result in the menu will navigate you to that story and open the appropriate debugging panel. For example, if a component test fails, you can jump straight to the failure in the Component tests addon panel. That panel provides an interactive debugger for your component test, allowing you to step through each simulated behavior or assertion.
The Component tests addon panel replaces the Interactions addon panel when the Test addon is installed. While the testing mechanism is different, the functionality of the addon panel itself remains the same.
The test module will also show you the total number of tests run, the number of tests that passed, and the number of tests that failed or errored. You can press the failure number to filter the sidebar to only those stories that failed.
CLI
You can also run tests using the Vitest CLI. We recommend adding a script to your package.json to make running tests easier. Here's an example of how to do that:
{
  "scripts": {
    "test": "vitest",
    "test-storybook": "vitest --project=storybook"
  }
}
In this example, we've added two scripts: test to run all tests in your project (you may already have this), and test-storybook to run only your Storybook tests. The --project=storybook flag tells Vitest to run the tests for the Storybook project.
Then, run this command to run your tests (in watch mode, by default) using the Vitest CLI:
npm run test-storybookDebugging
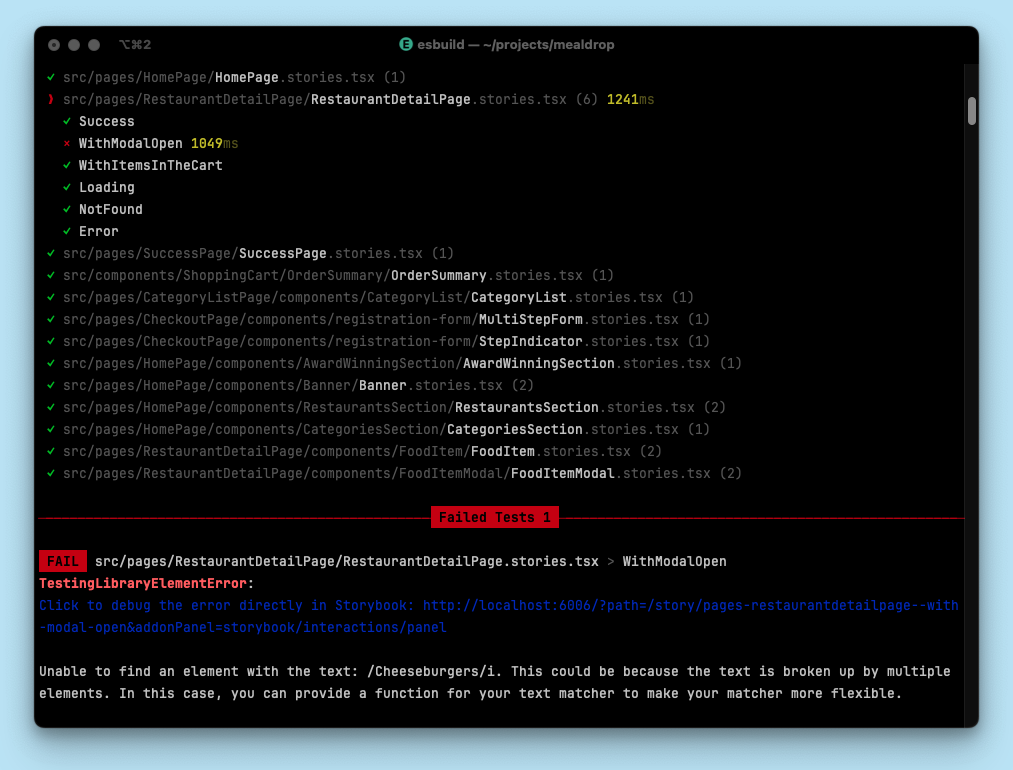
While the plugin does not require Storybook to run when testing, you may still want to run Storybook to debug your tests. To enable this, provide the storybookScript option in the plugin configuration. When you run Vitest in watch mode, the plugin will start Storybook using this script and provide links to the story in the output on test failures. This allows you to quickly jump to the story in Storybook to debug the issue.
You can also provide a storybookUrl option to the plugin configuration. When you're not using watch mode and tests fail, the plugin will provide a link to the story using this URL in the output. This is useful when running tests in CI or other environments where Storybook is not already running.
Editor extension
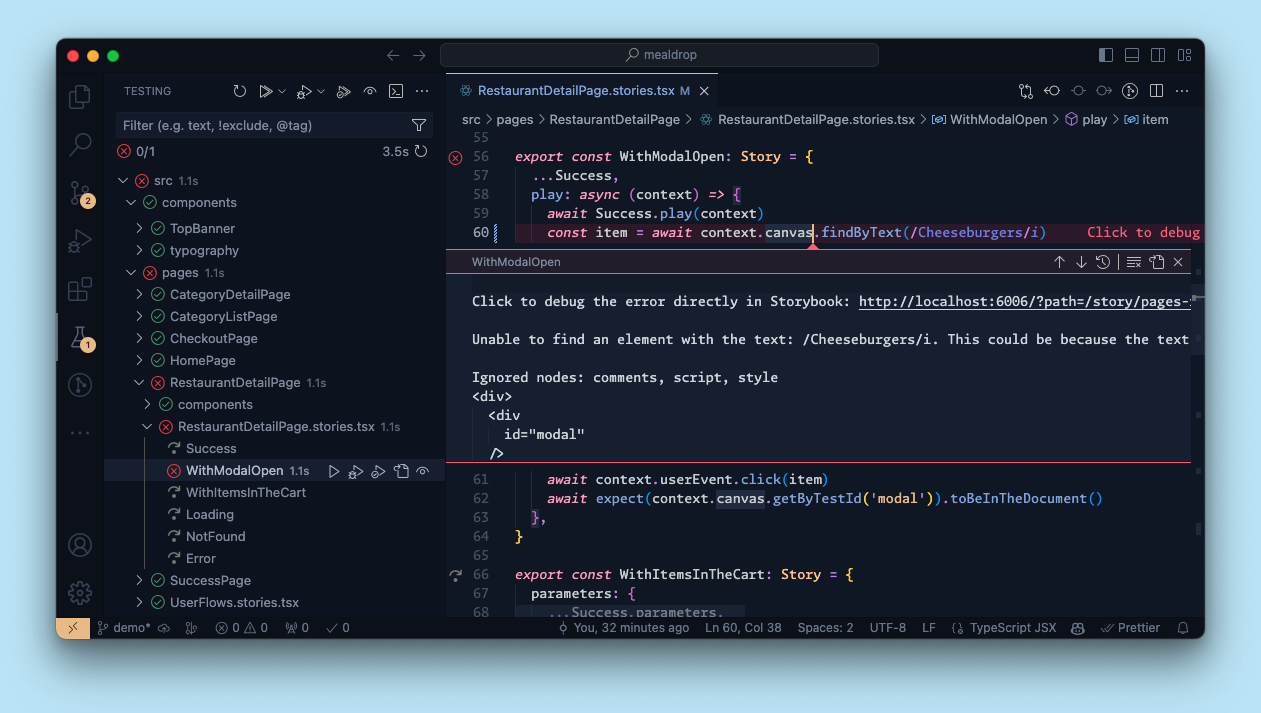
Transforming your stories into Vitest tests with the plugin also enables you to run and debug tests using Vitest IDE integrations. This allows you to run tests directly from your editor, such as VSCode and JetBrains IDE.
This screenshot shows how you can run your Vitest tests in VSCode using the Vitest extension. Stories are annotated with the test status, and, when a test fails, a link to the story is provided for debugging.
In CI
For the most part, running your Storybook tests in CI is done via the CLI. However, to have the test output link to your published Storybook on test failures, you need to provide the storybookUrl option in the plugin configuration.
Here's an example using GitHub Actions. The steps are similar for other CI providers, though details in the syntax or configuration may vary.
When actions for services like Vercel, Netlify and others run a deployment job, they follow a pattern of emitting a deployment_status event containing the newly generated URL under deployment_status.target_url. This is the URL to the published Storybook instance. We then pass that URL to the plugin configuration using an environment variable, SB_URL. Finally, we update the plugin configuration to use that environment variable in the storybookUrl option.
name: Storybook Tests
on: deployment_status
jobs:
  test:
    timeout-minutes: 60
    runs-on: ubuntu-latest
    if: github.event.deployment_status.state == 'success'
    steps:
      - uses: actions/checkout@v4
      - uses: actions/setup-node@v4
        with:
          node-version: '18.x'
      - name: Install dependencies
        run: yarn
      - name: Run Storybook tests
        run: yarn test-storybook
        env:
SB_URL: '${{ github.event.deployment_status.target_url }}'export default defineWorkspace([
// ...
{
// ...
{
plugins: [
storybookTest({
// ...
storybookScript: 'yarn storybook --ci',
storybookUrl: process.env.SB_URL
}),
],
},
},
])How it works
The Test addon works by using a Vitest plugin to transform your stories into Vitest tests using portable stories. It also configures Vitest to run those tests in browser mode, using Playwright's Chromium browser. Because it is built on top of Vitest, the addon requires a Vite-based Storybook framework.
Stories are tested in two ways: a smoke test to ensure it renders and, if a play function is defined, that function is run and any assertions made within it are validated.
When you run tests in the Storybook UI, the addon runs Vitest in the background and reports the results in the sidebar.
Configuring tests
The tests run by the addon can be configured in two ways. You can toggle which test types are run and include, exclude, or skip stories from being tested.
Toggling test types
In addition to component tests, the Test addon supports multiple types of tests, depending on which other addons you are using in your project. Some test types, like visual tests, are run independently. Others, like accessibility, must be run alongside component tests. For these dependent test types, you can toggle them on or off in the test module by pressing the edit button (pencil icon) and checking or unchecking the test types you want to run.
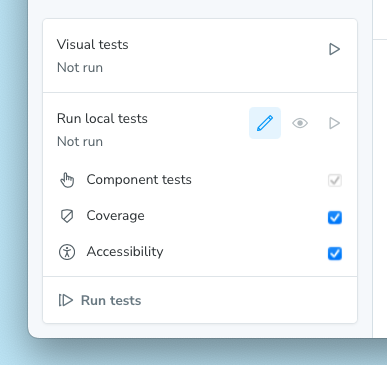
Note that you may not have all of the test types pictured, depending on which addons you have installed.
You can also access edit mode in the sidebar item menu for a story or group of stories:
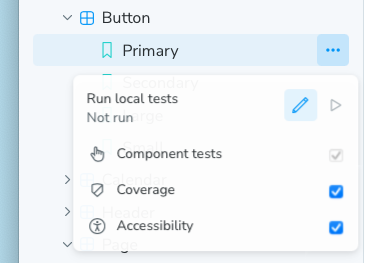
Note that toggling test types in the menu's edit mode affects all tests, not only those for the selected story or group of stories. It is intended as a convenience for quickly toggling test types on or off.
Including, excluding, or skipping tests
You can use tags to include, exclude, or skip stories from being tested. Included stories are tested, excluded stories are not tested, and skipped stories are not tested but are counted in the test results.
By default, the plugin will run all stories with the test tag. You can adjust this behavior by providing the tags option in the plugin configuration. This allows you to include, exclude, or skip stories based on their tags.
In this example, we'll apply the stable tag to all of the Button component's stories, except for ExperimentalFeatureStory, which will have the experimental tag:
// Replace your-framework with the framework you are using (e.g., nextjs, vue3-vite)
import type { Meta, StoryObj } from '@storybook/your-framework';

import { Button } from './Button';

const meta: Meta<typeof Button> = {
  component: Button,
  // 👇 Applies to all stories in this file
  tags: ['stable'],
};

export default meta;
type Story = StoryObj<typeof Button>;

export const ExperimentalFeatureStory: Story = {
  //👇 For this particular story, remove the inherited `stable` tag and apply the `experimental` tag
  tags: ['!stable', 'experimental'],
};
To connect those tags to our test behavior, we can adjust the plugin configuration to exclude the experimental tag:
export default defineWorkspace([
  // ...
  {
    // ...
    {
      plugins: [
        storybookTest({
          // ...
          tags: {
            include: ['test'],
            exclude: ['experimental'],
          },
        }),
      ],
    },
  },
])
If the same tag is in both the include and exclude arrays, the exclude behavior takes precedence.
Comparison to the test runner
The test runner requires a running Storybook instance to test your stories, because it visits each one, executes the play function, and listens for results. The Vitest plugin, however, transforms your stories into tests using Vite and portable stories, so it does not need to run Storybook to test your stories. Because of this reliance on Vite, the plugin can only be used with Storybook frameworks that use Vite (and Next.js). The test runner, on the other hand, can be used with any Storybook framework.
The test runner is only a CLI tool. It did not have a UI for running tests, nor did it have an editor extension. The addon, however, provides a UI in Storybook for running tests, and it enables you to run and debug tests using Vitest IDE integrations.
Additionally, the test runner ran your stories as orchestrated tests in Jest, and that orchestration came with some complexity. By comparison, this plugin transforms your stories into real tests and then runs them using Vitest, which is simpler and more configurable.
Finally, because of the simpler architecture and the use of Vitest, this plugin should be faster than the test runner for most projects. We'll do more benchmarking to quantify this in the future.
FAQ
What happens if Vitest itself has an error?
Sometimes tests can fail because of errors within Vitest itself. When this happens, the test module in the Storybook UI will alert you to the error, and you can click a link to view it in full. The error will also be logged to the console.
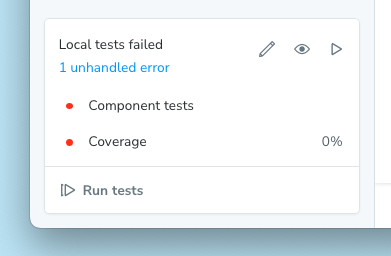
Vitest offers troubleshooting help for common errors.
What happens when there are different test results in multiple environments?
When you run tests with this addon, they are run as Vitest tests with whatever configuration you have set up in your project. By default, they will run in browser mode, using Playwright's Chromium browser. Sometimes, tests will fail when run in the addon (or via CLI), but then pass when viewed in the Component tests addon panel (or vice versa). This can happen because the tests are run in different environments, which can have different behaviors.
How do I debug my CLI tests in Storybook?
The plugin will attempt to provide links to the story in Storybook when tests fail in CLI, for debugging purposes.
If the URLs are not working when running tests in watch mode, you should check two configuration options:
storybookUrl: Ensure this URL is correct and accessible. For example, the default ishttp://localhost:6006, which may not use the same port number you're using.storybookScript: Ensure this script is correctly starting Storybook.
If the URLs are not working when running tests in CI, you should ensure the Storybook is built and published before running the tests. You can then provide the URL to the published Storybook using the storybookUrl option. See the In CI section for an example.
How do I ensure my tests can find assets in the public directory?
If your stories use assets in the public directory and you're not using the default public directory location (public), you need to adjust the Vitest configuration to include the public directory. You can do this by providing the publicDir option in the Vitest configuration file.
How do I isolate Storybook tests from others?
Some projects might contain a test property in their Vite configuration. Because the Vitest configuration used by this plugin extends that Vite config, the test properties are merged. This lack of isolation can cause issues with your Storybook tests.
To isolate your Storybook tests from other tests, you need to move the test property from your Vite configuration to the Vitest configuration. The Vitest config used by the plugin can then safely extend your Vite config without merging the test property.
Why do we recommend browser mode?
Vitest's browser mode runs your tests in a real browser (Chromium, via Playwright, in the default configuration). The alternative is a simulated browser environment, like JSDom or HappyDom, which can have differences in behavior compared to a real browser. For UI components, which can often depend on browser APIs or features, running tests in a real browser is more accurate.
For more, see Vitest's guide on using browser mode effectively.
How do I use WebDriver instead of Playwright?
We recommend running tests in a browser using Playwright, but you can use WebDriverIO instead. To do so, you need to adjust the browser provider in the Vitest configuration file.
How do I use a browser other than Chromium?
We recommend using Chromium, because it is most likely to best match the experience of a majority of your users. However, you can use other browsers by adjusting the browser name in the Vitest configuration file. Note that Playwright and WebDriverIO support different browsers.
How do I customize a test name?
By default, the export name of a story is mapped to the test name. To create a more descriptive test description, you can provide a name property for the story. This allows you to include spaces, brackets, or other special characters.
export const Story = {
  name: 'custom, descriptive name'
};
How do I fix the m.createRoot is not a function error?
This error can occur when using the addon on a project that uses a React version other than 18. To work around the issue, you can provide an alias to ensure the correct React version is used. Here's an example of how to do that in the Vitest configuration file:
import { defineConfig } from 'vitest/config';

export default defineConfig({
  // ...
  resolve: {
    alias: {
      "@storybook/react-dom-shim": "@storybook/react-dom-shim/dist/react-16",
    },
  },
});
API
Exports
This addon has the following exports:
import { storybookTest } from '@storybook/experimental-addon-test/vitest-plugin'storybookTest
Type: function
A Vitest plugin that transforms your stories into tests. It accepts an options object for configuration.
Options
The plugin is configured using an options object. Here are the available properties:
configDir
Type: string
Default: .storybook
The directory where the Storybook configuration is located, relative to the current working directory.
If your Storybook configuration is not in the default location, you must specify the location here so the plugin can function correctly.
storybookScript
Type: string
Optional script to run Storybook. If provided, Vitest will start Storybook using this script when run in watch mode. Only runs if the Storybook in storybookUrl is not already available.
storybookUrl
Type: string
Default: http://localhost:6006
The URL where Storybook is hosted. This is used for internal checks and to provide a link to the story in the test output on failures.
tags
Type:
{
  include: string[];
  exclude: string[];
  skip: string[];
}
Default:
{
  include: ['test'],
  exclude: [],
  skip: [],
}
Tags to include, exclude, or skip. These tags are defined as annotations in your story, meta, or preview.
include: Stories with these tags will be testedexclude: Stories with these tags will not be tested, and will not be counted in the test resultsskip: Stories with these tags will not be tested, and will be counted in the test results
