
Accessibility tests
Watch a video tutorial
Accessibility is the practice of making websites inclusive to all. That means supporting requirements such as: keyboard navigation, screen reader support, touch-friendly, usable color contrast, reduced motion, and zoom support.
Accessibility tests audit the rendered DOM against a set of heuristics based on WCAG rules and other industry-accepted best practices. They act as the first line of QA to catch blatant accessibility violations.
Accessibility checks with a11y addon
Storybook provides an official a11y addon. Powered by Deque's axe-core, which automatically catches up to 57% of WCAG issues.
Set up the a11y addon
If you want to check accessibility for your stories using the addon, you'll need to install it and add it to your Storybook.
Run the following command to install the addon.
npm install @storybook/addon-a11y --save-devUpdate your Storybook configuration (in .storybook/main.js|ts) to include the accessibility addon.
// Replace your-framework with the framework you are using (e.g., react-webpack5, vue3-vite)
import type { StorybookConfig } from '@storybook/your-framework';
const config: StorybookConfig = {
framework: '@storybook/your-framework',
stories: ['../src/**/*.mdx', '../src/**/*.stories.@(js|jsx|mjs|ts|tsx)'],
addons: [
// Other Storybook addons
'@storybook/addon-a11y', //👈 The a11y addon goes here
],
};
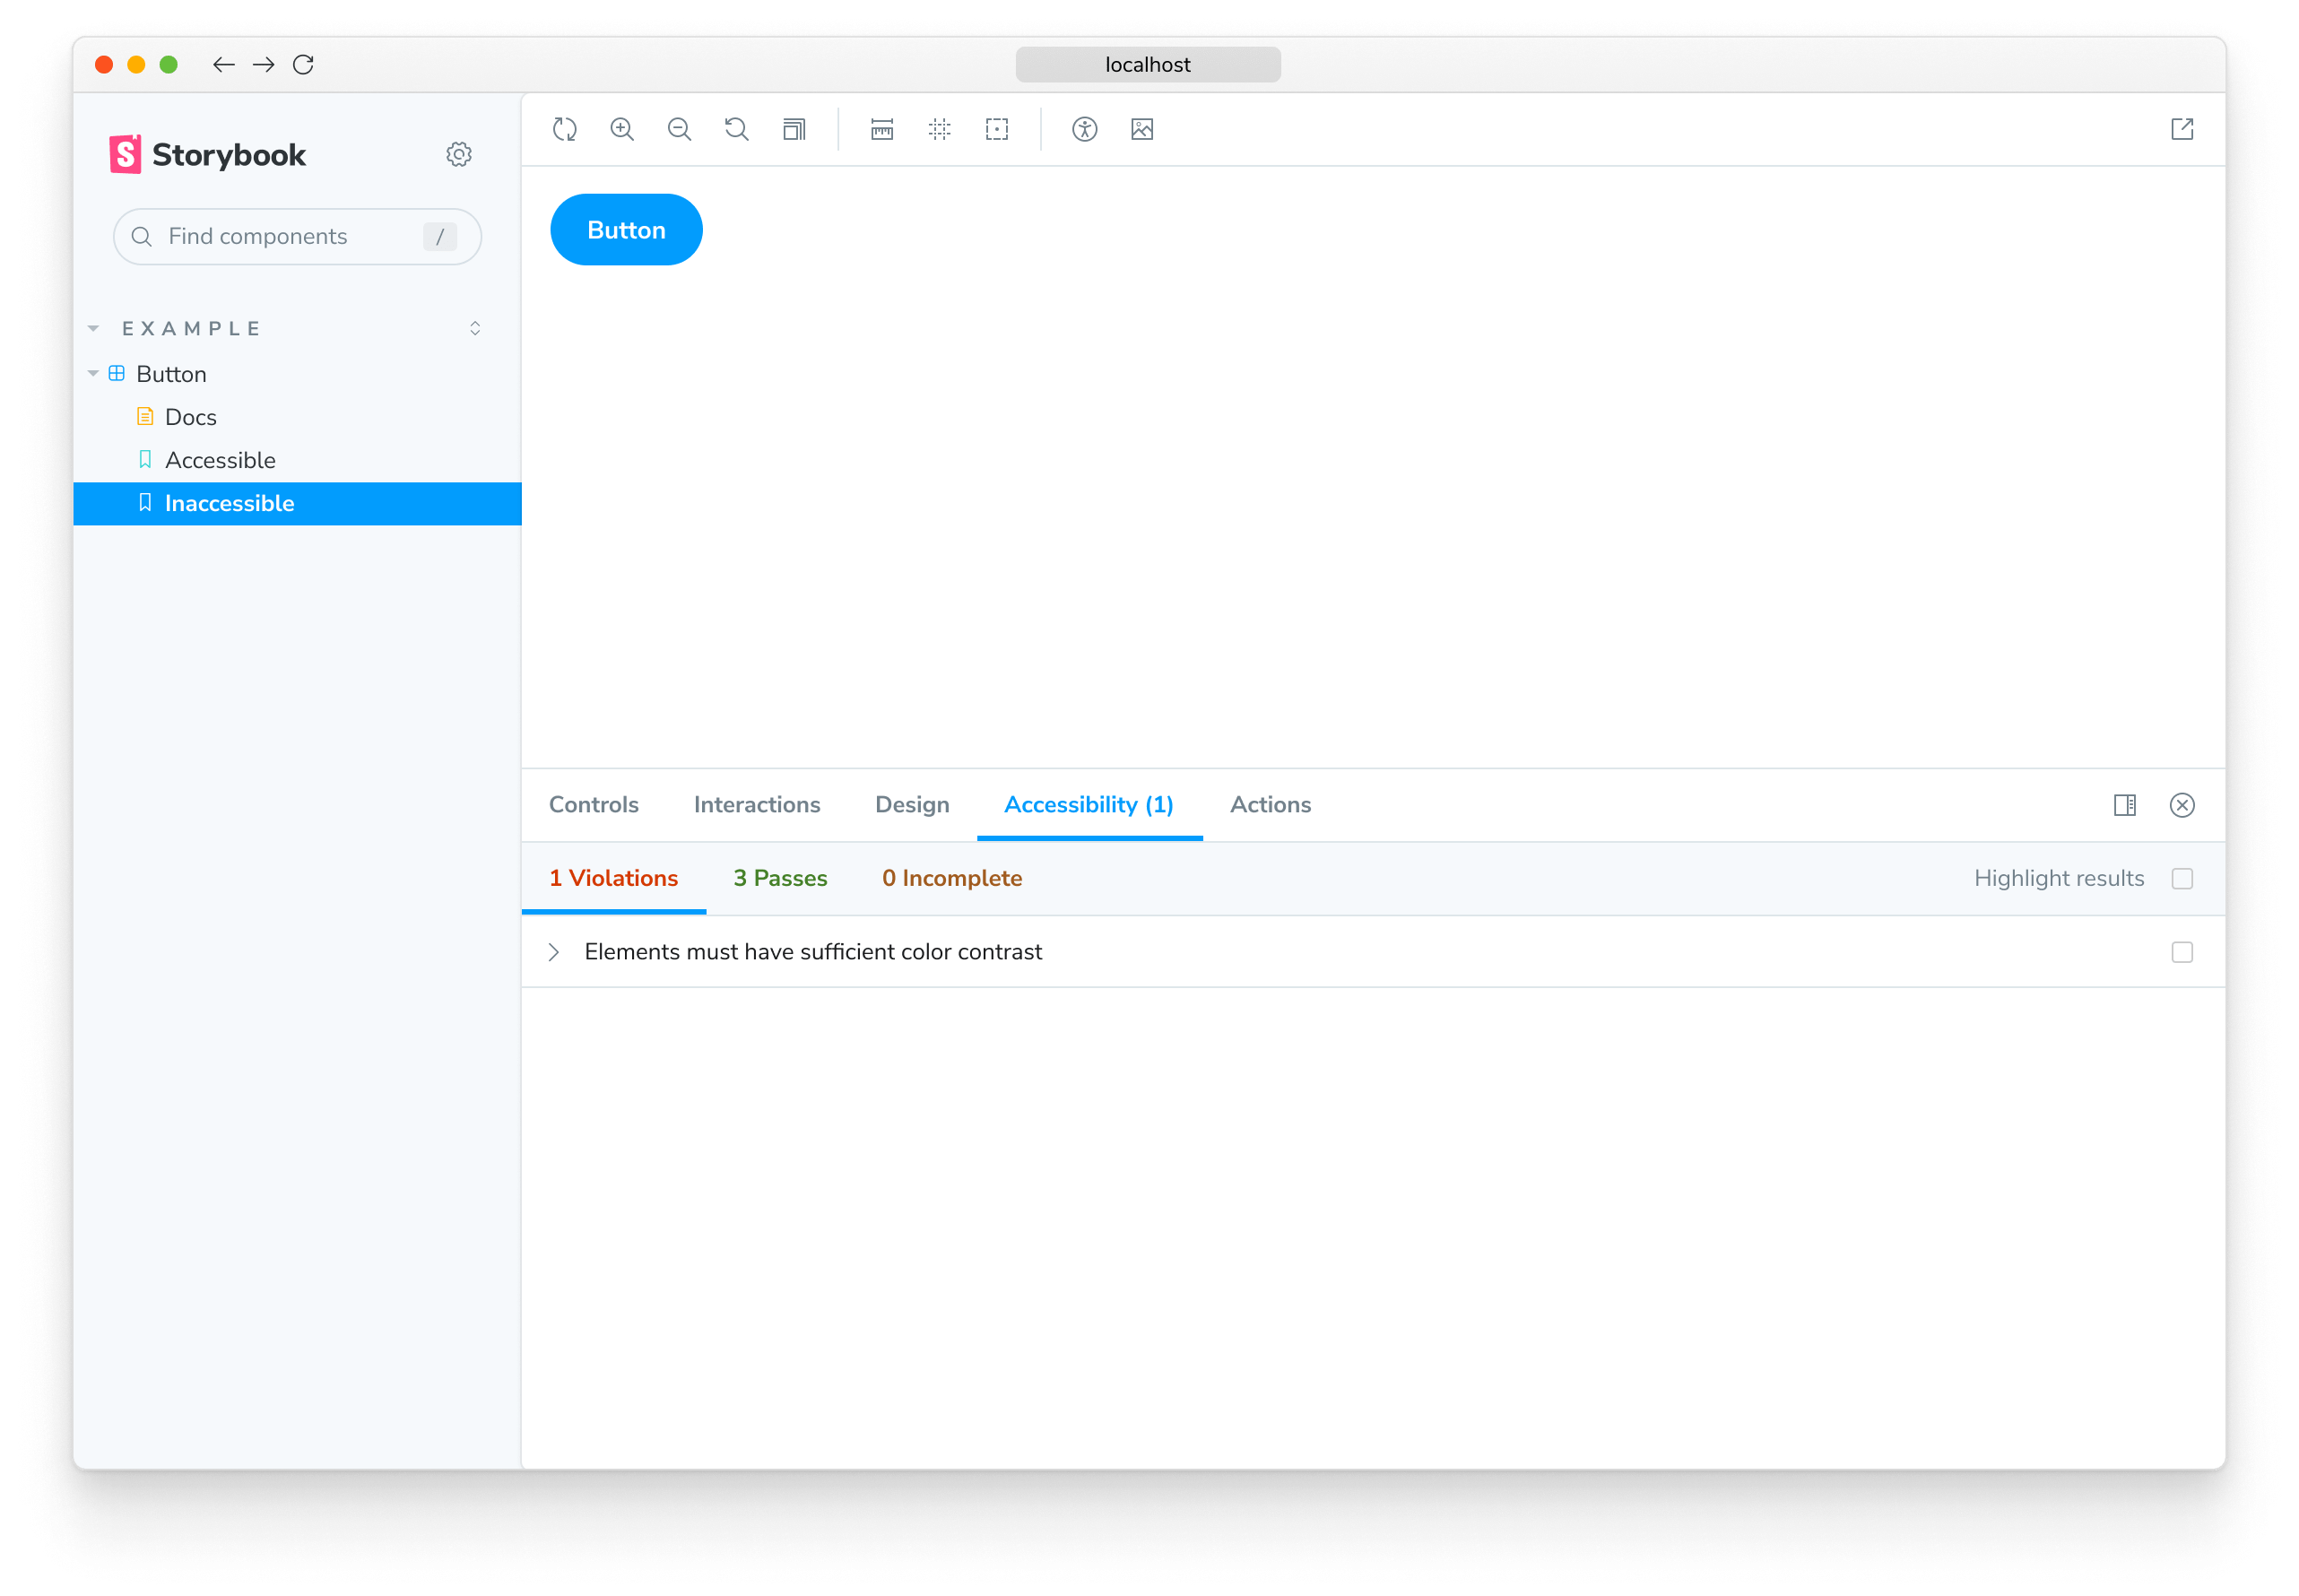
export default config;Start your Storybook, and you will see some noticeable differences in the UI. A new toolbar icon and the accessibility panel where you can inspect the results of the tests.
How it works
Storybook's a11y addon runs Axe on the selected story. Allowing you to catch and fix accessibility issues during development. For example, if you’re working on a button component and included the following set of stories:
import type { Meta, StoryObj } from '@storybook/react';

import { Button } from './Button';

const meta: Meta<typeof Button> = {
  component: Button,
  argTypes: {
    backgroundColor: { control: 'color' },
  },
};

export default meta;
type Story = StoryObj<typeof Button>;

// This is an accessible story
export const Accessible: Story = {
  args: {
    primary: false,
    label: 'Button',
  },
};

// This is not
export const Inaccessible: Story = {
  args: {
    ...Accessible.args,
    backgroundColor: 'red',
  },
};
Cycling through both stories, you will see that the Inaccessible story contains some issues that need fixing. Opening the violations tab in the accessibility panel provides a clear description of the accessibility issue and guidelines for solving it.
Configure
Out of the box, Storybook's accessibility addon includes a set of accessibility rules that cover most issues. You can also fine-tune the addon configuration or override Axe's ruleset to best suit your needs.
Global a11y configuration
If you need to dismiss an accessibility rule or modify its settings across all stories, you can add the following to your storybook/preview.js|ts:
// Replace your-framework with the framework you are using (e.g., react, vue3)
import { Preview } from '@storybook/your-framework';

const preview: Preview = {
  parameters: {
    a11y: {
      // Optional selector to inspect
      element: '#storybook-root',
      config: {
        rules: [
          {
            // The autocomplete rule will not run based on the CSS selector provided
            id: 'autocomplete-valid',
            selector: '*:not([autocomplete="nope"])',
          },
          {
            // Setting the enabled option to false will disable checks for this particular rule on all stories.
            id: 'image-alt',
            enabled: false,
          },
        ],
      },
      // Axe's options parameter
      options: {},
      // Optional flag to prevent the automatic check
      manual: true,
    },
  },
};

export default preview;
Component-level a11y configuration
You can also customize your own set of rules for all stories of a component. Update your story's default export and add a parameter with the required configuration:
// Replace your-framework with the name of your framework
import type { Meta } from '@storybook/your-framework';

import { MyComponent } from './MyComponent';

const meta: Meta<typeof MyComponent> = {
  component: MyComponent,
  parameters: {
    a11y: {
      // Optional selector to inspect
      element: '#storybook-root',
      config: {
        rules: [
          {
            // The autocomplete rule will not run based on the CSS selector provided
            id: 'autocomplete-valid',
            selector: '*:not([autocomplete="nope"])',
          },
          {
            // Setting the enabled option to false will disable checks for this particular rule on all stories.
            id: 'image-alt',
            enabled: false,
          },
        ],
      },
      options: {},
      manual: true,
    },
  },
};

export default meta;
Story-level a11y configuration
Customize the a11y ruleset at the story level by updating your story to include a new parameter:
import type { Meta, StoryObj } from '@storybook/react';

import { MyComponent } from './MyComponent';

const meta: Meta<typeof MyComponent> = {
  component: MyComponent,
};

export default meta;
type Story = StoryObj<typeof MyComponent>;

export const ExampleStory: Story = {
  parameters: {
    a11y: {
      element: '#storybook-root',
      config: {
        rules: [
          {
            // The autocomplete rule will not run based on the CSS selector provided
            id: 'autocomplete-valid',
            selector: '*:not([autocomplete="nope"])',
          },
          {
            // Setting the enabled option to false will disable checks for this particular rule on all stories.
            id: 'image-alt',
            enabled: false,
          },
        ],
      },
      options: {},
      manual: true,
    },
  },
};
How to disable a11y tests
Disable accessibility testing for stories or components by adding the following parameter to your story’s export or component’s default export respectively:
import type { Meta, StoryObj } from '@storybook/react';

import { MyComponent } from './MyComponent';

const meta: Meta<typeof MyComponent> = {
  component: MyComponent,
};

export default meta;
type Story = StoryObj<typeof MyComponent>;

export const NonA11yStory: Story = {
  parameters: {
    a11y: {
      // This option disables all a11y checks on this story
      disable: true,
    },
  },
};
Automate accessibility tests with test runner
The most accurate way to check accessibility is manually on real devices. However, you can use automated tools to catch common accessibility issues. For example, Axe, on average, catches upwards to 57% of WCAG issues automatically.
These tools work by auditing the rendered DOM against heuristics based on WCAG rules and other industry-accepted best practices. You can then integrate these tools into your test automation pipeline using the Storybook test runner and axe-playwright.
Setup
To enable accessibility testing with the test runner, you will need to take additional steps to set it up properly. We recommend you go through the test runner documentation before proceeding with the rest of the required configuration.
Run the following command to install the required dependencies.
npm install axe-playwright --save-devAdd a new configuration file inside your Storybook directory with the following inside:
import type { TestRunnerConfig } from '@storybook/test-runner';
import { injectAxe, checkA11y } from 'axe-playwright';

/*
 * See https://storybook.js.org/docs/7/writing-tests/test-runner#test-hook-api
 * to learn more about the test-runner hooks API.
 */
const config: TestRunnerConfig = {
  async preVisit(page) {
    await injectAxe(page);
  },
  async postVisit(page) {
    await checkA11y(page, '#storybook-root', {
      detailedReport: true,
      detailedReportOptions: {
        html: true,
      },
    });
  },
};

export default config;preVisit and postVisit are convenient hooks that allow you to extend the test runner's default configuration. Read more about them here.
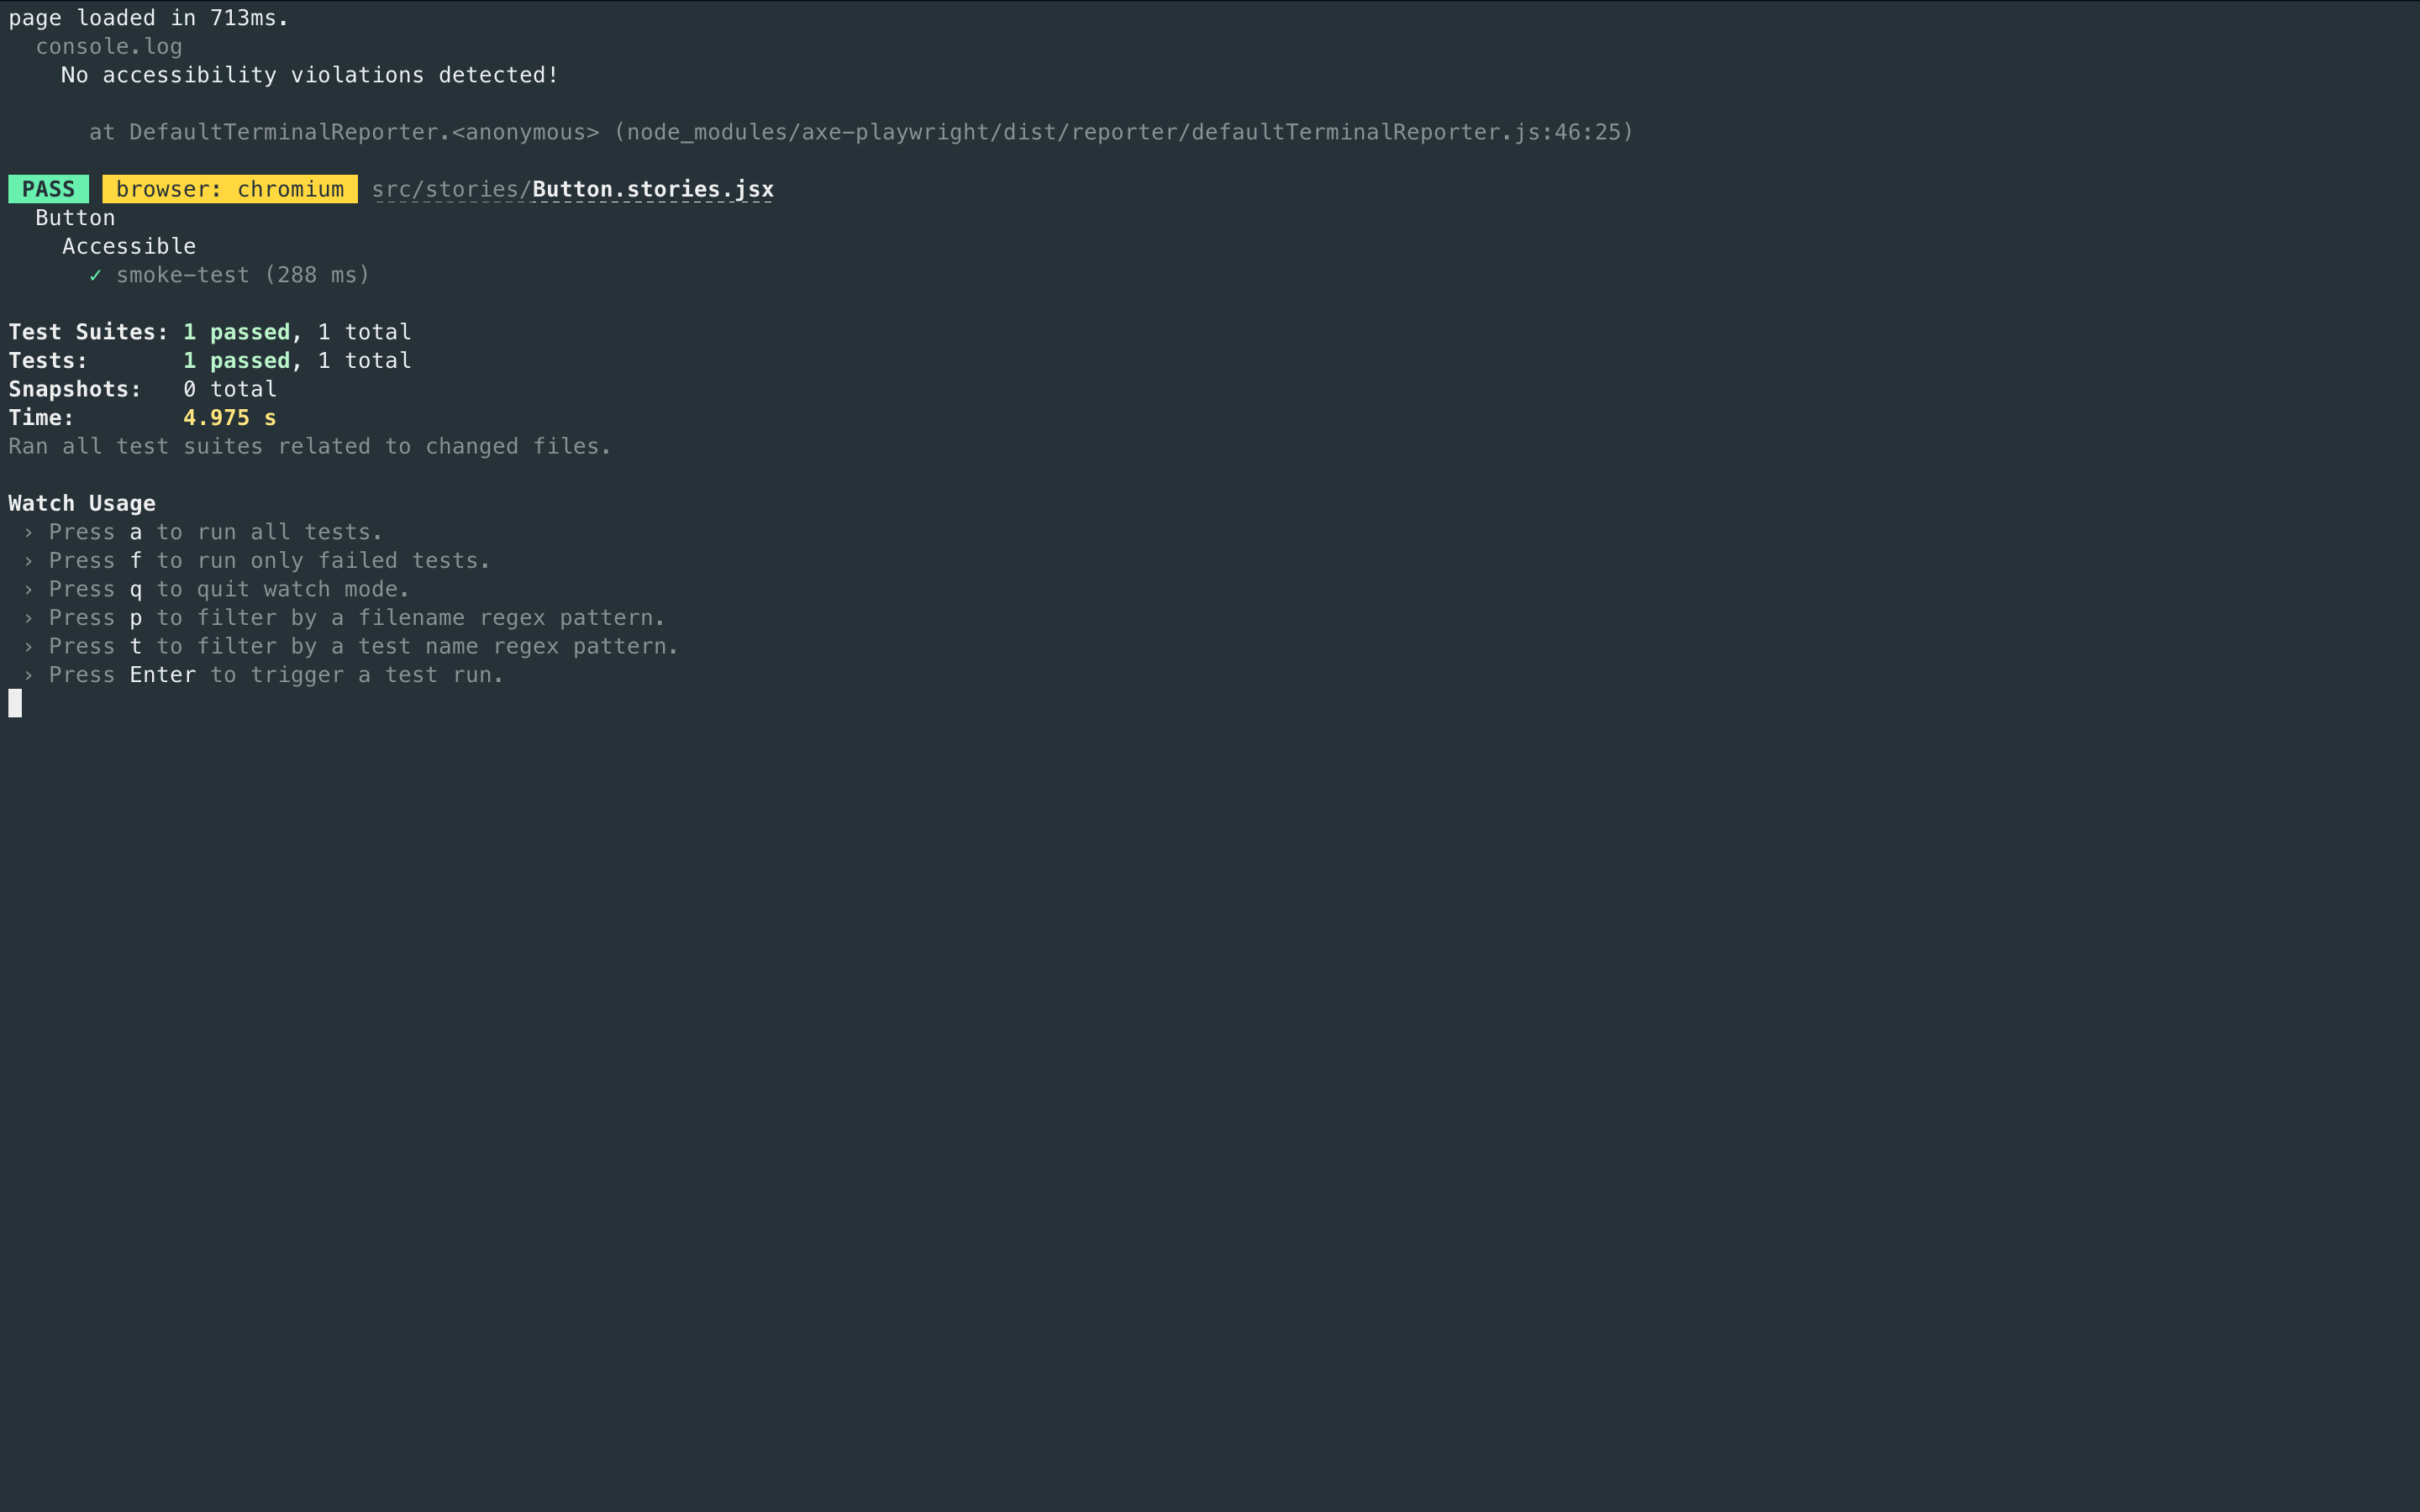
When you execute the test runner (for example, with yarn test-storybook), it will run the accessibility audit and any interaction tests you might have configured for each component story.
It starts checking for issues by traversing the DOM tree starting from the story's root element and generates a detailed report based on the issues it encountered.
A11y config with the test runner
The test runner provides helper methods, allowing access to the story's information. You can use them to extend the test runner's configuration and provide additional options you may have for a specific story. For example:
import type { TestRunnerConfig } from '@storybook/test-runner';
import { getStoryContext } from '@storybook/test-runner';

import { injectAxe, checkA11y, configureAxe } from 'axe-playwright';

/*
 * See https://storybook.js.org/docs/7/writing-tests/test-runner#test-hook-api
 * to learn more about the test-runner hooks API.
 */
const config: TestRunnerConfig = {
  async preVisit(page) {
    await injectAxe(page);
  },
  async postVisit(page, context) {
    // Get the entire context of a story, including parameters, args, argTypes, etc.
    const storyContext = await getStoryContext(page, context);

    // Apply story-level a11y rules
    await configureAxe(page, {
      rules: storyContext.parameters?.a11y?.config?.rules,
    });

    await checkA11y(page, '#storybook-root', {
      detailedReport: true,
      detailedReportOptions: {
        html: true,
      },
    });
  },
};

export default config;
Disable a11y tests with the test runner
Additionally, if you have already disabled accessibility tests for any particular story, you can also configure the test runner to avoid testing it as well. For example:
import type { TestRunnerConfig } from '@storybook/test-runner';
import { getStoryContext } from '@storybook/test-runner';

import { injectAxe, checkA11y } from 'axe-playwright';

/*
 * See https://storybook.js.org/docs/7/writing-tests/test-runner#test-hook-api
 * to learn more about the test-runner hooks API.
 */
const config: TestRunnerConfig = {
  async preVisit(page) {
    await injectAxe(page);
  },
  async postVisit(page, context) {
    // Get the entire context of a story, including parameters, args, argTypes, etc.
    const storyContext = await getStoryContext(page, context);

    // Do not run a11y tests on disabled stories.
    if (storyContext.parameters?.a11y?.disable) {
      return;
    }
    await checkA11y(page, '#storybook-root', {
      detailedReport: true,
      detailedReportOptions: {
        html: true,
      },
    });
  },
};

export default config;
What’s the difference between browser-based and linter-based accessibility tests?
Browser-based accessibility tests, like those found in Storybook, evaluate the rendered DOM because that gives you the highest accuracy. Auditing code that hasn't been compiled yet is one step removed from the real thing, so you won't catch everything the user might experience.
Learn about other UI tests
- Test runner to automate test execution
- Visual tests for appearance
- Accessibility tests for accessibility
- Interaction tests for user behavior simulation
- Coverage tests for measuring code coverage
- Snapshot tests for rendering errors and warnings
- End-to-end tests for simulating real user scenarios
- Unit tests for functionality