
Interaction tests
As you build more complex UIs like pages, components become responsible for more than just rendering the UI. They fetch data and manage state. Interaction tests allow you to verify these functional aspects of UIs.
In a nutshell, you start by supplying the appropriate props for the initial state of a component. Then simulate user behavior such as clicks and form entries. Finally, check whether the UI and component state update correctly.
In Storybook, this familiar workflow happens in your browser. That makes it easier to debug failures because you're running tests in the same environment as you develop components: the browser.
How does component testing in Storybook work?
You start by writing a story to set up the component's initial state. Then simulate user behavior using the play function. Finally, use the test-runner to confirm that the component renders correctly and that your interaction tests with the play function pass. Additionally, you can automate test execution via the command line or in your CI environment.
- The
playfunction is a small snippet of code that runs after a story finishes rendering. You can use this to test user workflows. - The test is written using Storybook-instrumented versions of Jest and Testing Library.
@storybook/addon-interactionsvisualizes the test in Storybook and provides a playback interface for convenient browser-based debugging.@storybook/test-runneris a standalone utility—powered by Jest and Playwright—that executes all of your interactions tests and catches broken stories.
Set up the interactions addon
To enable interaction testing with Storybook, you'll need to take additional steps to set it up properly. We recommend you go through the test runner documentation before proceeding with the rest of the required configuration.
Run the following command to install the interactions addon and related dependencies.
npm install @storybook/testing-library @storybook/jest @storybook/addon-interactions --save-devUpdate your Storybook configuration (in .storybook/main.js|ts) to include the interactions addon.
// Replace your-framework with the framework you are using (e.g., react-webpack5, vue3-vite)
import type { StorybookConfig } from '@storybook/your-framework';

const config: StorybookConfig = {
  framework: '@storybook/your-framework',
  stories: ['../src/**/*.mdx', '../src/**/*.stories.@(js|jsx|mjs|ts|tsx)'],
  addons: [
    // Other Storybook addons
    '@storybook/addon-interactions', // 👈 Register the addon
  ],
};

export default config;
Write an interaction test
The test itself is defined inside a play function connected to a story. Here's an example of how to set up an interaction test with Storybook and the play function:
import type { Meta, StoryObj } from '@storybook/react';

import { within, userEvent } from '@storybook/testing-library';

import { expect } from '@storybook/jest';

import { LoginForm } from './LoginForm';

const meta: Meta<typeof LoginForm> = {
  component: LoginForm,
};

export default meta;
type Story = StoryObj<typeof LoginForm>;

export const EmptyForm: Story = {};

/*
 * See https://storybook.js.org/docs/7/writing-stories/play-function#working-with-the-canvas
 * to learn more about using the canvasElement to query the DOM
 */
export const FilledForm: Story = {
  play: async ({ canvasElement }) => {
    const canvas = within(canvasElement);

    // 👇 Simulate interactions with the component
    await userEvent.type(canvas.getByTestId('email'), 'email@provider.com');

    await userEvent.type(canvas.getByTestId('password'), 'a-random-password');

    // See https://storybook.js.org/docs/7/essentials/actions#automatically-matching-args to learn how to setup logging in the Actions panel
    await userEvent.click(canvas.getByRole('button'));

    // 👇 Assert DOM structure
    await expect(
      canvas.getByText(
        'Everything is perfect. Your account is ready and we should probably get you started!'
      )
    ).toBeInTheDocument();
  },
};
Once the story loads in the UI, it simulates the user's behavior and verifies the underlying logic.
API for user-events
Under the hood, Storybook’s interaction addon mirrors Testing Library’s user-events API. If you’re familiar with Testing Library, you should be at home in Storybook.
Below is an abridged API for user-event. For more, check out the official user-event docs.
| User events | Description |
|---|---|
clear | Selects the text inside inputs, or textareas and deletes it userEvent.clear(await within(canvasElement).getByRole('myinput')); |
click | Clicks the element, calling a click() function userEvent.click(await within(canvasElement).getByText('mycheckbox')); |
dblClick | Clicks the element twice userEvent.dblClick(await within(canvasElement).getByText('mycheckbox')); |
deselectOptions | Removes the selection from a specific option of a select element userEvent.deselectOptions(await within(canvasElement).getByRole('listbox'),'1'); |
hover | Hovers an element userEvent.hover(await within(canvasElement).getByTestId('example-test')); |
keyboard | Simulates the keyboard events userEvent.keyboard(‘foo’); |
selectOptions | Selects the specified option, or options of a select element userEvent.selectOptions(await within(canvasElement).getByRole('listbox'),['1','2']); |
type | Writes text inside inputs, or textareas userEvent.type(await within(canvasElement).getByRole('my-input'),'Some text'); |
unhover | Unhovers out of element userEvent.unhover(await within(canvasElement).getByLabelText(/Example/i)); |
Group interactions with the step function
For complex flows, it can be worthwhile to group sets of related interactions together using the step function. This allows you to provide a custom label that describes a set of interactions:
// Replace your-framework with the name of your framework
import type { Meta, StoryObj } from '@storybook/your-framework';

import { userEvent, within } from '@storybook/testing-library';

import { MyComponent } from './MyComponent';

const meta: Meta<typeof MyComponent> = {
  component: MyComponent,
};

export default meta;
type Story = StoryObj<typeof MyComponent>;

/*
 * See https://storybook.js.org/docs/7/writing-stories/play-function#working-with-the-canvas
 * to learn more about using the canvasElement to query the DOM
 */
export const Submitted: Story = {
  play: async ({ args, canvasElement, step }) => {
    const canvas = within(canvasElement);

    await step('Enter email and password', async () => {
      await userEvent.type(canvas.getByTestId('email'), 'hi@example.com');
      await userEvent.type(canvas.getByTestId('password'), 'supersecret');
    });

    await step('Submit form', async () => {
      await userEvent.click(canvas.getByRole('button'));
    });
  },
};
This will show your interactions nested in a collapsible group:
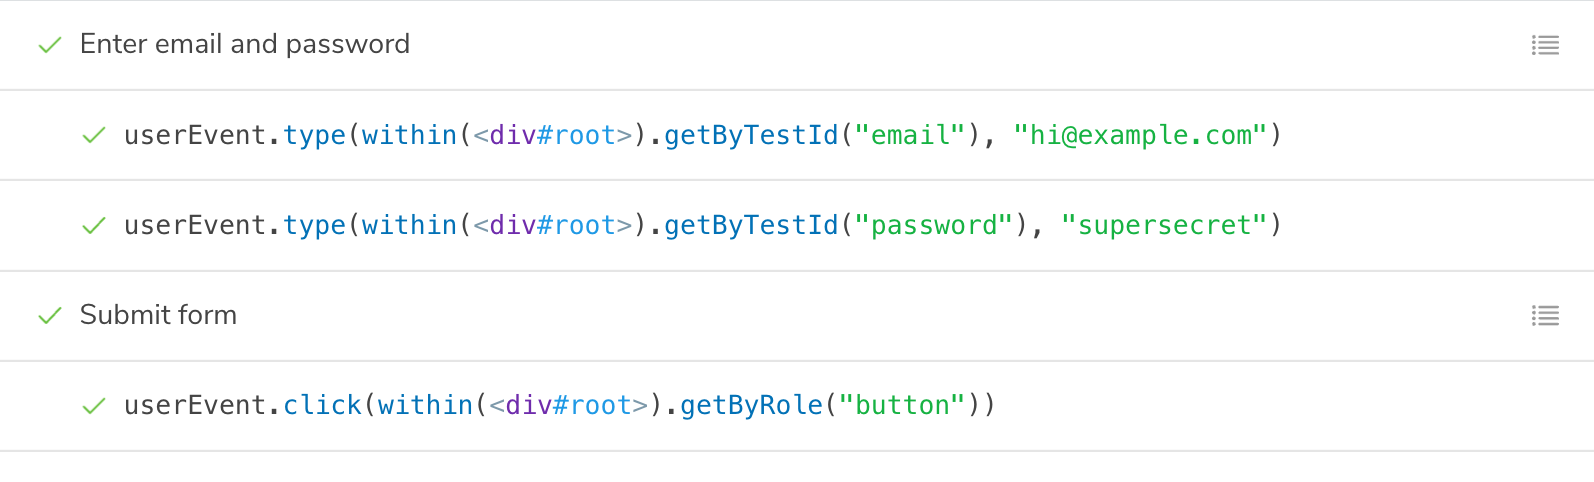
Interactive debugger
If you check your interactions panel, you'll see the step-by-step flow. It also offers a handy set of UI controls to pause, resume, rewind, and step through each interaction.
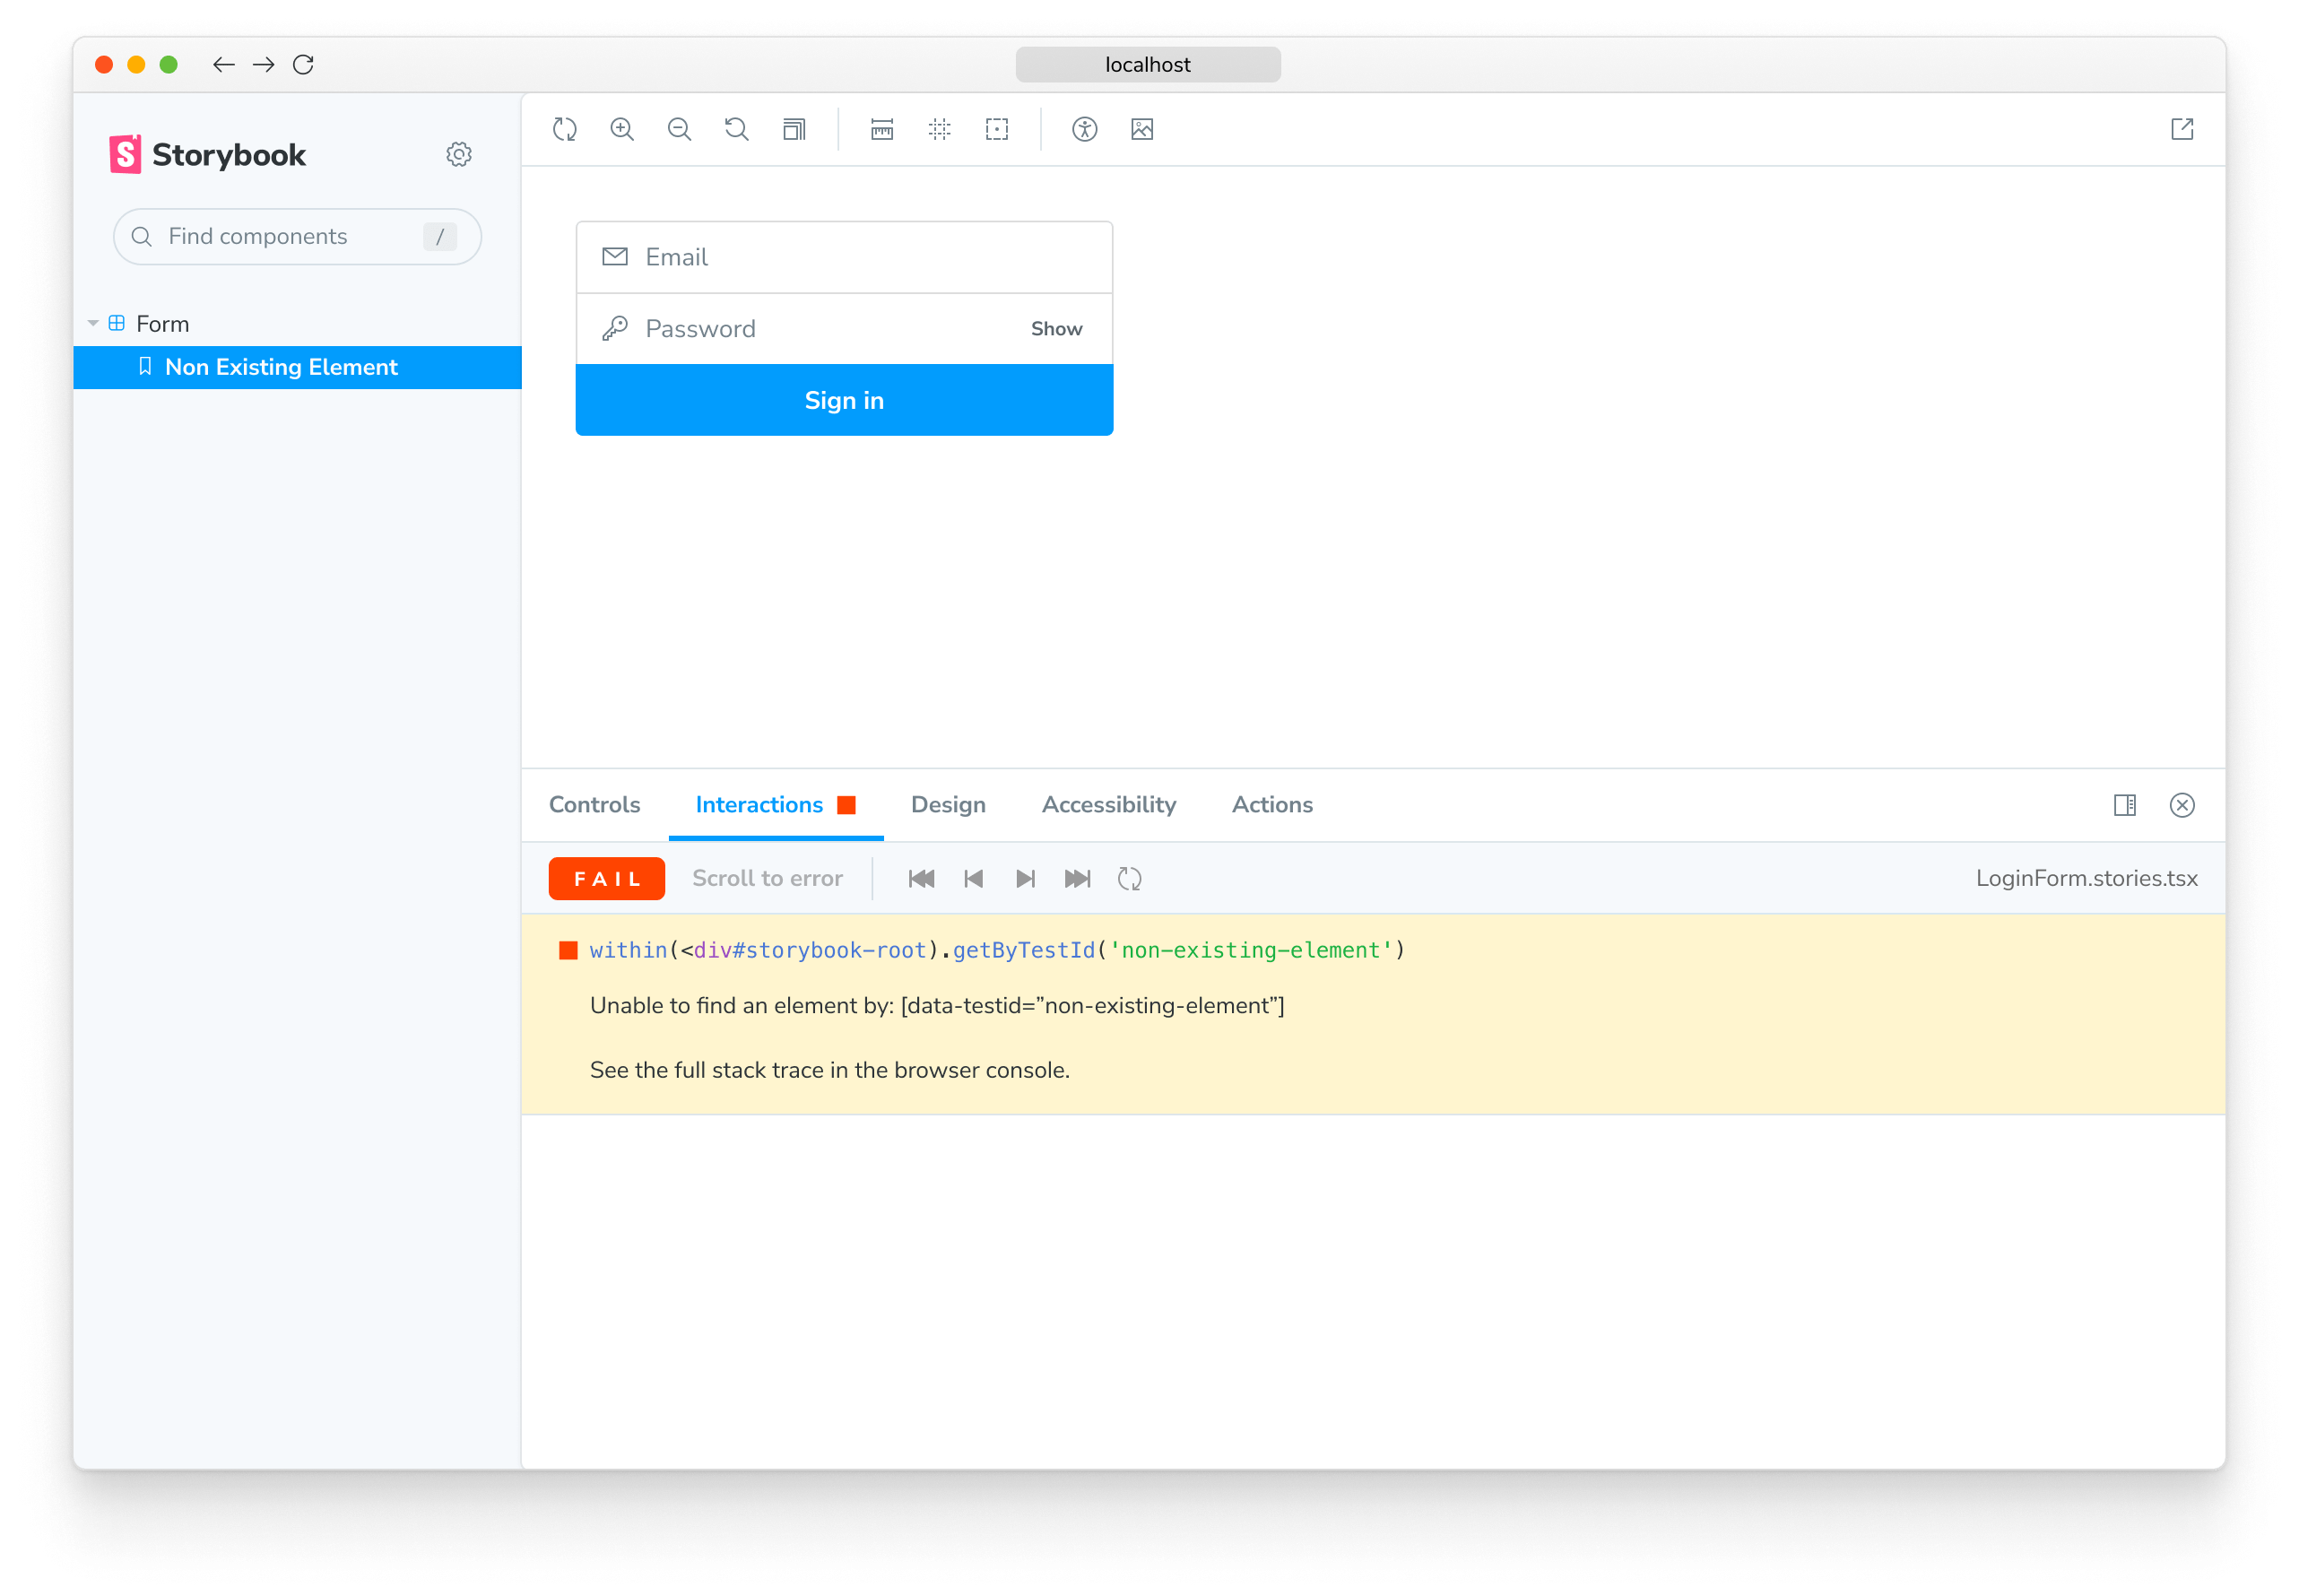
Permalinks for reproductions
The play function is executed after the story is rendered. If there’s an error, it’ll be shown in the interaction addon panel to help with debugging.
Since Storybook is a webapp, anyone with the URL can reproduce the error with the same detailed information without any additional environment configuration or tooling required.
Streamline interaction testing further by automatically publishing Storybook in pull requests. That gives teams a universal reference point to test and debug stories.
Execute tests with the test-runner
Storybook only runs the interaction test when you're viewing a story. Therefore, you'd have to go through each story to run all your checks. As your Storybook grows, it becomes unrealistic to review each change manually. Storybook test-runner automates the process by running all tests for you. To execute the test-runner, open a new terminal window and run the following command:
npm run test-storybook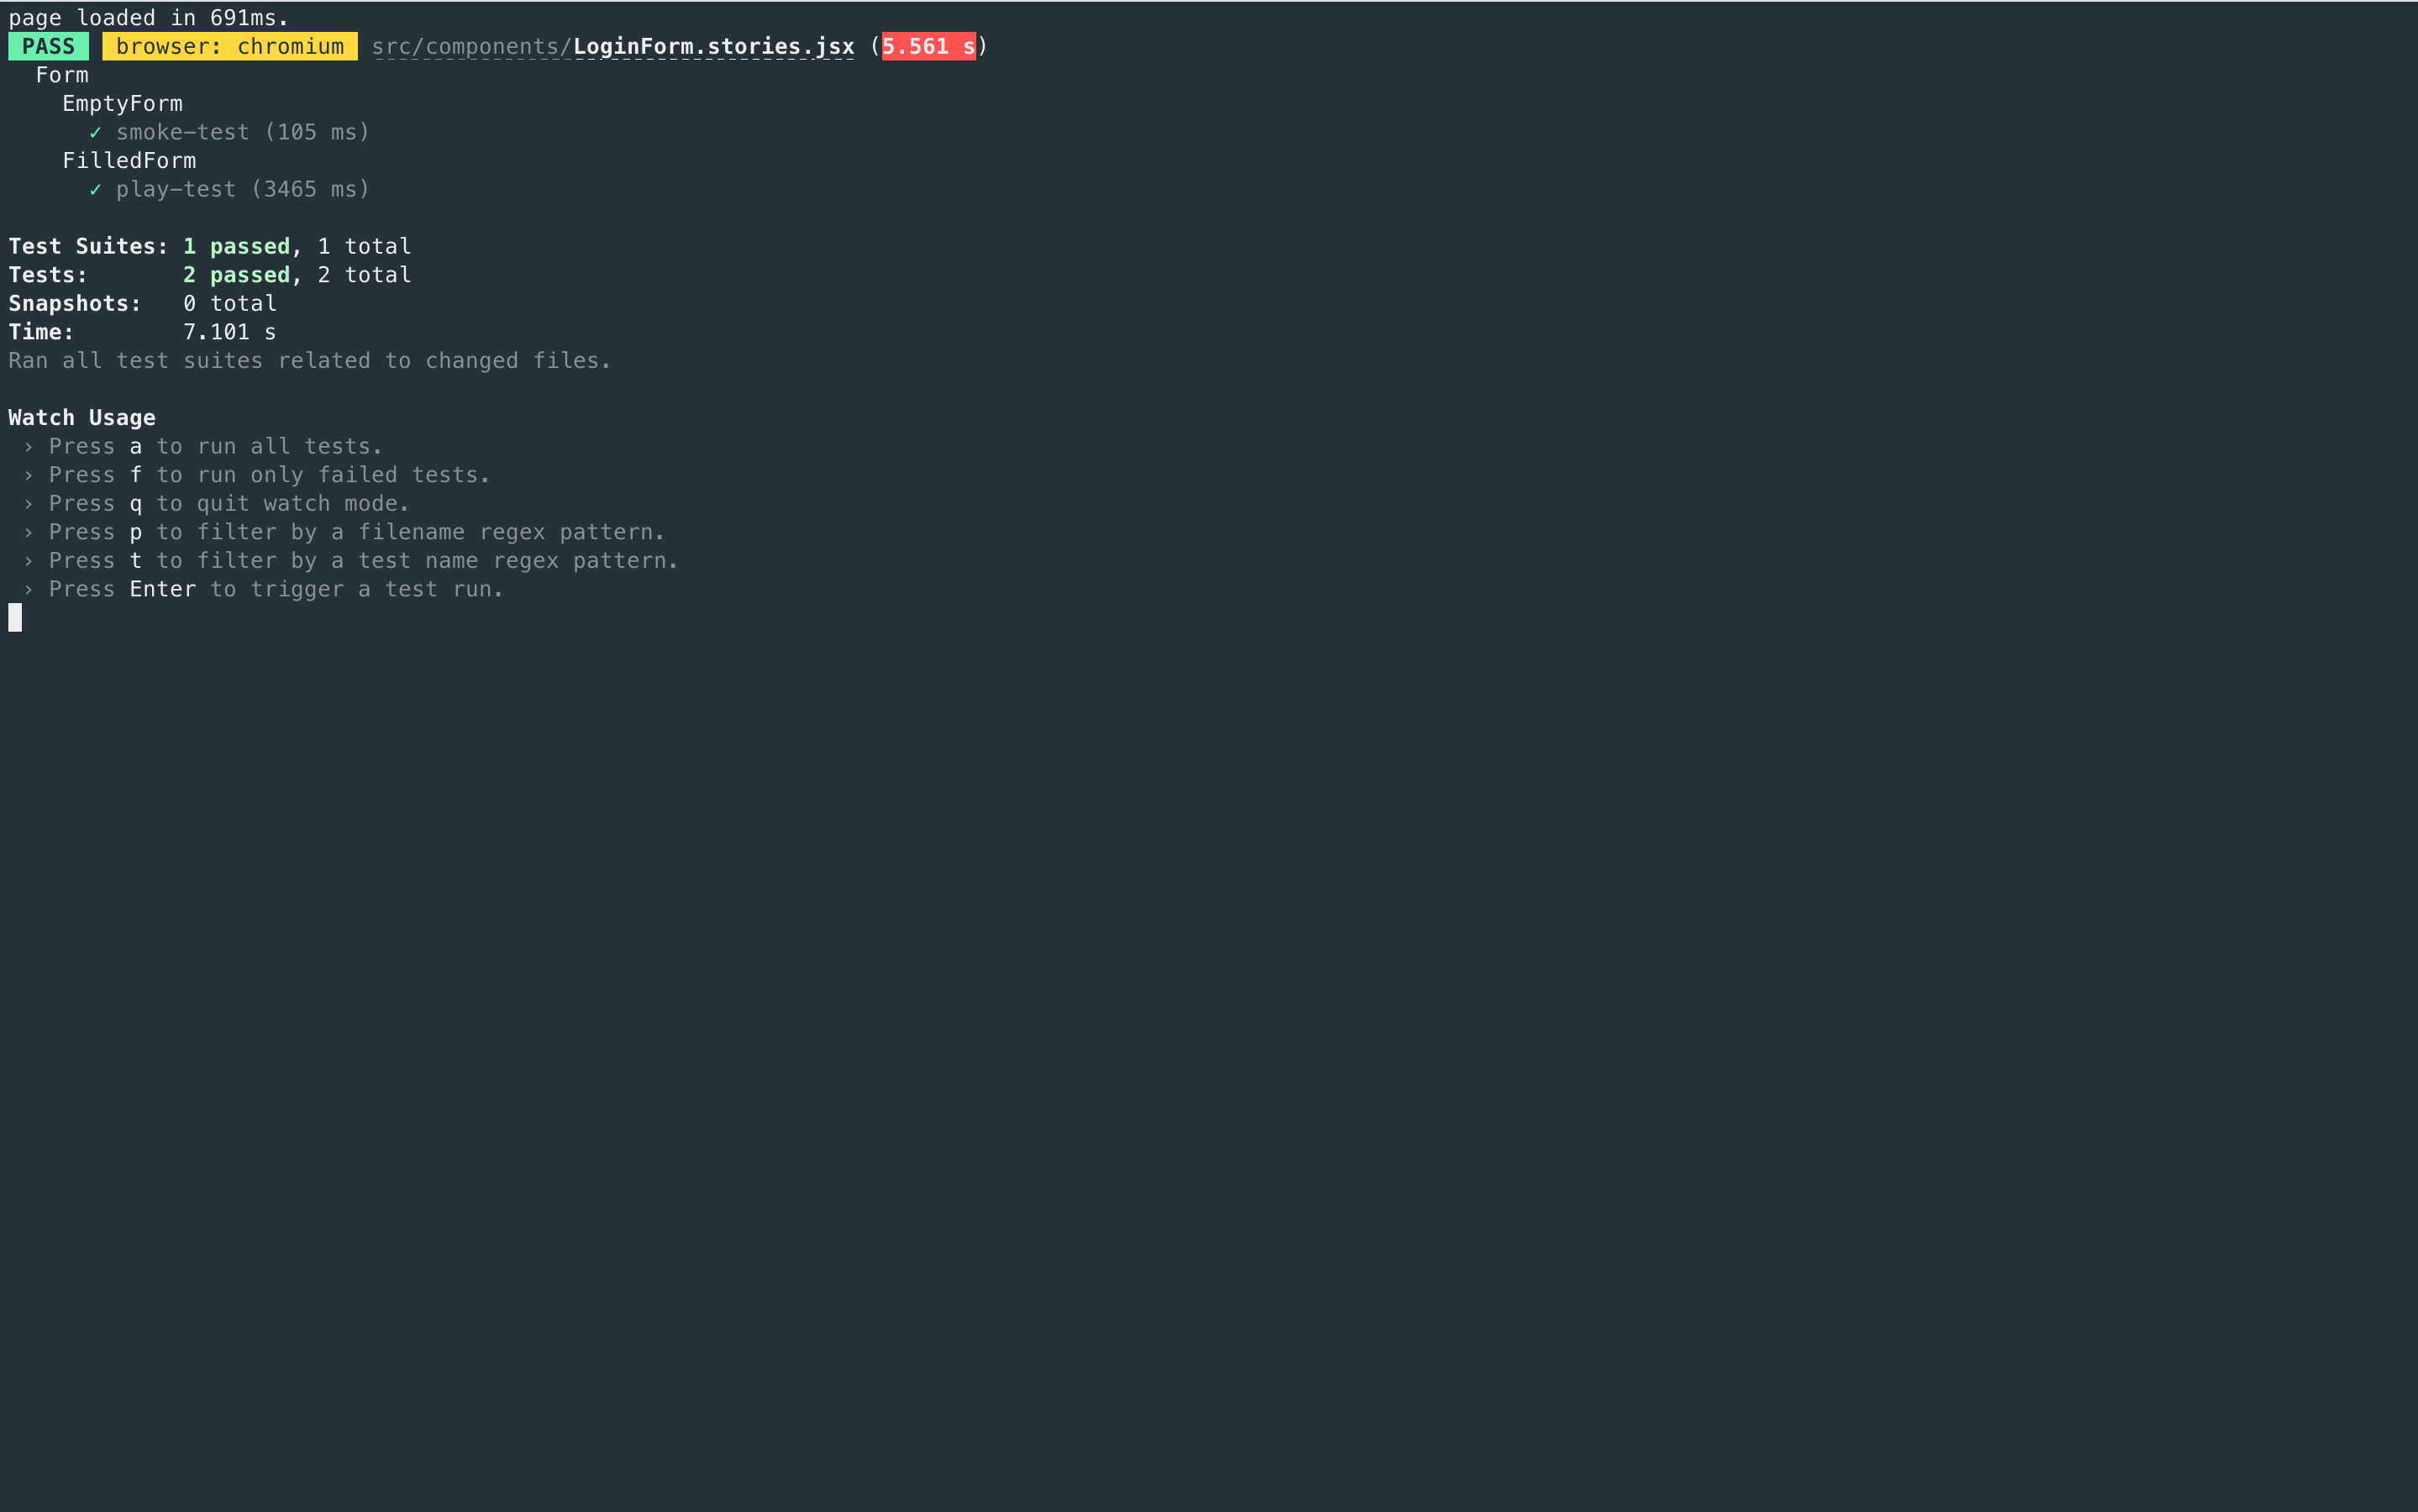
If you need, you can provide additional flags to the test-runner. Read the documentation to learn more.
Automate
Once you're ready to push your code into a pull request, you'll want to automatically run all your checks using a Continuous Integration (CI) service before merging it. Read our documentation for a detailed guide on setting up a CI environment to run tests.
Troubleshooting
The TypeScript types aren't recognized
If you're writing interaction tests with TypeScript, you may run into a situation where the TypeScript types aren't recognized in your IDE. This a known issue with newer package managers (e.g., pnpm, Yarn) and how they hoist dependencies. If you're working with Yarn the process happens automatically and the types should be recognized. However, if you're working with pnpm, you'll need to create a .npmrc file in the root of your project and add the following:
// .npmrc
public-hoist-pattern[]=@types*
If you're still encountering issues, you can always add the @types/testing-library__jest-dom package to your project.
What’s the difference between interaction tests and visual tests?
Interaction tests can be expensive to maintain when applied wholesale to every component. We recommend combining them with other methods like visual testing for comprehensive coverage with less maintenance work.
What's the difference between interaction tests and using Jest + Testing Library alone?
Interaction tests integrate Jest and Testing Library into Storybook. The biggest benefit is the ability to view the component you're testing in a real browser. That helps you debug visually, instead of getting a dump of the (fake) DOM in the command line or hitting the limitations of how JSDOM mocks browser functionality. It's also more convenient to keep stories and tests together in one file than having them spread across files.
Learn about other UI tests
- Test runner to automate test execution
- Visual tests for appearance
- Accessibility tests for accessibility
- Interaction tests for user behavior simulation
- Coverage tests for measuring code coverage
- Snapshot tests for rendering errors and warnings
- End-to-end tests for simulating real user scenarios
- Unit tests for functionality